Delta HMI DOP-108IG Hardware Installation Manual
Summary
The DOP-108IG is a powerful 8-inch TFT LCD Human Machine Interface (HMI) built for robust industrial automation and control applications. This comprehensive manual serves as your definitive guide, covering detailed installation procedures, wiring assignments for multiple communication protocols (including RS-232, RS-422, and Ethernet), and full technical specifications. It is specifically written for engineers and technicians requiring accurate information to safely implement and commission the HMI into automated industrial machinery.
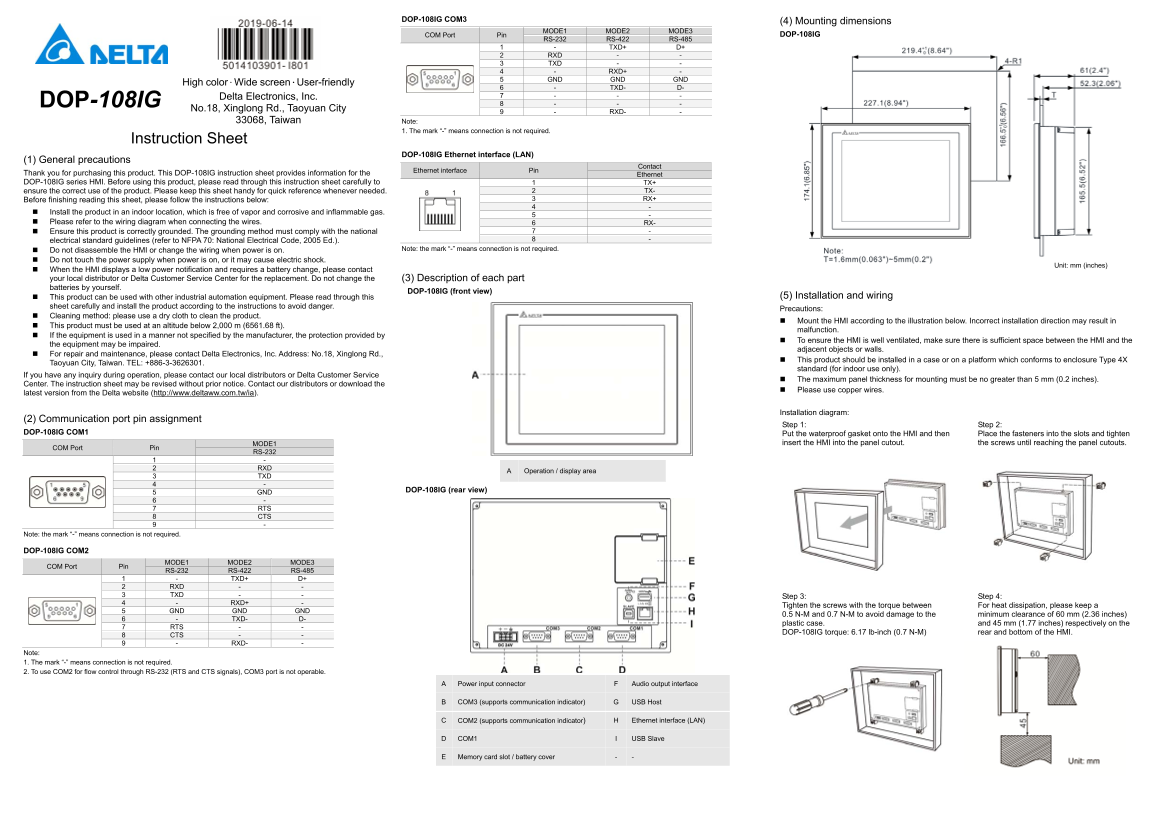
Page 1 Text Content
DOP-108IG COM3 (4) Mounting dimensions
COM Port Pin MODE1 MODE2 MODE3 DOP-108IG
RS-232 RS-422 RS-485
1 - TXD+ D+ 2 RXD - - 3 TXD - - 4 - RXD+ - 5 GND GND GND
High color.Wide screen.User-friendly
6 - TXD- D- Delta Electronics, Inc. 7 - - - DOP-108IG 8 - - -
No.18, Xinglong Rd., Taoyuan City
9 - RXD- -
33068, Taiwan Note:
1. The mark “-” means connection is not required.
Instruction Sheet
DOP-108IG Ethernet interface (LAN)
(1) General precautions
Ethernet interface Pin Contact
Thank you for purchasing this product. This DOP-108IG instruction sheet provides information for the Ethernet DOP-108IG series HMI. Before using this product, please read through this instruction sheet carefully to 1 TX+
ensure the correct use of the product. Please keep this sheet handy for quick reference whenever needed. 2 TX- Before finishing reading this sheet, please follow the instructions below: 3 RX+ 4 -
Install the product in an indoor location, which is free of vapor and corrosive and inflammable gas.
Please refer to the wiring diagram when connecting the wires. 6 RX-
Ensure this product is correctly grounded. The grounding method must comply with the national 7 - electrical standard guidelines (refer to NFPA 70: National Electrical Code, 2005 Ed.). 8 -
Do not disassemble the HMI or change the wiring when power is on. Note: the mark “-” means connection is not required.
Do not touch the power supply when power is on, or it may cause electric shock.
Unit: mm (inches)
When the HMI displays a low power notification and requires a battery change, please contact your local distributor or Delta Customer Service Center for the replacement. Do not change the (3) Description of each part batteries by yourself.
DOP-108IG (front view)
This product can be used with other industrial automation equipment. Please read through this (5) Installation and wiring
sheet carefully and install the product according to the instructions to avoid danger.
Precautions:
Cleaning method: please use a dry cloth to clean the product.
Mount the HMI according to the illustration below. Incorrect installation direction may result in
This product must be used at an altitude below 2,000 m (6561.68 ft).
malfunction.
If the equipment is used in a manner not specified by the manufacturer, the protection provided by
To ensure the HMI is well ventilated, make sure there is sufficient space between the HMI and the
the equipment may be impaired.
adjacent objects or walls.
For repair and maintenance, please contact Delta Electronics, Inc. Address: No.18, Xinglong Rd.,
This product should be installed in a case or on a platform which conforms to enclosure Type 4X
Taoyuan City, Taiwan. TEL: +886-3-3626301.
standard (for indoor use only).
If you have any inquiry during operation, please contact our local distributors or Delta Customer Service
The maximum panel thickness for mounting must be no greater than 5 mm (0.2 inches).
Center. The instruction sheet may be revised without prior notice. Contact our distributors or download the
Please use copper wires.
latest version from the Delta website (http://www.deltaww.com.tw/ia).
Installation diagram:
(2) Communication port pin assignment
Step 1: Step 2:
DOP-108IG COM1 Put the waterproof gasket onto the HMI and then Place the fasteners into the slots and tighten
insert the HMI into the panel cutout. the screws until reaching the panel cutouts.
COM Port Pin MODE1
RS-232
1 - 2 RXD
Operation / display area
3 TXD 4 -
DOP-108IG (rear view)
5 GND 6 - 7 RTS 8 CTS 9 -
Note: the mark “-” means connection is not required.
DOP-108IG COM2
COM Port Pin MODE1 MODE2 MODE3
RS-232 RS-422 RS-485
1 - TXD+ D+ 2 RXD - - 3 TXD - - Step 3: Step 4: 4 - RXD+ -
Tighten the screws with the torque between For heat dissipation, please keep a
5 GND GND GND
0.5 N-M and 0.7 N-M to avoid damage to the minimum clearance of 60 mm (2.36 inches)
6 - TXD- D-
plastic case. and 45 mm (1.77 inches) respectively on the
7 RTS - -
DOP-108IG torque: 6.17 lb-inch (0.7 N-M) rear and bottom of the HMI.
8 CTS - - 9 - RXD- -
Note: 1. The mark “-” means connection is not required. 2. To use COM2 for flow control through RS-232 (RTS and CTS signals), COM3 port is not operable.
A Power input connector F Audio output interface
B COM3 (supports communication indicator) G USB Host
C COM2 (supports communication indicator) H Ethernet interface (LAN)
D COM1 I USB Slave
E Memory card slot / battery cover - -
Page Summary Contents For Delta HMI DOP-108IG Hardware Installation Manual
Manual Details
| Brand | Delta |
|---|---|
| Pages | 8 |
| File Size | 1.14 MB |
| Published | June 06, 2026 |
Enter the captcha to get the download link:
