Delta HMI DOP-103SQ Installation Manual
Summary
Discover the DOP-103SQ series HMI, a robust industrial touchscreen display designed for demanding indoor automation environments. This manual serves as your comprehensive guide, detailing essential setup procedures including communication pin assignments (RS-232/485), accurate mounting dimensions, and critical electrical safety precautions. It is an indispensable resource for engineers and technicians responsible for integrating sophisticated automation equipment, ensuring correct installation, functionality, and long-term safe operation within industrial control panels.
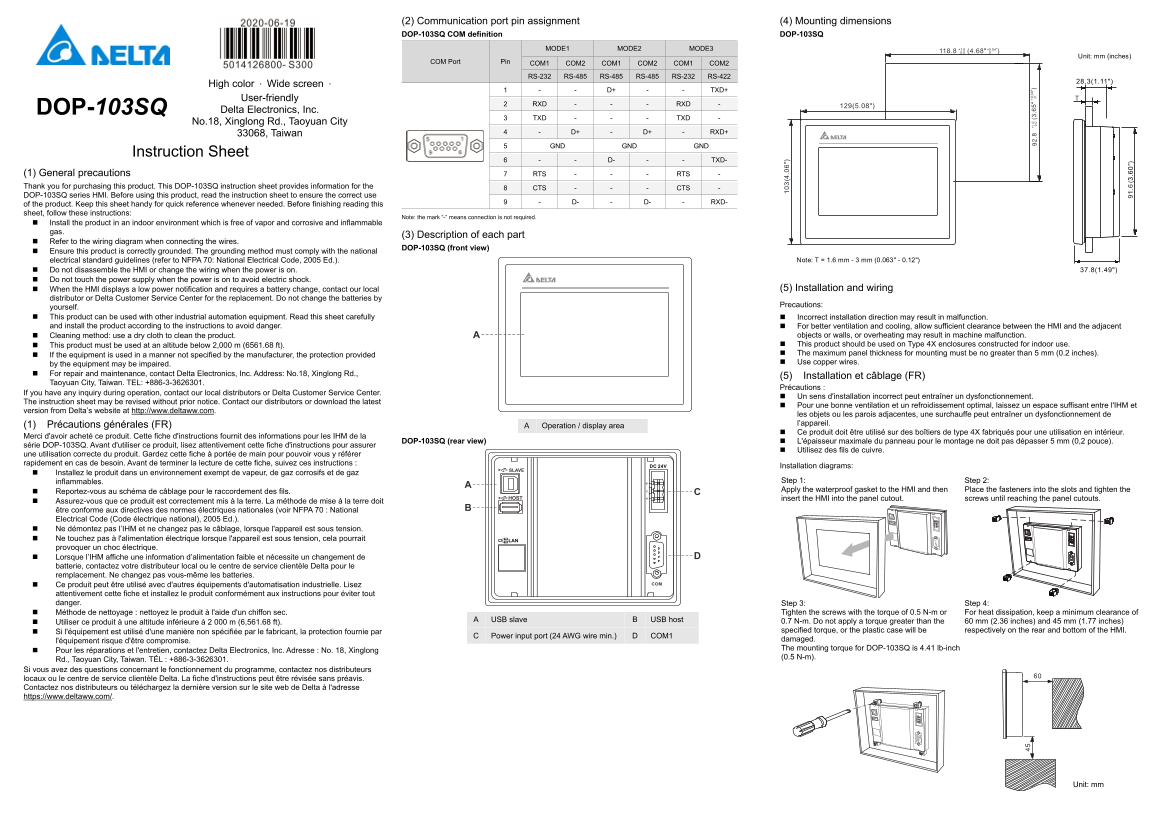
Page 1 Text Content
(2) Communication port pin assignment (4) Mounting dimensions DOP-103SQ COM definition DOP-103SQ
MODE1 MODE2 MODE3
Unit: mm (inches)
COM Port Pin COM1 COM2 COM1 COM2 COM1 COM2
RS-232 RS-485 RS-485 RS-485 RS-232 RS-422
High color ‧ Wide screen ‧
1 - - D+ - - TXD+
User-friendly
2 RXD - - - RXD -
DOP-103SQ Delta Electronics, Inc.
3 TXD - - - TXD -
No.18, Xinglong Rd., Taoyuan City
33068, Taiwan 4 - D+ - D+ - RXD+ 5 GND GND GND
Instruction Sheet
6 - - D- - - TXD-
(1) General precautions 7 RTS - - - RTS - Thank you for purchasing this product. This DOP-103SQ instruction sheet provides information for the 8 CTS - - - CTS - DOP-103SQ series HMI. Before using this product, read the instruction sheet to ensure the correct use
9 - D- - D- - RXD-
of the product. Keep this sheet handy for quick reference whenever needed. Before finishing reading this sheet, follow these instructions:
Note: the mark “-” means connection is not required.
Install the product in an indoor environment which is free of vapor and corrosive and inflammable gas.
(3) Description of each part
Refer to the wiring diagram when connecting the wires.
DOP-103SQ (front view)
Ensure this product is correctly grounded. The grounding method must comply with the national
electrical standard guidelines (refer to NFPA 70: National Electrical Code, 2005 Ed.). Note: T = 1.6 mm - 3 mm (0.063" - 0.12")
Do not disassemble the HMI or change the wiring when the power is on. Do not touch the power supply when the power is on to avoid electric shock.
When the HMI displays a low power notification and requires a battery change, contact our local (5) Installation and wiring
distributor or Delta Customer Service Center for the replacement. Do not change the batteries by
Precautions:
yourself. This product can be used with other industrial automation equipment. Read this sheet carefully Incorrect installation direction may result in malfunction. and install the product according to the instructions to avoid danger. For better ventilation and cooling, allow sufficient clearance between the HMI and the adjacent
Cleaning method: use a dry cloth to clean the product. objects or walls, or overheating may result in machine malfunction. This product must be used at an altitude below 2,000 m (6561.68 ft). This product should be used on Type 4X enclosures constructed for indoor use. If the equipment is used in a manner not specified by the manufacturer, the protection provided The maximum panel thickness for mounting must be no greater than 5 mm (0.2 inches). Use copper wires.
by the equipment may be impaired. For repair and maintenance, contact Delta Electronics, Inc. Address: No.18, Xinglong Rd.,
(5) Installation et câblage (FR)
Taoyuan City, Taiwan. TEL: +886-3-3626301.
Précautions :
If you have any inquiry during operation, contact our local distributors or Delta Customer Service Center.
Un sens d'installation incorrect peut entraîner un dysfonctionnement.
The instruction sheet may be revised without prior notice. Contact our distributors or download the latest
Pour une bonne ventilation et un refroidissement optimal, laissez un espace suffisant entre l'IHM et
version from Delta’s website at http://www.deltaww.com.
les objets ou les parois adjacentes, une surchauffe peut entraîner un dysfonctionnement de (1) Précautions générales (FR) l’appareil.
Operation / display area
Ce produit doit être utilisé sur des boîtiers de type 4X fabriqués pour une utilisation en intérieur.
Merci d'avoir acheté ce produit. Cette fiche d'instructions fournit des informations pour les IHM de la
DOP-103SQ (rear view) L'épaisseur maximale du panneau pour le montage ne doit pas dépasser 5 mm (0,2 pouce).
série DOP-103SQ. Avant d'utiliser ce produit, lisez attentivement cette fiche d'instructions pour assurer
Utilisez des fils de cuivre.
une utilisation correcte du produit. Gardez cette fiche à portée de main pour pouvoir vous y référer rapidement en cas de besoin. Avant de terminer la lecture de cette fiche, suivez ces instructions :
Installation diagrams:
Installez le produit dans un environnement exempt de vapeur, de gaz corrosifs et de gaz
inflammables. Step 1: Step 2: Apply the waterproof gasket to the HMI and then Place the fasteners into the slots and tighten the
Reportez-vous au schéma de câblage pour le raccordement des fils.
insert the HMI into the panel cutout. screws until reaching the panel cutouts.
Assurez-vous que ce produit est correctement mis à la terre. La méthode de mise à la terre doit être conforme aux directives des normes électriques nationales (voir NFPA 70 : National Electrical Code (Code électrique national), 2005 Ed.). Ne démontez pas l’IHM et ne changez pas le câblage, lorsque l'appareil est sous tension. Ne touchez pas à l'alimentation électrique lorsque l'appareil est sous tension, cela pourrait provoquer un choc électrique. Lorsque l’IHM affiche une information d’alimentation faible et nécessite un changement de batterie, contactez votre distributeur local ou le centre de service clientèle Delta pour le remplacement. Ne changez pas vous-même les batteries. Ce produit peut être utilisé avec d'autres équipements d'automatisation industrielle. Lisez attentivement cette fiche et installez le produit conformément aux instructions pour éviter tout danger. Step 3: Step 4:
Méthode de nettoyage : nettoyez le produit à l'aide d'un chiffon sec. Tighten the screws with the torque of 0.5 N-m or For heat dissipation, keep a minimum clearance of
USB slave B USB host 0.7 N-m. Do not apply a torque greater than the 60 mm (2.36 inches) and 45 mm (1.77 inches)
Utiliser ce produit à une altitude inférieure à 2 000 m (6,561.68 ft).
Si l'équipement est utilisé d'une manière non spécifiée par le fabricant, la protection fournie par specified torque, or the plastic case will be respectively on the rear and bottom of the HMI.
Power input port (24 AWG wire min.) COM1
l'équipement risque d'être compromise. damaged. The mounting torque for DOP-103SQ is 4.41 lb-inch
Pour les réparations et l'entretien, contactez Delta Electronics, Inc. Adresse : No. 18, Xinglong
Rd., Taoyuan City, Taiwan. TÉL : +886-3-3626301.
Si vous avez des questions concernant le fonctionnement du programme, contactez nos distributeurs locaux ou le centre de service clientèle Delta. La fiche d'instructions peut être révisée sans préavis. Contactez nos distributeurs ou téléchargez la dernière version sur le site web de Delta à l'adresse https://www.deltaww.com/.
Page Summary Contents For Delta HMI DOP-103SQ Installation Manual
Manual Details
| Brand | Delta |
|---|---|
| Pages | 8 |
| File Size | 1.00 MB |
| Published | June 05, 2026 |
Enter the captcha to get the download link:

Frequently Asked Questions
What type of enclosure is the DOP-103SQ designed for?
It should be used on Type 4X enclosures built for indoor use.
How do I ensure proper electrical safety when using the HMI?
Ensure the product is correctly grounded, and never touch the power supply while the unit is powered on to avoid shock.
What are the minimum requirements for installing the DOP-103SQ panel?
The maximum mounting panel thickness must not exceed 5 mm (0.2 inches).
How should I clean the HMI display and housing?
Use a dry cloth to clean the product; ensure sufficient clearance for optimal ventilation.
What are the communication options available on the DOP-103SQ?
It offers multiple serial ports, including RS-232 (with flow control), RS-485, and RS-422.