Netgear FVG318v1 - ProSAFE 54 Mbps Wireless VPN Firewall 8-Port Switch FVG318 Installation Guide
Summary
Secure your home network with the ProSafe Wireless VPN Firewall (FVG318). This comprehensive guide walks users through easy installation and configuration, allowing secure internet access whether you use cable or DSL service. It covers detailed setup steps—including modem connection, router pairing, and wireless optimization—and features troubleshooting tips for reliable connectivity. Ideal for homeowners or small businesses establishing a secure, high-performance Wi-Fi network from scratch.
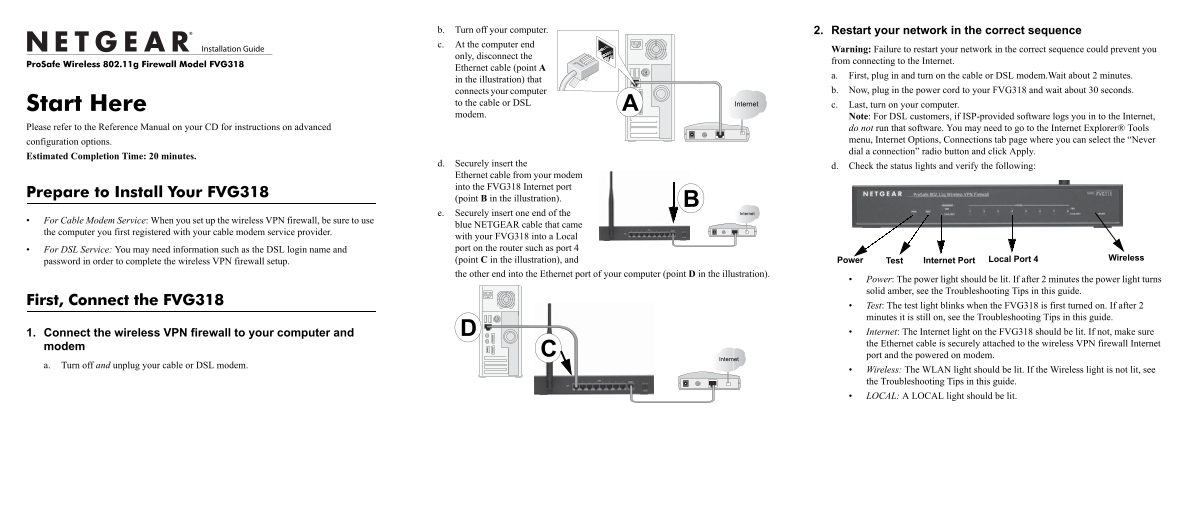
Page 1 Text Content
b. Turn off your computer. 2. Restart your network in the correct sequence c. At the computer end
Warning: Failure to restart your network in the correct sequence could prevent you
only, disconnect the
from connecting to the Internet.
Pro Safe Wireless 802.11g Firewall Model FVG318
Ethernet cable (point A
a. First, plug in and turn on the cable or DSL modem.Wait about 2 minutes.
in the illustration) that
connects your computer b. Now, plug in the power cord to your FVG318 and wait about 30 seconds.
Start Here to the cable or DSL c. Last, turn on your computer. modem. Note: For DSL customers, if ISP-provided software logs you in to the Internet,
Please refer to the Reference Manual on your CD for instructions on advanced do not run that software. You may need to go to the Internet Explorer® Tools
configuration options. menu, Internet Options, Connections tab page where you can select the “Never dial a connection” radio button and click Apply.
Estimated Completion Time: 20 minutes.
d. Securely insert the
d. Check the status lights and verify the following:
Ethernet cable from your modem into the FVG318 Internet port
Prepare to Install Your FVG318
(point B in the illustration). e. Securely insert one end of the
For Cable Modem Service: When you set up the wireless VPN firewall, be sure to use
blue NETGEAR cable that came
the computer you first registered with your cable modem service provider.
with your FVG318 into a Local For DSL Service: You may need information such as the DSL login name and port on the router such as port 4
(point C in the illustration), and Local Port 4 Wireless
password in order to complete the wireless VPN firewall setup. Power Test Internet Port
the other end into the Ethernet port of your computer (point D in the illustration).
Power: The power light should be lit. If after 2 minutes the power light turns solid amber, see the Troubleshooting Tips in this guide.
First, Connect the FVG318
Test: The test light blinks when the FVG318 is first turned on. If after 2 minutes it is still on, see the Troubleshooting Tips in this guide. 1. Connect the wireless VPN firewall to your computer and Internet: The Internet light on the FVG318 should be lit. If not, make sure the Ethernet cable is securely attached to the wireless VPN firewall Internet
modem
port and the powered on modem.
a. Turn off and unplug your cable or DSL modem.
Wireless: The WLAN light should be lit. If the Wireless light is not lit, see the Troubleshooting Tips in this guide. LOCAL: A LOCAL light should be lit.
Page Summary Contents For Netgear FVG318v1 - ProSAFE 54 Mbps Wireless VPN Firewall 8-Port Switch FVG318 Installation Guide
Manual Details
| Brand | NETGEAR |
|---|---|
| Pages | 2 |
| File Size | 230.51 KB |
| Published | June 06, 2026 |
Enter the captcha to get the download link:

Frequently Asked Questions
What is the required sequence to power on the network equipment?
You must first plug in and turn on the modem, wait about two minutes; then plug in the FVG318; last, turn on the computer.
How do I configure the FVG318 firewall for internet access?
Use the Smart Wizard configuration assistant when the FVG318 is in its factory default state by navigating to http://www.routerlogin.net.
What should I check if the Internet status light fails to illuminate?
Verify that the Ethernet cable from the modem to the FVG318's Internet port is securely attached, and both units are powered on.