Netgear GS116v1 - 16 Port Gigabit Ethernet Unmanaged Switch Installation Guide
Summary
Optimize your home or office network with this NETGEAR 16-port Gigabit Switch. This comprehensive guide provides step-by-step instructions on proper setup and connection procedures, ensuring reliable data transfer across all connected devices. The manual covers everything from initial unboxing verification and power connectivity to troubleshooting common issues like inactive ports and power failures. Ideal for tech-savvy users looking to expand bandwidth or build a robust network structure, this guide ensures seamless, professional installation in minutes.
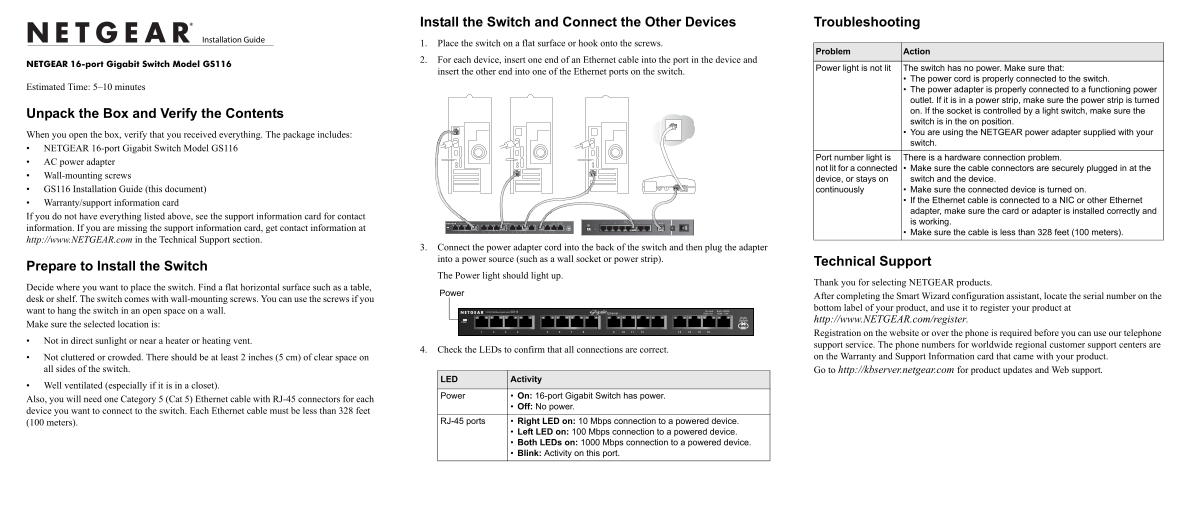
Page 1 Text Content
Install the Switch and Connect the Other Devices Troubleshooting 1. Place the switch on a flat surface or hook onto the screws.
Problem Action
2. For each device, insert one end of an Ethernet cable into the port in the device and
NETGEAR 16-port Gigabit Switch Model GS116
Power light is not lit The switch has no power. Make sure that:
insert the other end into one of the Ethernet ports on the switch.
The power cord is properly connected to the switch.
Estimated Time: 5–10 minutes
The power adapter is properly connected to a functioning power outlet. If it is in a power strip, make sure the power strip is turned on. If the socket is controlled by a light switch, make sure the
Unpack the Box and Verify the Contents
switch is in the on position. You are using the NETGEAR power adapter supplied with your
When you open the box, verify that you received everything. The package includes:
switch.
NETGEAR 16-port Gigabit Switch Model GS116
Port number light is There is a hardware connection problem.
AC power adapter
not lit for a connected Make sure the cable connectors are securely plugged in at the
Wall-mounting screws
device, or stays on switch and the device.
GS116 Installation Guide (this document) continuously Make sure the connected device is turned on.
If the Ethernet cable is connected to a NIC or other Ethernet
Warranty/support information card
adapter, make sure the card or adapter is installed correctly and
If you do not have everything listed above, see the support information card for contact
is working.
information. If you are missing the support information card, get contact information at
Make sure the cable is less than 328 feet (100 meters).
http://www.NETGEAR.com in the Technical Support section.
3. Connect the power adapter cord into the back of the switch and then plug the adapter into a power source (such as a wall socket or power strip).
Technical Support
Prepare to Install the Switch
The Power light should light up.
Thank you for selecting NETGEAR products.
Decide where you want to place the switch. Find a flat horizontal surface such as a table,
Power
After completing the Smart Wizard configuration assistant, locate the serial number on the
desk or shelf. The switch comes with wall-mounting screws. You can use the screws if you
bottom label of your product, and use it to register your product at
want to hang the switch in an open space on a wall.
http://www.NETGEAR.com/register.
Make sure the selected location is:
Registration on the website or over the phone is required before you can use our telephone
Not in direct sunlight or near a heater or heating vent.
support service. The phone numbers for worldwide regional customer support centers are
4. Check the LEDs to confirm that all connections are correct.
Not cluttered or crowded. There should be at least 2 inches (5 cm) of clear space on on the Warranty and Support Information card that came with your product.
all sides of the switch. Go to http://kbserver.netgear.com for product updates and Web support.
LED Activity
Well ventilated (especially if it is in a closet).
Power On: 16-port Gigabit Switch has power.
Also, you will need one Category 5 (Cat 5) Ethernet cable with RJ-45 connectors for each
Off: No power.
device you want to connect to the switch. Each Ethernet cable must be less than 328 feet
(100 meters). RJ-45 ports Right LED on: 10 Mbps connection to a powered device.
Left LED on: 100 Mbps connection to a powered device. Both LEDs on: 1000 Mbps connection to a powered device. Blink: Activity on this port.
Page Summary Contents For Netgear GS116v1 - 16 Port Gigabit Ethernet Unmanaged Switch Installation Guide
Manual Details
| Brand | NETGEAR |
|---|---|
| Pages | 2 |
| File Size | 1.74 MB |
| Published | June 04, 2026 |
Enter the captcha to get the download link:

Frequently Asked Questions
Why is the power light on the switch not lit?
Confirm that the power adapter cord is properly connected to the switch and plugged into a functioning wall outlet or switched-on power strip.
What physical guidelines should be followed when setting up the switch?
Place it on a flat surface with clear space (at least 2 inches) on all sides, ensuring it's well ventilated and away from direct sunlight or heaters.
How can I determine the connection speed of a connected device?
Check the RJ-45 port LEDs: green indicates 10 Mbps, amber is 100 Mbps, and both lights being lit signifies 1000 Mbps (1 Gbps).
Are there any limitations on Ethernet cable length?
Each Ethernet cable connecting a device must be less than 328 feet (100 meters) in length.