Netgear WNDAP620 — ProSAFE 3x3 Single Radio, Dual Band Wireless-N Access Point Installation Guide
Summary
Enhance your network reliability with the WNDAP620 Dual Band Wireless Access Point. This guide is essential reading for users needing to deploy professional-grade Wi-Fi coverage in offices or homes. The manual provides a clear, step-by-step walkthrough covering everything from physical Ethernet setup and IP configuration (DHCP/Static) to advanced wireless security profile implementation. Learn how to seamlessly establish strong, stable connections across both 2.4 GHz and 5 GHz bands, ensuring robust network performance nationwide.
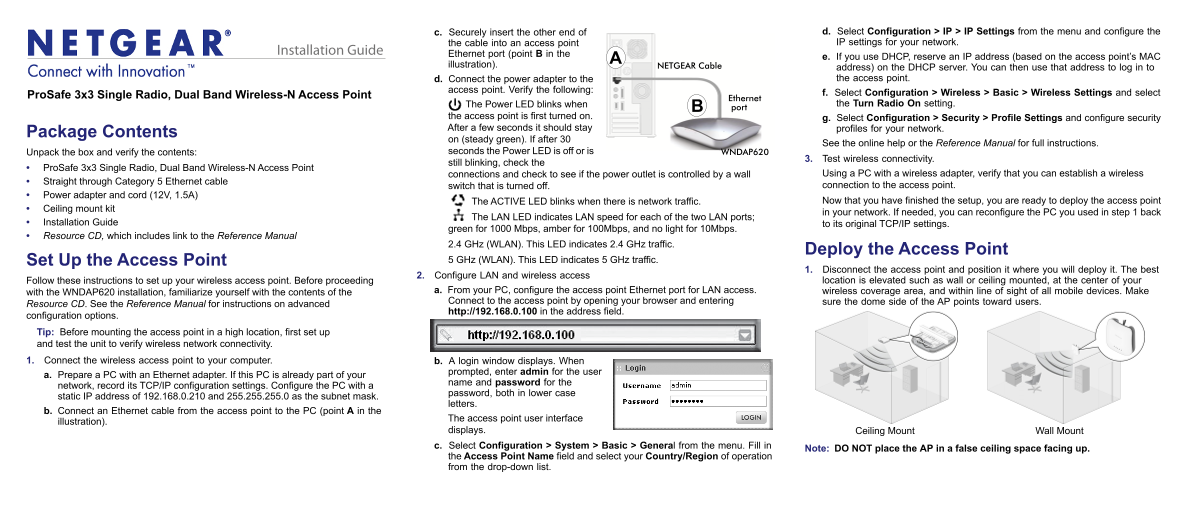
Page 1 Text Content
c. Securely insert the other end of d. Select Configuration > IP > IP Settings from the menu and configure the the cable into an access point IP settings for your network.
Installation Guide Ethernet port (point B in the
e. If you use DHCP, reserve an IP address (based on the access point’s MAC
illustration). NETGEAR Cable A
address) on the DHCP server. You can then use that address to log in to d. Connect the power adapter to the the access point.
access point. Verify the following:
Pro Safe 3x3 Single Radio, Dual Band Wireless-N Access Point f. Select Configuration > Wireless > Basic > Wireless Settings and select
Ethernet
The Power LED blinks when the Turn Radio On setting.
the access point is first turned on. g. Select Configuration > Security > Profile Settings and configure security After a few seconds it should stay profiles for your network.
Package Contents
on (steady green). If after 30
See the online help or the Reference Manual for full instructions.
Unpack the box and verify the contents: seconds the Power LED is off or is WNDAP620
3. Test wireless connectivity.
still blinking, check the
• Pro Safe 3x3 Single Radio, Dual Band Wireless-N Access Point
connections and check to see if the power outlet is controlled by a wall Using a PC with a wireless adapter, verify that you can establish a wireless
• Straight through Category 5 Ethernet cable
switch that is turned off. connection to the access point.
• Power adapter and cord (12V, 1.5A)
The ACTIVE LED blinks when there is network traffic. Now that you have finished the setup, you are ready to deploy the access point
• Ceiling mount kit
in your network. If needed, you can reconfigure the PC you used in step 1 back
The LAN LED indicates LAN speed for each of the two LAN ports;
• Installation Guide to its original TCP/IP settings.
green for 1000 Mbps, amber for 100Mbps, and no light for 10Mbps.
• Resource CD, which includes link to the Reference Manual
2.4 GHz (WLAN). This LED indicates 2.4 GHz traffic.
Deploy the Access Point
Set Up the Access Point 5 GHz (WLAN). This LED indicates 5 GHz traffic.
1. Disconnect the access point and position it where you will deploy it. The best
2. Configure LAN and wireless access
Follow these instructions to set up your wireless access point. Before proceeding location is elevated such as wall or ceiling mounted, at the center of your
with the WNDAP620 installation, familiarize yourself with the contents of the a. From your PC, configure the access point Ethernet port for LAN access. wireless coverage area, and within line of sight of all mobile devices. Make Connect to the access point by opening your browser and entering sure the dome side of the AP points toward users.
Resource CD. See the Reference Manual for instructions on advanced
http://192.168.0.100 in the address field.
configuration options. Tip: Before mounting the access point in a high location, first set up and test the unit to verify wireless network connectivity. 1. Connect the wireless access point to your computer. b. A login window displays. When
prompted, enter admin for the user
a. Prepare a PC with an Ethernet adapter. If this PC is already part of your
name and password for the
network, record its TCP/IP configuration settings. Configure the PC with a
password, both in lower case
static IP address of 192.168.0.210 and 255.255.255.0 as the subnet mask.
letters.
b. Connect an Ethernet cable from the access point to the PC (point A in the
The access point user interface
illustration).
displays. Ceiling Mount Wall Mount c. Select Configuration > System > Basic > General from the menu. Fill in
Note: DO NOT place the AP in a false ceiling space facing up.
the Access Point Name field and select your Country/Region of operation from the drop-down list.
Page Summary Contents For Netgear WNDAP620 — ProSAFE 3x3 Single Radio, Dual Band Wireless-N Access Point Installation Guide
Manual Details
| Brand | NETGEAR |
|---|---|
| Pages | 2 |
| File Size | 360.72 KB |
| Published | June 06, 2026 |
Enter the captcha to get the download link:

Frequently Asked Questions
What is the default IP address for the access point?
The access point's default IP address is 192.168.0.100, with a default subnet mask of 255.255.255.0.
How do I verify successful initial setup?
After setup, check that the Power and LAN LEDs are on, confirming the access point has power and is connected to the network.
Where should I position the access point for best coverage?
Position it where wireless coverage is maximized, preferably high up like a ceiling or wall mount at the center of the area.
What do the various LEDs indicate during operation?
The Power LED changes state (blinking/steady), the ACTIVE LED indicates network traffic, and LAN/WLAN LEDs show specific radio activity (2.4 GHz or 5 GHz).