# A B C D E F G H I J K L M N O P Q R S T U V W X Y Z

HP Photosmart Premium Fax e-All-in-One Printer Series - C410 Reference Guide

Summary

Establish your HP Photosmart Premium Fax All-in-One Printer with confidence using this comprehensive guide. This resource walks new users through every stage, from unpacking the hardware and installing trays to seamless initial setup via USB or wireless connection (including WPS). It features detailed troubleshooting sections for resolving tricky connectivity issues, powering the unit correctly, reinstalling drivers, and ensuring reliable remote printing performance. Necessary reading for anyone setting up or needing support with their C410 series workstation.
📄 Preview PAGE OF 24

Page 1 Text Content

PHOTOSMART PREMIUM FAX Inside... Setup troubleshooting 3 e-ALL-IN-ONE C410 series Get to know your HP Photosmart 4 Features and tips 6 Get more info 8 Specs 8

Start setup here...

Networked printer setup and use 9 Fixing connectivity issues 10

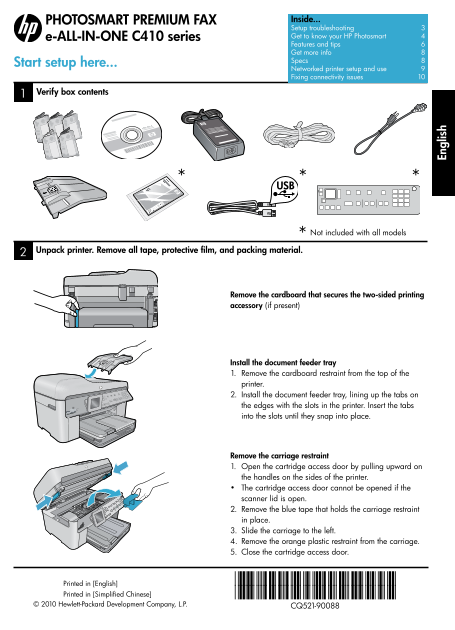
Verify box contents

* Not included with all models

Unpack printer. Remove all tape, protective film, and packing material.

Remove the cardboard that secures the two-sided printing accessory (if present)

Install the document feeder tray 1. Remove the cardboard restraint from the top of the printer. 2. Install the document feeder tray, lining up the tabs on the edges with the slots in the printer. Insert the tabs into the slots until they snap into place.

En gl is

Remove the carriage restraint 1. Open the cartridge access door by pulling upward on the handles on the sides of the printer. The cartridge access door cannot be opened if the scanner lid is open. 2. Remove the blue tape that holds the carriage restraint in place. 3. Slide the carriage to the left. 4. Remove the orange plastic restraint from the carriage. 5. Close the cartridge access door.

Printed in [English] *CQ521-90088*

Printed in [Simplified Chinese] *CQ521-90088*

© 2010 Hewlett-Packard Development Company, L.P.

CQ521-90088

Page Summary Contents For HP Photosmart Premium Fax e-All-in-One Printer Series - C410 Reference Guide

Page 1 PHOTOSMART PREMIUM FAX Inside... Setup troubleshooting 3 e-ALL-IN-ONE C410 series Get to know your HP Photosmart 4 Features and tips 6 Get more info 8 Specs 8 Start setup here... Networked printer set...
Page 2 Install faceplate, if included Install the faceplate If you need to install a faceplate on the control panel: 1. Remove the existing faceplate by pulling up on the right edge. 2. Position the new face...
Page 3 Setup troubleshooting If the 1. Check the power cord. Make sure the power cord is firmly connected to both the printer and the power adaptor. HP Photosmart A light on the power supply will be on if th...
Page 4 Get to know your HP Photosmart 3 def2 abc1 6 mno5 jkl4 ghi 9 wxyz8 tuv7 pqrs Color graphics display (also referred to as the Wireless button and light: Opens the Network display): Displays menus, phot...
Page 5 Get to know your HP Photosmart Start Fax: Sends or receives a black-and-white or Cancel: Stops the current operation. color fax. Start Copy: Starts a black-and-white or color Help: Provides help about...
Page 6 Features and tips Print documents and photos Use the Print menu on the printer display to print documents and photos from software applications on a connected computer. Print photos directly from a me...
Page 7 Features and tips Print from anywhere Note: A USB connection by itself won’t enable e Print. To use e Print, the printer must be connected to the Internet through a router, either wirelessly or via an...
Page 8 Get more info Find more information Additional product information can be found in the onscreen Help and Readme file that are installed with the HP Photosmart software. Onscreen Help includes instruct...
Page 9 Networked printer setup and use Changing the type of computer connection Changing your connection from USB to wireless If you initially set up your printer using a USB connection to your computer, you...
Page 10 Fixing connectivity issues Run a Wireless Network Test to check diagnostic and configuration information. To do this: 1. On the HP Photosmart front panel, press the Wireless button to display the Wire...
Page 11 HP printer limited warranty statement HP product Duration of limited warranty Software Media 90 days Printer 1 year Print or Ink cartridges Until the HP ink is depleted or the “end of warranty” date p...
Page 12 English
Page 13 PHOTOSMART PREMIUM FAX 在内部... 设置疑难排解 15 e-ALL-IN-ONE C410 series HP Photosmart 入门 16 功能与提示 18 了解更多信息 20 规格 20
Page 14 请勿连接 USB 连接线,除非软件提示您这么做!(仅限 Windows®) 连接电源线和适配器。 按下 启动 HP Photosmart。 按照打印机显示屏上的设置向导进行操作 请确保按照显示屏上的说明操作,它将指导您完成HP Wi Fi 保护设置 (WPS) –(可选) Photosmart的设置和连接, 包括安装墨盒和软件。 此 HP Photosmart 支持 Wi Fi 保护设置 (WPS...
Page 15 如果无法开启 HP 1. 检查电源线。 确保电源线牢固地连接到打印机和电源适配器。如果电源线连接正常,那么电源指示灯 Photosmart... 将亮起。 如果使用电源插线板,请确保该插线板的开关已打开。或者将打印机直接插入电源 插座。 测试电源插座,确保它正在正常工作。插上另一台可正常工作的设备,查看是否有电。 如果没电,则电源插座可能有问题。 如果将打印机插入到带开关的插座中,请确保该插座开关...
Page 16 HP Photosmart 入门 3 def2 abc1 6 mno5 jkl4 ghi 9 wxyz8 tuv7 pqrs 彩色图形显示屏(也称为显示屏):显示菜单、照 无线按钮和指示灯:打开“网络”菜单,该菜单可 片和信息。可将显示屏立起来以一定角度放置,以 用于访问“无线设置”向导和 Wi-Fi 保护设置。无 实现更佳视觉效果。 线指示灯指示连接状态: e Print:打开 Web Serv...
Page 17 HP Photosmart 入门 开始传真:发送或接收黑白或彩色传真。 取消:停止当前操作。 Apps:打开 Apps 菜单以便访问和打印 Web 信 Memory Stick Multi Media Card Compact Flash (CF) I 型和 II 型 正面 USB 端口:针对数码相机和可移动驱动器
Page 18 发生混淆。 安装新墨盒时,请参考墨盒包装上的图片获取相关说明。请先除去塑料包装和桔黄色的拉环 再拧下桔黄色的塑料盖。 打印过程中通过以下方法使用墨盒中的墨水: 初始化,用于为打印准备好打印机和墨盒 打印头维护,用于保持打印喷嘴清洁和墨水畅通无阻 当墨盒用完后,墨盒中还会残留一些墨水。有关详细信息,请访问: www.hp.com/go/inkusage。 扫描照片和文档 使用打印机显示屏上的扫描菜单...
Page 19 随时随地打印 注意:仅凭 USB 连接将不会启用 e Print。要使用 e Print,必须以无线或用 Ethernet 电缆通过路由 器将打印机连接到 Internet。这种连接与打印机和计算机之间的 USB 连接不同。 HP 的免费 e Print 服务提供从电子邮件随时随地打印的便捷方法。只要将电子邮件从计算机或移 动设备转发到打印机的电子邮件地址,就会打印电子邮件消息和认可的附件。 附件...
Page 20 查找更多信息 可以在随 HP Photosmart 软件一起安装的屏幕帮助和自述文件中找到更多产品信息。 屏幕帮助包括有关产品功能和疑难排解的说明。它还包含产品规格、法律声明、环境、法 规、支持信息以及指向 Web 上更多在线信息的链接。 自述文件包含 HP 支持联系信息、操作系统要求和产品信息的最新更新。在 Windows 中, 单击开始 > 所有程序 > HP > Photo...
Page 21 更改计算机连接类型 将连接从 USB 更改为无线 如果最初使用计算机的 USB 连接设置打印机,那么可以按以下步骤将连接切换为无线网络连接: USB 到无线 Windows Mac 要从 USB 连接更改为无线连接,请执行以下 要从 USB 连接更改为无线连接,请执行以下 操作: 操作: 1. 单击开始,单击所有程序,单击 HP,单击 1. 在 HP Photosmart 前面板上,按无线按钮 P...
Page 22 运行无线网络测试检查诊断和配置信息。为此,请执行以下操作: 1. 在 HP Photosmart 前面板上,按无线按钮以在打印机显示屏上显示无线菜单。 2. 在显示屏上选择运行无线网络测试。 3. 将自动打印无线网络测试报告。 您可能选择了错误的网络或输入了不正确的网络名称 (SSID)。 检查这些设置以确保正确无误。 您可能输入了不正确的无线密码(WPA 密码或 WEP 密钥)。 如果要在网络上...
Page 23 HP 打印机有限保修声明

Manual Details

Brand HP
Pages 24
File Size 11.01 MB
Published June 02, 2026
74 views

Enter the captcha to get the download link:

captcha

Frequently Asked Questions

What are the initial steps after unboxing the printer?

Remove all tape and protective film, then install the document feeder tray by lining up tabs in the slots until they snap into place.

Why is my photosmart printer not turning on?

Check that the power cord is firmly connected to both the printer and adapter. If using a power strip, ensure it is powered on or plug directly into an outlet.

How can I set up the HP Photosmart for wireless connection?

You can use the WPS button on your router during setup if prompted, or alternatively follow the setup wizard by selecting wireless settings on the display.

I installed the software but no documents will print; what should I do?

Close and reopen the router, printer, and computer in sequence. If that fails, you may need to run the network diagnostic utility or reinstall the software.