# A B C D E F G H I J K L M N O P Q R S T U V W X Y Z

HP Photosmart Premium e-All-in-One Printer Series - C310 Reference Guide

Summary

This comprehensive manual guides new owners through setting up and maximizing their HP Photosmart All-in-One printer. It covers everything from initial unboxing and connection methods, including simple wireless setup using WPS, to advanced network connectivity. Users will find detailed instructions on installing drivers for both Windows and Mac, troubleshooting printing errors, managing ink levels, and resolving common software or Wi-Fi issues to ensure quick and reliable photo printing.
📄 Preview PAGE OF 16

Page 1 Text Content

Inside...

PHOTOSMART PREMIUM

Setup troubleshooting 2 Get to know your HP Photosmart 3

e-ALL-IN-ONE C310 SERIES

Features and tips 4 What’s new? Web Services 5

Start setup here...

Network Printer Setup 6

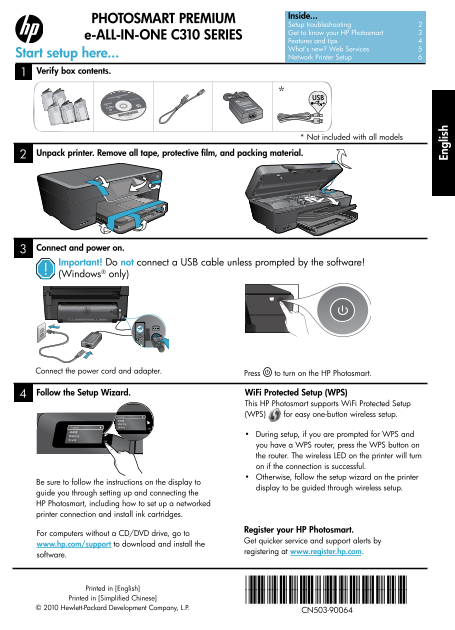
Verify box contents.

* Not included with all models

Unpack printer. Remove all tape, protective film, and packing material.

Connect and power on. Important! Do not connect a USB cable unless prompted by the software! (Windows® only)

Connect the power cord and adapter.

Press to turn on the HP Photosmart.

Follow the Setup Wizard. Wi Fi Protected Setup (WPS) This HP Photosmart supports Wi Fi Protected Setup (WPS) for easy one-button wireless setup.

• During setup, if you are prompted for WPS and you have a WPS router, press the WPS button on En gl is the router. The wireless LED on the printer will turn on if the connection is successful. • Otherwise, follow the setup wizard on the printer

Be sure to follow the instructions on the display to

display to be guided through wireless setup.

guide you through setting up and connecting the HP Photosmart, including how to set up a networked printer connection and install ink cartridges.

Register your HP Photosmart.

For computers without a CD/DVD drive, go to

Get quicker service and support alerts by

www.hp.com/support to download and install the

registering at www.register.hp.com.

software.

*CN503-90064*

Printed in [English] Printed in [Simplified Chinese] *CN503-90064*

© 2010 Hewlett-Packard Development Company, L.P.

CN503-90064

Page Summary Contents For HP Photosmart Premium e-All-in-One Printer Series - C310 Reference Guide

Page 1 Inside... PHOTOSMART PREMIUM Setup troubleshooting 2 Get to know your HP Photosmart 3 e-ALL-IN-ONE C310 SERIES Features and tips 4 What’s new? Web Services 5 Start setup here... Network Printer Setup ...
Page 2 Setup troubleshooting If the HP Check the power cord. Photosmart Make sure the power cord is firmly connected to both the printer and the power adaptor. An doesn’t turn on... LED on the power supply w...
Page 3 Get to know your HP Photosmart Display The color touch screen displays menus, Help Touch Help on the Home screen to see all Help photos, and messages. Flick horizontally or vertically topics. Touch He...
Page 4 Features and tips Print photos directly from a memory card in various sizes and papers. Use the Photo menu on the printer display for browsing photos, applying automatic fixes, and making selections. ...
Page 5 What’s new? Web Services How to get started with HP e Print To use HP e Print, you must have your printer connected to a network with an Internet connection. Press the Wireless button on the HP Photos...
Page 6 Network Printer Setup Changing from USB to wireless network connection If you initially set up your printer using a USB connection to your computer, you can switch the connection to a wireless network...
Page 7 Fixing connectivity issues You may have picked the wrong network or typed in your network name (SSID) incorrectly. Check these settings to ensure that they are correct. You may have typed your wireles...
Page 8 HP printer limited warranty statement HP product Duration of limited warranty Software Media 90 days Printer 1 year Print or Ink cartridges Until the HP ink is depleted or the “end of warranty” date p...
Page 9 PHOTOSMART PREMIUM 设置疑难排解 10 HP Photosmart 入门 11 e-ALL-IN-ONE C310 SERIES 功能和技巧 12 新增功能 Web 服务 13 连接并打开电源。 重要事项!在软件没有提示之前,请勿连接 USB 电缆! (仅限 Windows®) 连接电源线和适配器。 按下 打开 HP Photosmart 电源。 按照 设置向导 进行操作。 Wi...
Page 10 如果 HP 检查电源线。 确保电源线牢固地连接到打印机和电源适配器。如果电源线正常,则电源上的 LED 灯亮起。 Photosmart 无法 1. 关闭打印机电源,然后拔下电源线。重新插上电源线,然后按 按钮打开打印机。 2. 小心别按 按钮太快。仅按一下按钮。打印机可能需要几分钟才能打开,所以如果多次按 下 按钮,可能会关闭打印机。 3. 如果已经完成了所有上述步骤,但仍有问题,请联系 HP 支...
Page 11 HP Photosmart 入门 主屏幕 返回主屏幕(打开产品时的默认屏幕)。 Apps 提供访问 Web 和打印来自 Web 的信息(如地 扫描 打开 扫描菜单 ,从中可以选择扫描目的地。 无线* 打开 网络 菜单,从中可以访问 无线设置向 和 Wi Fi 保护设置。 取消 停止当前的操作。 HP e Print 打开 Web 服务 菜单,从中可以查看和 闪烁(快速) 打印机未能使用 Wi Fi...
Page 12 直接从存储卡打印各种大小和纸张的照片。使用打印机显示屏上的照片菜单可以浏览照片、 应用自动修复和进行选择。 从连接的计算机上的软件应用程序打印文档和照片。 安装新的墨盒时,请参阅墨盒包装上的图示以了解安装说明。确保在拆掉了塑料包装和橙色 标签之后才旋开橙色塑料盖子。 第一次安装和使用 HP Photosmart 时,请确保安装设备附带的墨盒。这些墨盒是专为第一次 此外,墨盒用完后,墨盒中还会残留一...
Page 13 新增功能 Web 服务 HP e Print 入门 要使用 HP e Print,必须使用 Internet 连接将打印机连接到网络。 按下 HP Photosmart 前面板上的无线按钮。 从打印机显示屏上选择 Web 服务菜单。从这里,您可以打开或关闭服务,显示打印机的电 子邮件地址以及打印信息页。 HP e Print HP 的免费 e Print 服务使您能够随时随地从电子邮件轻松打印。只...
Page 14 将 USB 连接更改为无线网络连接 如果您最初是用 USB 连接至计算机来设置打印机的,可以通过执行以下步骤将连接改为无线 网络连接。 USB 到无线 Windows Mac 要从 USB 连接更改为无线连接: 要从 USB 连接更改为无线连接: 1. 依次单击开始、HP、Photosmart C310 1. 在 HP Photosmart 前面板上,按下无 series 以及 USB 到无线。保...
Page 15 您可能选择了错误的网络或没有正确键入网络名称 (SSID)。 检查这些设置以确保设置正确。 可能输入了不正确的无线密码(WEP 密钥或密码)。 如果在网络上使用了加密,那么将需要输入密钥。这些密钥是区分大小写的,所以请确保正 确输入了密钥。 如果安装过程中未自动找到网络名称 (SSID) 或无线密码,而您又不知道,那么可以下载网络 诊断实用程序,帮助您查找网络名称或无线密码。 网络诊断实用程序可以...
Page 16 HP 打印机有限保修声明

Manual Details

Brand HP
Pages 16
File Size 6.69 MB
Published June 20, 2026
4 views

Enter the captcha to get the download link:

captcha

Frequently Asked Questions

How do I troubleshoot a printer that won't turn on?

Ensure the power cord is firmly connected to both the printer and adapter. Check the power strip or plug directly into an outlet.

How do I set up the Wi-Fi connection using WPS?

If prompted, press the WPS button on your router. The wireless LED will turn green if successful.

What should I do if I cannot print to my computer?

Ensure the Photosmart is set as default and not offline. If issues persist, uninstall/reinstall the software following steps 1-5.

How can I change a USB connection to wireless only?

On the printer panel, press Wireless -> Connection $\rightarrow$ Keep holding until prompted for disconnect. Then follow screen instructions.