# A B C D E F G H I J K L M N O P Q R S T U V W X Y Z

HP Photosmart C7200 Series All-in-One Printer Setup Guide

Summary

This comprehensive guide provides new users with everything needed to set up and operate the HP Photosmart All-in-One photo printer. It covers essential initial setup steps, including connecting power cables and establishing network connectivity via USB, Wi-Fi, or Ethernet. Learn how to correctly install ink cartridges, load various types of paper (including specialized school sheets), and explore photo printing features—from memory card integration to printing professional-quality images. Perfect for owners looking for a step-by-step walkthrough of all multifunction capabilities.
📄 Preview PAGE OF 16

Page 1 Text Content

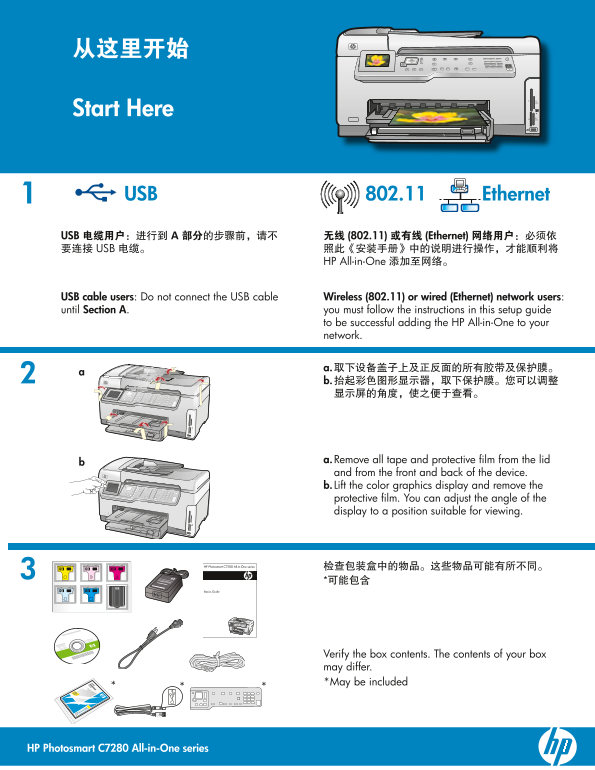
Start Here

802.11 Ethernet USB

USB 电缆用户:进行到 A 部分 的步骤前,请不 无线 (802.11) 或有线 (Ethernet) 网络用户:必须依 要连接 USB 电缆。 照此《安装手册》中的说明进行操作,才能顺利将

HP All-in-One 添加至网络。

USB cable users: Do not connect the USB cable Wireless (802.11) or wired (Ethernet) network users: until Section A . you must follow the instructions in this setup guide

to be successful adding the HP All-in-One to your network.

a. Remove all tape and protective fi lm from the lid and from the front and back of the device. b. Lift the color graphics display and remove the protective fi lm. You can adjust the angle of the display to a position suitable for viewing.

HP Photosmart C7200 All-in-One series 检查包装盒中的物品。这些物品可能有所不同。

Basics Guide

Verify the box contents. The contents of your box may differ. *May be included

HP Photosmart C7280 All-in-One series

Page Summary Contents For HP Photosmart C7200 Series All-in-One Printer Setup Guide

Page 1 Start Here 802.11 Ethernet USB USB 电缆用户:进行到 A 部分 的步骤前,请不 无线 (802.11) 或有线 (Ethernet) 网络用户:必须依 要连接 USB 电缆。 照此《安装手册》中的说明进行操作,才能顺利将 HP All-in-One 添加至网络。 USB cable users: Do not connect the USB cable Wirel...
Page 2 a. If the control panel faceplate is not already attached, position it over the buttons on the device. b. Press down fi rmly on all edges of the faceplate until it snaps into place. Make sure all butt...
Page 3 Open the access door. a. Squeeze the bottom of each latch to release it, and then lift the latch. b. Lift all six latches. a. Match the color and pattern of the ink cartridge to the color and pattern ...
Page 4 a. 拉出纸盒。 b. 将纸张宽度导轨滑到左侧。 c. 将普通白纸放入主纸盒,然后调整纸张导轨。 d. 推入纸盒并按“ OK ”。 a. Pull out the paper tray. b. Slide the paper-width guide to the left. c. Insert plain white paper into the main tray and adjust the ...
Page 5 A - USB C - Ethernet B - 802.11 仅可选择 一种 连接类型(A - USB、B - 802.11/无线或 C - Ethernet/有线) Choose only ONE connection type (A - USB, B - 802.11/Wireless, or C - Ethernet/Wired) A - USB 如果您要将 HP All-in-One 直...
Page 6 A - USB Mac: Windows: a. 启动计算机并登录(如有必要),然后等待桌面 注意: 如果没有随附 USB 电缆,请单独购 出现。放入绿色 CD,然后按照屏幕说明进行操 买。 作。 a. 将 USB 电缆的一端连接到 HP All-in-One 注意: 如果没有出现启动屏幕,请依次双击 背面的端口,然后将另一端连接到计算机 “ 我的电脑 ”、带 HP 徽标的“ CD–ROM ”图标...
Page 7 USB 疑难排解 USB Troubleshooting www.hp.com/support 问题: (仅适用于 Windows)显示 Microsoft“添加硬件”屏幕。 解决办法: 取消所有屏幕操作。拔掉 USB 电缆,然后放入绿色 HP All-in-One CD。请参阅 A 部分 。 Problem: (Windows) The Microsoft Add Hardware screen...
Page 8 B1 - 802.11 a. 找到 并 记下 您的无线路由器设置: 网络名称(也称 SSID):___________________________________________ WEP 密钥/WPA 密码短语(如有需要):_______________________________ 注意 :要继续进行无线设置就必须了解这些信息。HP 提供了一个名为 Wireless Network Ass...
Page 9 e. 请执行以下其中一项操作: 按 以突出显示您先前记下的网络名称。 如果列表中没有显示您记下的网络名称,可以手动输入。按 直至“ 输入新网络名称 (SSID) ”突出显示, 然后按“ OK ”。接着通过屏幕键盘输入网络名称。如有必要,可参阅下文中的“屏幕键盘使用技巧”。 f. 如果网络采用了安全设施,系统会提示您输入 WEP 密钥或 WPA 密码短语。两者都区分大小写。通过屏幕键 盘按要求输入 ...
Page 10 C - Ethernet a. 找到 Ethernet 电缆。 b. 拔下设备背面的黄色插头。 c. 将 Ethernet 电缆的一端连接至设备背面的 Ethernet 端口。 d. 将 Ethernet 电缆的另一端连接至路由器。 e. 转至此《安装手册》的 D 部分 安装相关软件。 注意: 计算机和 HP All-in-One 必须位于同一个工作中的活动 网络内。 如果您使用的是 DSL 或电...
Page 11 D1 - Ethernet/ 802.11 Windows: Mac: a. 启动计算机并登录(如有必要),然后等待桌面出 现。放入绿色 CD,然后按照屏幕说明进行操作。 “ 我的电脑 ”、带 HP 徽标的“ CD-ROM ” b. 放入 绿色 CD。 图标和“ setup.exe ”。 c. 双击桌面上的“HP Photosmart CD”图 c. 防火墙软件可能会出现提示,警告您 HP 软件正...
Page 12 D2 - Ethernet/ 802.11 如果网络中还有其他计算机,则在每台计算机 If you have additional computers on your network, 上都安装 HP All-in-One 软件。 install the HP All-in-One software on each computer. 按照屏幕上的说明进行操作。请务必选择网络 Follow the...
Page 13 www.hp.com/support 问题: 从 HP All-in-One 控制面板运行“ 无线设置向导 ”后,HP All-in-One 无法连接到网络。 解决办法: 您可以打印一个诊断报告,它或许有助于找出问题所在。运行 HP All-in-One 控制面板“网络”菜单上 的“ 无线网络测试 ”。 如果通过“ 无线设置向导 ”手动输入网络名称 (SSID),名称可能会输入错误。重新运行“ 无...
Page 14 问题: 安装 HP All-in-One 软件时,显示“ 找不到打印机 ”的错误消息。 解决办法: HP All-in-One 可能没有连接到网络。如果是无线连接,请确保在继续安装软件前先从控制面板运行“无 线设置向导”。如果是有线 Ethernet 连接,请检查 HP All-in-One、路由器和计算机之间的所有连接。 尝试暂时禁用计算机上当前运行的所有防火墙、防间谍或防毒软件。 Proble...
Page 15 c. d. Photosmart Express Print Create Share Save c. 当彩色图形显示器显示“Photosmart c. When the Photosmart Express menu appears in the Express”菜单时,按“ OK ”选择“ 查看 ”。 color graphics display, press OK to select Vie...
Page 16 浏览更多功能 Explore more features 可打印的文教用纸 :您知道可以使用 HP All-in-One 打印文教用纸吗?笔记本纸、坐标纸、任务核对 表、甚至乐谱纸都可以从控制面板打印。按 (安 装) 访问可打印的文教用纸。 Printable School Papers : Did you know you can print school papers from your HP...

Manual Details

Brand HP
Pages 16
File Size 6.36 MB
Published May 30, 2026
48 views

Enter the captcha to get the download link:

captcha

Frequently Asked Questions

如何连接HP All-in-One到网络?

必须先按照《安装手册》的说明完成初始的网络设置;如果使用USB电缆,需参考A部分步骤。

墨盒和卡销的匹配要求是什么?

墨盒的颜色和图案必须与检修门上的对应颜色和图案相匹配。只能使用打印机随附的墨盒。

光面照片纸如何放入照片纸盒?

将照片纸的光面朝下放置在照片纸盒,然后滑动纸张导轨使其紧贴照片纸边缘。

校准工作完成后应如何操作?

校准页打印完毕后,按“OK”按钮,此时校准工作即告完成。