# A B C D E F G H I J K L M N O P Q R S T U V W X Y Z

HP Photosmart C4100 Series All-in-One Printer Setup Guide

Summary

Introducing detailed setup guidance for the HP Photosmart C4100 All-in-One photo printer. This comprehensive manual is designed for new users, providing step-by-step instructions covering everything from initial hardware unboxing and physical assembly to advanced operation. Learn how to correctly load ink cartridges, manage paper trays, perform printhead alignment, and seamlessly connect your new device to both Windows and Mac computers. Get up and running quickly with confidence!
📄 Preview PAGE OF 12

Page 1 Text Content

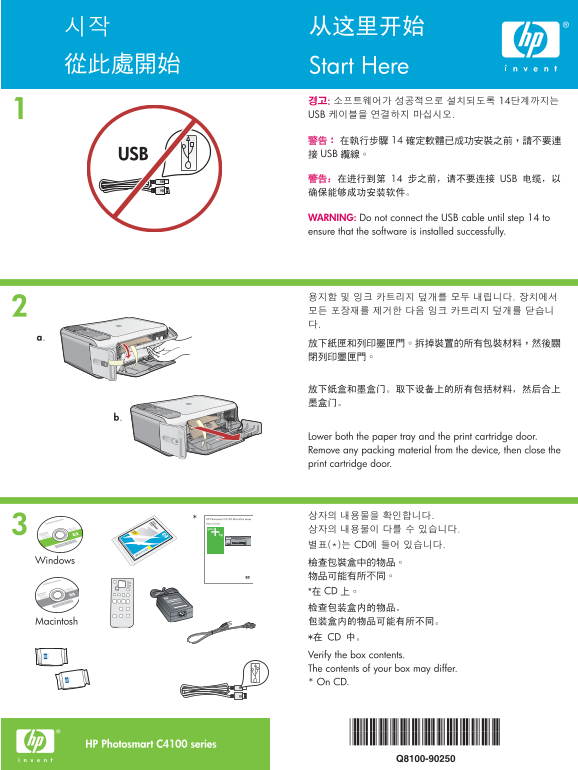
從此處開始 Start Here

경고: 소프트웨어가 성공적으로 설치되도록 14단계까지는 USB 케이블을 연결하지 마십시오.

警告: 在執行步驟 14 確定軟體已成功安裝之前,請不要連 USB 接 USB 纜線。

警告: 在进行到第 14 步之前,请不要连接 USB 电缆,以 确保能够成功安装软件。

WARNING: Do not connect the USB cable until step 14 to ensure that the software is installed successfully.

Lower both the paper tray and the print cartridge door. Remove any packing material from the device, then close the print cartridge door.

HP Photosmart C4100 All-in-One series 상자의 내용물을 확인합니다.

Basics Guide

상자의 내용물이 다를 수 있습니다. 별표(*)는 CD에 들어 있습니다.

Windows 檢查包裝盒㆗的物品。

物品可能㈲所不同。 *在 CD ㆖。 检查包装盒内的物品。 Macintosh 包装盒内的物品可能有所不同。 *在 CD 中。 Verify the box contents. The contents of your box may differ. * On CD.

HP Photosmart C4100 series

Page Summary Contents For HP Photosmart C4100 Series All-in-One Printer Setup Guide

Page 1 從此處開始 Start Here 경고: 소프트웨어가 성공적으로 설치되도록 14단계까지는 USB 케이블을 연결하지 마십시오. 警告: 在執行步驟 14 確定軟體已成功安裝之前,請不要連 USB 接 USB 纜線。 警告: 在进行到第 14 步之前,请不要连接 USB 电缆,以 确保能够成功安装软件。 WARNING: Do not connect the USB cable until ...
Page 2 Attach the faceplate if not already attached. Lift the color graphics display. For best viewing, remove the protective film from the display. Connect the power cord and adapter. Press ( On button) and...
Page 3 Pull out the tray extender, and then load plain white paper. Open the print cartridge door. Make sure the print carriage moves to the right. If it does not move to the right, turn the device off, then...
Page 4 a. HP 로고를 위쪽으로 오게 하여 카트리지를 잡습니다. b. 컬러 카트리지를 왼쪽 카트리지 슬롯 에 끼우고 흑백 카 트리지를 오른쪽 카트리지 슬롯 에 끼웁니다. 카트리지를 슬롯 안으로 단단히 밀어 넣어 제자리에 장 착 시킵니다. a. 握住墨匣,讓 HP 標誌朝㆖。 b. 將 ㆔色 墨匣插入 ㊧側墨匣插槽 ,然後將 黑色 墨匣插入 ㊨側 墨匣插槽 。 確定您已將墨匣 ...
Page 5 Mac: Windows: 녹색 Windows CD를 선택합니다. 회색 Mac CD를 선택합니다. 選擇 綠色 Windows CD。 選擇 灰色 Mac CD。 选择 绿色 Windows CD。 选择 灰色 Mac CD。 Select the green Windows CD. Select the gray Mac CD. Mac: Windows: Windows: 컴퓨터의 전...
Page 6 14b Mac: Windows: Windows: USB 연결 메시지가 나타나면 USB 케이블을 Mac: Mac용 HP All-in-One CD를 넣습니다. HP All-in-One의 뒷면 포트에 연결한 다음 컴퓨터에 있는 HP All-in-One Installer 아이콘을 두 번 누릅니다. 임의의 USB 포트에 연결합니다. 화면의 지시에 따릅니다. Wind...
Page 7 功能瀏覽 Explore the features HP All-in-One 설치를 완료했습니다. 이제 몇 가 现在,您已经设置完成 HP All-in-One,可以尝 現在您已完成了 HP All-in-One 的安裝,即可試 Now that you have finished setting up your HP All-in-One, you can try out a few of...
Page 8 4 x 6인치 사진 인쇄 打印 4 x 6 英寸的照片 列㊞ 4 x 6 英吋相片 Print a 4 x 6 inch photo a. Photosmart Express a. 카메라의 메모리 카드를 해당 메모리 카드 슬롯에 끼운 다음 Photosmart Express 버튼을 누릅니다. 경고: 한번에 여러 개의 메모리 카드를 삽입하면 안됩니다. 여러 개의 카드를 삽입...
Page 9 重新列㊞相片 Make a photo reprint Now instead of printing a picture from your memory card, try making a photo reprint of a 4 x 6 inch photo. a. Remove the memory card. b. Insert the loaded photo cassette in...
Page 10 CD 레이블 인쇄 打印 CD 标签 列㊞ CD 標籤 Print a CD label b. 메모리 카드를 끼웁니다. c. 장치에 있는 Photosmart Express 버튼을 누릅니다. d. OK 를 눌러 보기 및 인쇄 를 선택합니다. 화살표 버튼을 눌러 다른 사진을 선택한 다음 OK 를 누릅니다. 인쇄 메뉴 가 나타납니다. e. 를 눌러 프로젝트 를 강조한 다...
Page 11 疑難排解 Troubleshooting www.hp.com/support 문제: (Windows만 해당) USB 케이블을 연결하라는 메시지가 화면에 표시되지 않습니다. 해결: 모든 화면을 취소합니다. Windows용 HP All-in-One CD를 꺼냈다가 다시 넣습니다. 12단계를 참조하십시오. 問題: (僅㊜用 Windows) 沒㈲看見螢幕提示您連接 USB ...
Page 12 문제: (Windows만 해당) Microsoft 하드웨어 추가 화면이 표시됩니다. 해결: 모든 화면을 취소합니다. USB 케이블을 뽑고 녹색 HP All-in-One Windows CD를 넣습니다. 11 및 12 단계를 참조하십시오. 問題: (僅㊜用 Windows) 顯示 Microsoft 「新增硬體」 畫面。 動作: 關閉所㈲畫面。拔掉 USB 纜線,再插入綠色...

Manual Details

Brand HP
Pages 12
File Size 2.11 MB
Published June 17, 2026
6 views

Enter the captcha to get the download link:

captcha

Frequently Asked Questions

How should I handle packaging material and preparation steps?

Remove all packing materials from the device first, then close the print cartridge door.

What is the warning regarding the USB cable connection?

Do not connect the USB cable until Step 14 to ensure the software is installed successfully.

How do I prepare the printer for ink cartridges and paper?

Load plain white paper in the paper tray extender, ensure the print carriage moves to the right when opening the door, and remove tape from both cartridges.

What should I do if the print carriage does not move to the right?

Turn the device off, then turn it back on again.

Which CD should I use for a Windows vs. Mac computer?

Select the green CD for Windows and the gray CD for Macintosh.