# A B C D E F G H I J K L M N O P Q R S T U V W X Y Z

HP Photosmart 3100 Series All-in-One Printer Setup Brochure

Summary

Introducing your new HP All-in-One printer and scanner solution. This comprehensive setup guide is essential for first-time owners, detailing every step from unboxing to full operation. It provides detailed instructions on hardware installation—including attaching control panels, loading ink cartridges, and paper trays—as well as connecting the device to your PC via included software CD. Use this manual to successfully initialize alignment and begin printing, scanning, and copying immediately.
📄 Preview PAGE OF 12

Page 1 Text Content

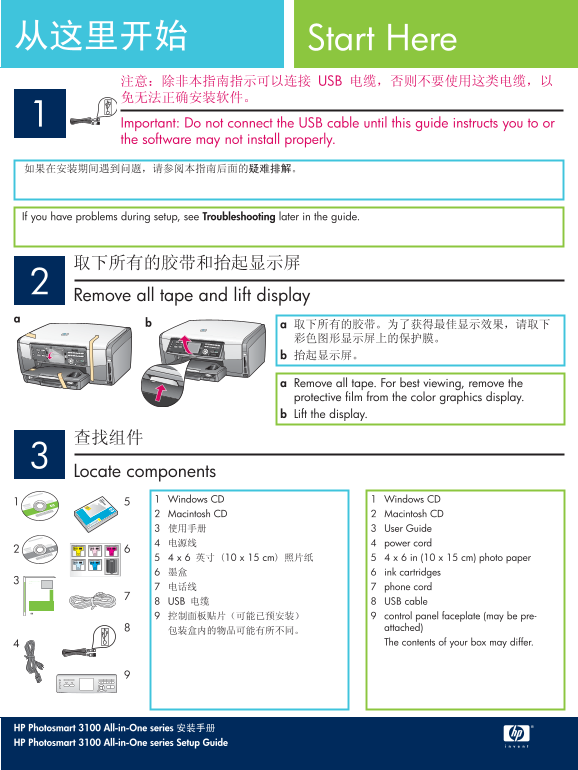
Start Here USB

Important: Do not connect the USB cable until this guide instructs you to or the software may not install properly.

If you have problems during setup, see Troubleshooting later in the guide.

Remove all tape and lift display

a Remove all tape. For best viewing, remove the protective fi lm from the color graphics display. b Lift the display.

Locate components

1 Windows CD 1 Windows CD 2 Macintosh CD 2 Macintosh CD

3 User Guide 4 power cord

4 x 6 10 x 15 cm 5 4 x 6 in (10 x 15 cm) photo paper

6 ink cartridges

HP Photosmart 2600/2700 series all-in-one User Guide

7 phone cord

8 USB 8 USB cable

9 control panel faceplate (may be pre- attached) The contents of your box may differ.

HP Photosmart 3100 All-in-One series HP Photosmart 3100 All-in-One series Setup Guide

Page Summary Contents For HP Photosmart 3100 Series All-in-One Printer Setup Brochure

Page 1 Start Here USB Important: Do not connect the USB cable until this guide instructs you to or the software may not install properly. If you have problems during setup, see Troubleshooting later in the g...
Page 2 Attach the control panel faceplate (if not attached) a Lift the lid. b Position the control panel faceplate over the buttons on the device. c Press down fi rmly on all edges of the overlay to secure i...
Page 3 Load paper trays Main tray: Load plain white paper in the bottom paper tray. Plain paper is needed for alignment. Photo paper tray: 4 x 6 10 x15 cm Load the 4 x 6 in (10 x15 cm) photo paper with the g...
Page 4 Connect the power cord Important : Do not connect the USB cable until instructed later in this guide. Connect the supplied phone cord (1-LINE) Connect one end of the supplied phone cord to the phone p...
Page 5 Press the On button and configure b OK a After you press the On button, the blue light fl ashes, and then becomes solid. This may take up to a minute. b Wait for the language prompt before continuing....
Page 6 Lift latches inside of the device a Squeeze the bottom of each latch to release it, and then lift the latch. b Lift all six latches. Insert all six ink cartridges Match the color and pattern of the in...
Page 7 Close the access door and follow the prompts a After you close the access door, a prompt appears to load plain white paper. Make sure paper is loaded, and then HP All-in-One press OK to start the proc...
Page 8 Insert the correct CD Windows Macintosh a HP All-in-One Windows CD a HP All-in-One Macintosh CD Macintosh Users: a Locate the HP All-in-One Macintosh CD. b Continue to the next page. Windows Users: a ...
Page 9 USB Connect the USB cable Macintosh a USB USB Macintosh Users: a Connect the USB cable from your computer to the USB port on the back of the device. Windows HP All-in-One Windows Users: a Follow the o...
Page 10 Connect the USB cable continued Macintosh b “HP All-in-One Installer” “Setup Assistant” Macintosh Users: b Double-click the HP All-in-One Installer icon. If you do not see this screen, see Troubleshoo...
Page 11 USB HP All-in-One Windows CD Microsoft USB HP All-in-One Windows CD HP All-in-One USB USB © Copyright 2005 Hewlett-Packard Development Company, L.P. Printed in []. Printed in [].
Page 12 Troubleshooting Q5831-90175 Problem: A Paper Jam message appears. Action: Remove the back access door, and then gently pull out any paper. Turn the device off, and then on. Load the paper again. Probl...

Manual Details

Brand HP
Pages 12
File Size 1.50 MB
Published June 15, 2026
5 views

Enter the captcha to get the download link:

captcha

Frequently Asked Questions

What is the first step after unboxing the device?

First, remove all protective tape and lift the display to get the best viewing experience.

How do I attach the optional control panel faceplate?

Lift the lid, position the faceplate over the buttons, and press down firmly on all edges to secure it, ensuring no buttons are blocked.

What is needed for plain white paper?""The bottom paper tray requires plain white paper for proper alignment.

-

When should I connect the USB cable?

Do not connect the USB cable until instructed later in this guide, otherwise, software may fail to install properly.