# A B C D E F G H I J K L M N O P Q R S T U V W X Y Z

HP Photosmart C4380 All-in-One Printer Series Setup Guide

Summary

This comprehensive guide walks new users through setting up their HP Photosmart C4380 All-in-One printer. It covers everything from initial unboxing and connecting power to loading ink cartridges and paper supplies. Users will learn how to successfully connect the device to a network, troubleshoot common wireless connectivity issues (including 2.4GHz interference), and run necessary calibration tests for hassle-free printing right out of the box.
📄 Preview PAGE OF 16

Page 1 Text Content

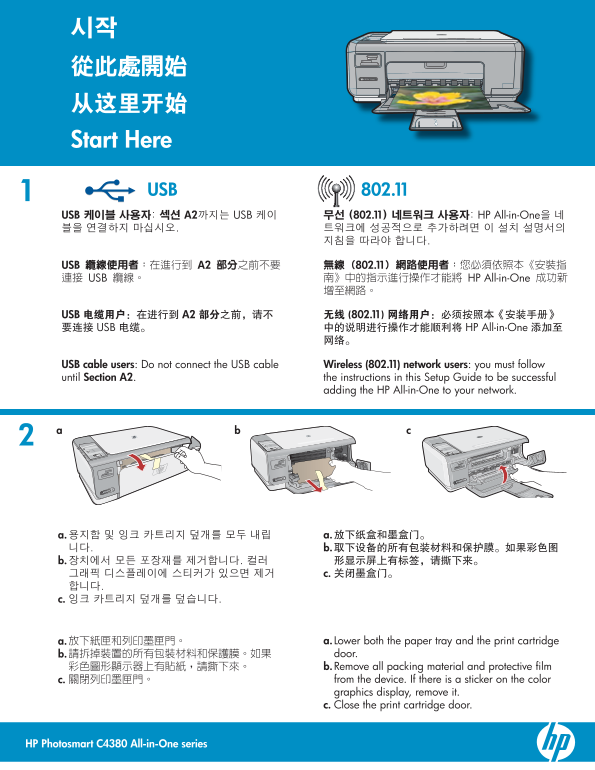
시작 從此處開始 从这里开始 Start Here

USB 802.11

USB 케이블 사용자 : 섹션 A2 까지는 USB 케이 무선 (802.11) 네트워크 사용자 : HP All-in-One을 네 블을 연결하지 마십시오. 트워크에 성공적으로 추가하려면 이 설치 설명서의

USB 纜線使用者 :在進行到 A2 部分 之前不要 無線 (802.11) 網路使用者 :您必須依照本《安裝指 連接 USB 纜線。 南》中的指示進行操作才能將 HP All-in-One 成功新

USB 电缆用户 :在进行到 A2 部分 之前,请不 无线 (802.11) 网络用户 :必须按照本《安装手册》 要连接 USB 电缆。 中的说明进行操作才能顺利将 HP All-in-One 添加至

USB cable users : Do not connect the USB cable Wireless (802.11) network users : you must follow until Section A2 . the instructions in this Setup Guide to be successful

adding the HP All-in-One to your network.

a. 放下紙匣和列印墨匣門。 a. Lower both the paper tray and the print cartridge b. 請拆掉裝置的所有包裝材料和保護膜。如果 door. 彩色圖形顯示器上有貼紙,請撕下來。 b. Remove all packing material and protective fi lm c. 關閉列印墨匣門。 from the device. If there is a sticker on the color graphics display, remove it. c. Close the print cartridge door.

HP Photosmart C4380 All-in-One series

Page Summary Contents For HP Photosmart C4380 All-in-One Printer Series Setup Guide

Page 1 시작 從此處開始 从这里开始 Start Here USB 802.11 USB 케이블 사용자 : 섹션 A2 까지는 USB 케이 무선 (802.11) 네트워크 사용자 : HP All-in-One을 네 블을 연결하지 마십시오. 트워크에 성공적으로 추가하려면 이 설치 설명서의 USB 纜線使用者 :在進行到 A2 部分 之前不要 無線 (802.11) 網路使用者 :您必須依照...
Page 2 HP Photosmart C4380 series 상자의 내용물을 확인합니다. 상자의 내용물이 다 를 수 있습니다. *포함되어 있을 수 있습니다. Basics Guide Verify the box contents. The contents of your box may differ. *May be included a. 전원 코드와 어댑터를 연결합니다. b. 버튼...
Page 3 Open the print cartridge door. Make sure the print carriage moves to the right. If it does not move to the right, turn the device off, then turn it back on again. IMPORTANT: The device must be turned ...
Page 4 a. HP 로고를 위쪽으로 오게 하여 카트리지를 잡습 니다. b. 3색 카트리지를 왼쪽 카트리지 슬롯 에 끼우고 검 정 카트리지를 오른쪽 카트리지 슬롯 에 끼웁니 다. c. 카트리지를 슬롯 안으로 견고히 밀어 넣어 제자 리에 장착 합니다. d. 잉크 카트리지 덮개를 덮습니다. e. 메시지가 표시되면 OK(확인) 를 눌러 정품 HP 잉 크 카트리지 설치를 승...
Page 5 a. 잉크 카트리지 덮개를 덮습니다. a. 关闭墨盒门。 중요 : 용지함에 용지를 넣었는지 확인한 다 注意 :确保已在纸盒中放入纸张,然后等待几分 음, 정렬 페이지가 인쇄될 때까지 몇 분 동 钟,直到打印完成校准页。 안 기다립니다. b. 打开盖子。将校准页顶部正面朝下放在玻璃板的 b. 덮개를 들어올립니다. 정렬 페이지의 윗 부 右前角。盖上盖子。 분이 유리의 앞쪽 오른...
Page 6 A1 - USB Mac: Windows: a. a. 컴퓨터의 전원을 켜고 필요한 경우 로그인한 USB 케이블을 HP All-in-One의 뒷면 포 후 바탕 화면이 나타날 때까지 기다립니다. 트와 컴퓨터의 USB 포트에 차례로 연결 녹색 CD를 넣고 화면의 지침에 따릅니다. 합니다. 중요: 시작 화면이 나타나지 않으면 내 컴 퓨터 , HP 로고가 있는 CD-...
Page 7 A2 - USB Mac: Windows: b. USB 연결 메시지가 나타나면 USB 케이블을 b. 녹색 CD를 넣습니다. HP All-in-One뒷면의 포트와 컴퓨터의 USB 포 c. 바탕 화면에서 HP Photosmart CD 아이콘 트에 차례로 연결합니다. 을 두 번 클릭합니다. c. 화면의 지시에 따라 소프트웨어 설치를 완료합 d. HP Install...
Page 8 Mac: Windows: a. USB 케이블을 HP All-in-One의 뒷면 포트 와 컴퓨터의 USB 포트에 차례로 연결합니 다. b. CD-ROM을 넣습니다. c. CD-ROM을 넣습니다. HP 로고가 있는 CD-ROM 아이콘 및 d. HP Photosmart CD 아이콘을 두 번 클릭합 setup.exe 를 차례로 두 번씩 누릅니다. e. HP Ins...
Page 9 B2 - 802.11 Windows: Mac: d. 연결 유형 화면에서, 반드시 네트워크를 통하여 g. Select Device(장치 선택) 화면이 나타나면, 선택해야 합니다. 장치를 선택한 다음 Continue(계속) 를 클릭 e. 메시지가 표시되면, 제공된 USB 케이블을 사용 합니다. 하여 HP All-in-One을 컴퓨터에 연결합니다. 소프트웨어 설...
Page 10 B3 - 802.11 Windows: Mac: g. Wireless Network Setup (무선 네트워크 설정) k. Wireless Network Setup(무선 네트워크 설 화면에서, 해당 무선 네트워크를 선택하고 정) 화면이 나타나면, 해당 무선 네트워크를 Next(다음) 를 클릭합니다. 선택하고 Continue(계속) 를 클릭합니다. 네트워크 보...
Page 11 B4 - 802.11 Windows/Mac: a. 네트워크에 별도의 컴퓨터가 있으면, 각 컴퓨터 a. 如果您的网络上存在其他计算机,则在每台计 마다 HP All-in-One 소프트웨어를 설치합니다. 算机上都安装 HP All-in-One 软件。 화면의 지시에 따릅니다. 연결 유형의 선택은 按照屏幕上的说明进行操作。请务必要选择网 반드시 네트워크와 HP All-in-...
Page 12 기능 탐색 浏览功能 功能瀏覽 Explore the features 이제 HP Photosmart 소프트웨어 프로그램이 您的 HP Photosmart 软件程序已经安装到计算机 컴퓨터에 설치되었으므로 HP All-in-One에서 上,现在您就可以尝试使用 HP All-in-One 上的一些 몇 가지 기능을 사용해 볼 수 있습니다. 功能了。 您的電腦現在已安裝 HP Ph...
Page 13 Print 9/9 c. 카메라의 메모리 카드를 해당 메모리 카드 c. 将相机中的存储卡插入到适当的存储卡插槽中。 슬롯에 끼웁니다. 存储卡上的最后一张照片会出现在显示屏上。 카드의 마지막 사진이 디스플레이에 나타납 d. 按箭头按钮查看所需的照片,然后按 OK 显示所选 니다. 的照片。 d. 화살표 버튼을 눌러 원하는 사진을 본 다음 e. 按“ 打印 ”打印该照片。 OK (...
Page 14 www.hp.com/support 문제: (Windows만 해당) USB 케이블을 연결하라는 메시지가 화면에 표시되지 않습니다. 해결: 모든 화면을 취소합니다. 녹색 HP All-in-One CD를 꺼냈다가 다 시 넣습니다. 섹션 A 를 참조하십시오. 問題: (僅適用 Windows) 沒有看見螢幕提示您連接 USB 纜線。 動作: 取消所有畫面。取出綠色 HP Al...
Page 15 네트워크 문제 해결 网络疑难排解 網路疑難排解 Network Troubleshooting www.hp.com/support 문제: 소프트웨어 설치 중에, Printer Not Found(프린터를 찾지 못하였습니다) 라는 오류 메시지가 나타납니 다. 해결: Wireless Network Test Report(무선 네트워크 시험 보고서) 를 인쇄합니다. 이 보고...
Page 16 www.hp.com/support 문제: HP All-in-One을 네트워크에 연결할 수 없습니다. 해결: HP All-in-One과 무선 라우터 사이에 신호가 약할 수 있습니다. HP All-in-One을 무선 라우터에 가급적 가까이 이동시키고 벽이나 대형 금속 캐비닛 같은 장애물을 치웁니다. HP All-in-One의 연결을 방해하는 다른 장치들의 간섭...

Manual Details

Brand HP
Pages 16
File Size 3.78 MB
Published June 17, 2026
7 views

Enter the captcha to get the download link:

captcha

Frequently Asked Questions

Should I connect the USB cable immediately when setting up the printer?

No. Do not connect the USB cable until following all instructions in this Setup Guide, specifically up to Section A2.

What do I do if my HP All-in-One cannot connect to the network?

Move the device closer to the wireless router and avoid obstructions like walls or large metal cabinets. Also, reset the wireless router by unplugging it for 30 seconds.

How should I handle ink cartridges during installation?

Remember to remove all protective tape from both cartridges, making sure never to touch the copper-colored contacts or reapply any tape.

What steps follow loading plain white paper in the tray?

After loading the paper, wait a few minutes for a calibration page to print automatically. Then, place that printed page back onto the scanner glass.

Besides weak signals, what causes wireless connectivity issues?

Any device using 2.4GHz frequencies, including microwaves, can cause interference and should not be used during the setup process.