# A B C D E F G H I J K L M N O P Q R S T U V W X Y Z

HP Photosmart C6300 Series Setup Guide

Summary

The comprehensive guide for your HP Photosmart C6300 All-in-One printer provides step-by-step instructions for setup, making it ideal for home photographers and users. This manual covers everything required to get started, including initial assembly, proper installation of ink cartridges and printheads, and loading different types of paper. It details multiple connection options—via USB cable, Ethernet (wired), or 802.11 (wireless)—along with software setup procedures and advanced features for printing photos directly from your computer or memory card.
📄 Preview PAGE OF 16

Page 1 Text Content

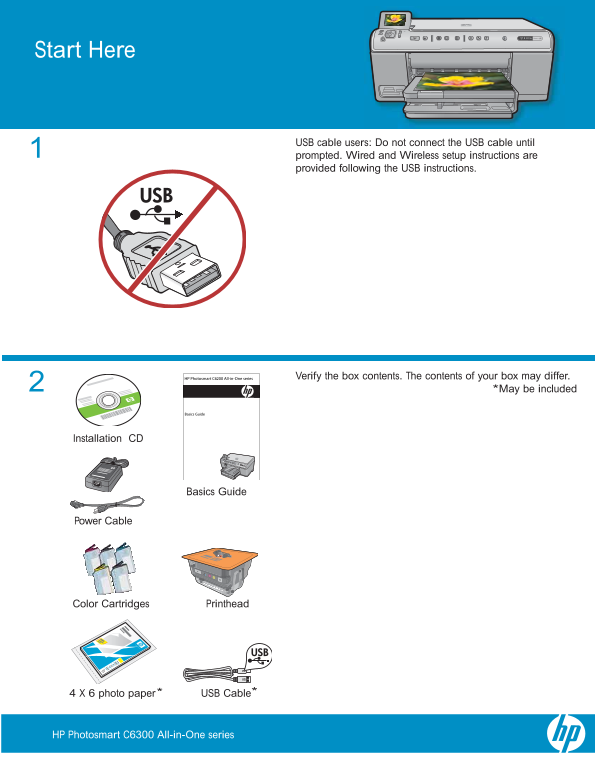
Start Here

USB cable users : Do not connect the USB cable until prompted. Wired and Wireless setup instructions are provided following the USB instructions.

Verify the box contents. The contents of your box may differ.

*May be included

Installation CD

Basics Guide

Power Cable

Color Cartridges Printhead

4 X 6 photo paper USB Cable

HP Photosmart C6300 All-in-One series

Page Summary Contents For HP Photosmart C6300 Series Setup Guide

Page 1 Start Here USB cable users : Do not connect the USB cable until prompted. Wired and Wireless setup instructions are provided following the USB instructions. Verify the box contents. The contents of yo...
Page 2 a. Remove all tape from the front and back of the device. Adjust the display and remove its protective fi lm. b. Open the device and remove all the packaging materials from inside the device. 2 • HP P...
Page 3 Connect the power cord and adapter. a. Press to turn on the HP All-in-One. b. If prompted, select your language and country/region. c. HP Photosmart C6300 All-in-One series • 3
Page 4 Open the ink cartridge access door. a. Carriage latch Firmly raise the gray latch, as shown. b. c. Remove the printhead from the packaging. Do not touch the copper colored contacts. Do not scratch the...
Page 5 IMPORTANT: You must complete step 5a before installing ink 5b cartridges. Remove the plastic wrap by pulling the orange tab. a. Twist the orange cap to snap it off. b. c. Turn the ink cartridge over, ...
Page 6 Lift the output tray. a. b. Slide the paper-width c. Insert plain white paper d. Lower the output guide to the left. into the main tray and tray. adjust the paper guides. a. Lift the photo tray b. Loa...
Page 7 C - 802.11B - Ethernet A - USB Choose only ONE connection type (A - USB, B - Ethernet/Wired, or C - 802.11/Wireless) A - USB Use the instructions in Section A if you want to connect the HP All-in-One ...
Page 8 A - USB Mac: Windows: a. Turn on your computer, login if necessary, and then IMPORTANT : Purchase a USB cable separately if it is wait for the desktop to appear. Insert the green CD not included. and ...
Page 9 USB Troubleshooting www.hp.com/support Problem: (Windows) The Microsoft Add Hardware screen appears. Action: Cancel all screens. Unplug the USB cable, and then insert the green HP All-in-One CD. Refer...
Page 10 B - Ethernet a. Locate your Ethernet/network cable. b. Remove the yellow plug from the back of the device. c. Connect one end of the Ethernet/network cable to the Ethernet port on the back of the devi...
Page 11 C1 - 802.11 a. Locate and write down your wireless router settings: Network Name (also called SSID) :_________________________________________ WEP key/WPA Passphrase (if needed) :_____________________...
Page 12 e. Do one of the following: Press to highlight the name of the network that you wrote down earlier. If the network name that you wrote down does not appear in the list, you can enter it manually. Pres...
Page 13 D1 - Ethernet/ 802.11 Windows: Mac: a. Turn on your computer, login if necessary, and then a. Turn on your computer, login if necessary, and then wait for the desktop to appear. wait for the desktop t...
Page 14 D2 - Ethernet/ 802.11 Windows: d. Your fi rewall software may provide prompts warning you that HP software is attempting to access your network. You should respond so that access is “always” allowed. ...
Page 15 Network Troubleshooting www.hp.com/support Problem: After you run the Wireless Setup Wizard from the HP All-in-One control panel, the HP All-in-One cannot connect to the network. Action: You can print...
Page 16 Explore the features Now that your HP Photosmart software program is installed on your computer, you can try out one of the features on the HP All-in-One. Print a 4 x 6 inch photo Photo Menu Save Crea...

Manual Details

Brand HP
Pages 16
File Size 4.73 MB
Published June 17, 2026
5 views

Enter the captcha to get the download link:

captcha

Frequently Asked Questions

What step must be completed before installing ink cartridges?

You must complete the printhead installation process (Step 5a) before proceeding to install any ink cartridges.

How can I connect the printer if only wired or wireless options are available?

You can use an Ethernet cable connection (B) or set up a wireless (802.11 b or g) connection (C).

What should I do if I receive a WPA passphrase error during setup?

Ensure the passphrase is typed exactly as written, as these security keys are case sensitive and must be unique.

Which physical areas should I avoid touching during setup?

You must not touch the copper colored contacts or otherwise scratch any other surface on the printer.