HP Photosmart A520 Series Printer Setup Guide
Summary
Master the operation of your HP Photosmart A520 series printer with this comprehensive setup guide. This resource details everything you need to know, from initial power connection and language selection to best practices for printing high-quality photos. It walks new users through system setup, proper cartridge handling, basic functions like navigating images, and utilizing included photo software to produce beautiful prints. Essential reading for any owner new to the A520 series.
Page 1 Text Content
*Q8526-90027* 安裝指南 설치 설명서 安装手册 Setup Guide
*Q8526-90027* HP Photosmart A520 series 印表機 HP Photosmart A520 series 프린터 HP Photosmart A520 series 打印机 HP Photosmart A520 series printer Q8526-90027
從此處開始 시작 KO 从这里开始 ZHCN Start Here ENZHTW
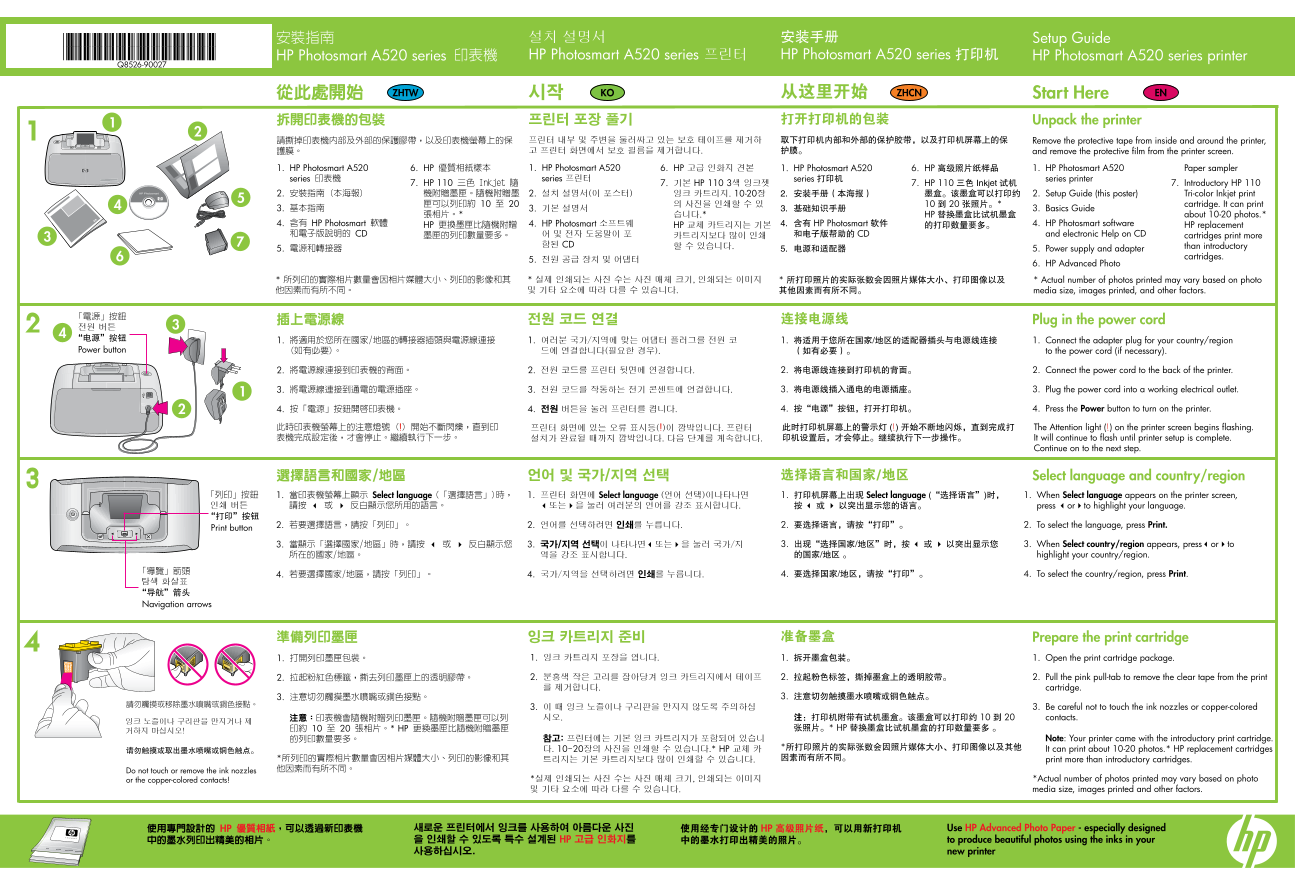
拆開印表機的包裝 프린터 포장 풀기 打开打印机的包装 Unpack the printer 請撕掉印表機內部及外部的保護膠帶,以及印表機螢幕上的保 프린터 내부 및 주변을 둘러싸고 있는 보호 테이프를 제거하 取下打印机内部和外部的保护胶带,以及打印机屏幕上的保 Remove the protective tape from inside and around the printer, 護膜。 고 프린터 화면에서 보호 필름을 제거합니다. 护膜。 and remove the protective film from the printer screen.
1. HP Photosmart A520 6. HP 優質相紙樣本 1. HP Photosmart A520 6. HP 고급 인화지 견본 1. HP Photosmart A520 6. HP 高级照片纸样品 1. HP Photosmart A520 Paper sampler series 印表機 series 프린터 series 打印机 series printer
7. HP 110 三色 Inkjet 隨 7. 기본 HP 110 3색 잉크젯 7. HP 110 三色 Inkjet 试机 7. Introductory HP 110
2. 安裝指南 (本海報) 機附贈墨匣。隨機附贈墨 2. 설치 설명서(이 포스터) 잉크 카트리지. 10-20장 2. 安装手册(本海报) 墨盒。该墨盒可以打印约 2. Setup Guide (this poster) Tri-color Inkjet print
匣可以列印約 10 至 20 의 사진을 인쇄할 수 있 10 到 20 张照片。* cartridge. It can print
3. 基本指南 3. 기본 설명서 3. 基础知识手册 3. Basics Guide
張相片。* 습니다.* HP 替换墨盒比试机墨盒 about 10-20 photos.*
4. 含有 HP Photosmart 軟體 HP 更換墨匣比隨機附贈 4. HP Photosmart 소프트웨 HP 교체 카트리지는 기본 4. 含有 HP Photosmart 软件 的打印数量要多。 4. HP Photosmart software HP replacement 和電子版說明的 CD 墨匣的列印數量要多。 어 및 전자 도움말이 포 카트리지보다 많이 인쇄 和电子版帮助的 CD and electronic Help on CD cartridges print more
함된 CD 할 수 있습니다. than introductory
5. 電源和轉接器 5. 电源和适配器 5. Power supply and adapter
cartridges.
6. HP Advanced Photo
* 所列印的實際相片數量會因相片媒體大小、列印的影像和其 * 실제 인쇄되는 사진 수는 사진 매체 크기, 인쇄되는 이미지 * 所打印照片的实际张数会因照片媒体大小、打印图像以及 * Actual number of photos printed may vary based on photo 他因素而有所不同。 및 기타 요소에 따라 다를 수 있습니다. 其他因素而有所不同。 media size, images printed, and other factors.
插上電源線 전원 코드 연결 连接电源线 Plug in the power cord
1. 將適用於您所在國家/地區的轉接器插頭與電源線連接 1. 여러분 국가/지역에 맞는 어댑터 플러그를 전원 코 1. 将适用于您所在国家/地区的适配器插头与电源线连接 1. Connect the adapter plug for your country/region
Power button (如有必要)。 드에 연결합니다(필요한 경우). (如有必要)。 to the power cord (if necessary).
2. 將電源線連接到印表機的背面。 2. 전원 코드를 프린터 뒷면에 연결합니다. 2. 将电源线连接到打印机的背面。 2. Connect the power cord to the back of the printer.
3. 將電源線連接到通電的電源插座。 3. 전원 코드를 작동하는 전기 콘센트에 연결합니다. 3. 将电源线插入通电的电源插座。 3. Plug the power cord into a working electrical outlet.
4. 按「電源」按鈕開啟印表機。 4. 전원 버튼을 눌러 프린터를 켭니다. 4. 按“电源”按钮,打开打印机。 4. Press the Power button to turn on the printer.
此時印表機螢幕上的注意燈號 ( ) 開始不斷閃爍,直到印 프린터 화면에 있는 오류 표시등( )이 깜박입니다. 프린터 此时打印机屏幕上的警示灯 ( ) 开始不断地闪烁,直到完成打 The Attention light ( ) on the printer screen begins flashing. 表機完成設定後,才會停止。繼續執行下一步。 설치가 완료될 때까지 깜박입니다. 다음 단계를 계속합니다. 印机设置后,才会停止。继续执行下一步操作。 It will continue to flash until printer setup is complete.
Continue on to the next step.
選擇語言和國家/地區 언어 및 국가/지역 선택 选择语言和国家/地区 Select language and country/region
「列印」按鈕 1. 當印表機螢幕上顯示 Select language (「選擇語言」)時, 1. 프린터 화면에 Select language (언어 선택)이나타나면 1. 打印机屏幕上出现 Select language (“选择语言”)时, 1. When Select language appears on the printer screen, 인쇄 버튼 請按 3 或 4 反白顯示您所用的語言。 3또는4을 눌러 여러분의 언어를 강조 표시합니다. 按 3 或 4 以突出显示您的语言。 press 3or4to highlight your language. “打印”按钮
2. 若要選擇語言,請按「列印」。 2. 언어를 선택하려면 인쇄를 누릅니다. 2. 要选择语言,请按“打印”。 2. To select the language, press Print.
Print button
3. 當顯示「選擇國家/地區」時,請按 3 或 4 反白顯示您 3. 국가/지역 선택이 나타나면3또는4을 눌러 국가/지 3. 出现“选择国家/地区”时,按 3 或 4 以突出显示您 3. When Select country/region appears, press3or4to
所在的國家/地區。 역을 강조 표시합니다. 的国家/地区 。 highlight your country/region.
4. 若要選擇國家/地區,請按「列印」。 4. 국가/지역을 선택하려면 인쇄를 누릅니다. 4. 要选择国家/地区,请按“打印”。 4. To select the country/region, press Print.
탐색 화살표 “导航”箭头 Navigation arrows
準備列印墨匣 잉크 카트리지 준비 准备墨盒 Prepare the print cartridge
1. 打開列印墨匣包裝。 1. 잉크 카트리지 포장을 엽니다. 1. 拆开墨盒包装。 1. Open the print cartridge package.
2. 拉起粉紅色標籤,撕去列印墨匣上的透明膠帶。 2. 분홍색 작은 고리를 잡아당겨 잉크 카트리지에서 테이프 2. 拉起粉色标签,撕掉墨盒上的透明胶带。 2. Pull the pink pull-tab to remove the clear tape from the print
를 제거합니다. cartridge.
3. 이 때 잉크 노즐이나 구리판을 만지지 않도록 주의하십 3. Be careful not to touch the ink nozzles or copper-colored
注意︰印表機會隨機附贈列印墨匣。隨機附贈墨匣可以列 시오. 注:打印机附带有试机墨盒。该墨盒可以打印约 10 到 20 contacts.
印約 10 至 20 張相片。* HP 更換墨匣比隨機附贈墨匣 张照片。* HP 替换墨盒比试机墨盒的打印数量要多 。
的列印數量要多。 참고: 프린터에는 기본 잉크 카트리지가 포함되어 있습니 Note: Your printer came with the introductory print cartridge.
다. 10-20장의 사진을 인쇄할 수 있습니다.* HP 교체 카 *所打印照片的实际张数会因照片媒体大小、打印图像以及其他 It can print about 10-20 photos.* HP replacement cartridges
*所列印的實際相片數量會因相片媒體大小、列印的影像和其 트리지는 기본 카트리지보다 많이 인쇄할 수 있습니다. 因素而有所不同。 print more than introductory cartridges.
Do not touch or remove the ink nozzles 他因素而有所不同。
or the copper-colored contacts! *실제 인쇄되는 사진 수는 사진 매체 크기, 인쇄되는 이미지 *Actual number of photos printed may vary based on photo 및 기타 요소에 따라 다를 수 있습니다. media size, images printed and other factors.
使用專門設計的 HP 優質相紙,可以透過新印表機 새로운 프린터에서 잉크를 사용하여 아름다운 사진 使用经专门设计的 HP 高级照片纸,可以用新打印机 Use HP Advanced Photo Paper - especially designed 中的墨水列印出精美的相片。 을 인쇄할 수 있도록 특수 설계된 HP 고급 인화지를 中的墨水打印出精美的照片。 to produce beautiful photos using the inks in your 사용하십시오. new printer
Page Summary Contents For HP Photosmart A520 Series Printer Setup Guide
Manual Details
| Brand | HP |
|---|---|
| Pages | 2 |
| File Size | 1.28 MB |
| Published | June 03, 2026 |
Enter the captcha to get the download link:

Frequently Asked Questions
What steps are required right after unpacking the printer?
First, remove all protective tape and film from inside and around the unit, including the screen. Then, connect power cords and press the Power button.
How should I safely handle the ink cartridges before use?
Open the package and remove the clear tape. Critically, be careful not to touch or remove the ink nozzles or any copper-colored contacts.
What if I need software or driver updates for this printer?
You can visit www.register.hp.com to register your product and receive free driver notices and technical support.
How is photo selection handled during printing from a memory card?
Use the 3 and 4 buttons to navigate through all images stored on the memory card, then press Print to print your first selected photo.