# A B C D E F G H I J K L M N O P Q R S T U V W X Y Z

HP DesignJet D5800 Production Printer - 60 Assembly Instructions for Printing Systems

Summary

The essential guide for setting up your high-performance HP DesignJet D5800 Production Printer. This manual covers complete, step-by-step assembly instructions for both the unit and its sturdy stand. It is designed for technical users and professionals needing to install large-format printing equipment efficiently. Follow along for detailed setup procedures and essential operation guidelines to ensure a flawless start to your specialized print workflow.
📄 Preview PAGE OF 31

Page 1 Text Content

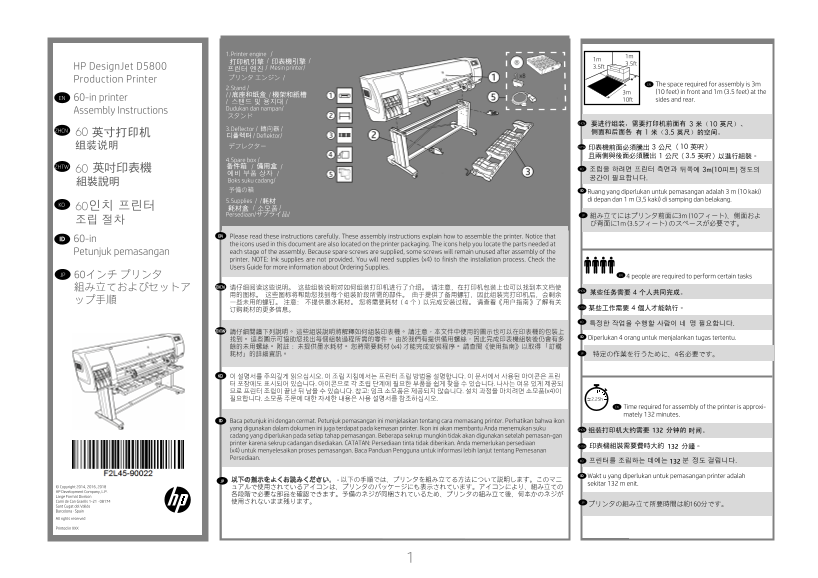
1. Printer engine /

3.5ft

HP Design Jet D5800 / Mesin printer/ 3.5ft

Production Printer プリンタ エンジン /

EN The space required for assembly is 3m

2. Stand /

3m (10 feet) in front and 1m (3.5 feet) at the

EN 60-in printer 10ft sides and rear.

Dudukan dan nampan/

Assembly Instructions

ZHCN 3. Deflector / 轉向器 / 디플렉터 / Deflektor/

デフレクター ZHTW

4. Spare box /

ZHTW KO

Boks suku cadang/ 予備の箱 Ruang yang diperlukan untuk pemasangan adalah 3 m (10 kaki)

5. Supplies / / di depan dan 1 m (3,5 kaki) di samping dan belakang.

Persediaan/サプライ品/ JP 組み立てにはプリンタ前面に 3m (10フィート)、側面およ び背面に 1m (3.5フィート) のスペースが必要です。

EN Please read these instructions carefully. These assembly instructions explain how to assemble the printer. Notice that

60-in

the icons used in this document are also located on the printer packaging. The icons help you locate the parts needed at Petunjuk pemasangan each stage of the assembly. Because spare screws are supplied, some screws will remain unused after assembly of the printer. NOTE: Ink supplies are not provided. You will need supplies (x4) to finish the installation process. Check the Users Guide for more information about Ordering Supplies.

JP 60インチ プリンタ EN 4 people are required to perform certain tasks

組み立ておよび セットア ZHCN 请仔细阅读这些说明。 这些组装说明对如何组装打印机进行了介绍。 请注意,在打印机包装上也可以找到本文档使

ZHTW 請仔細閱讀下列說明。 這些組裝說明將解釋如何組裝印表機。 請注意,本文件中使用的圖示也可以在印表機的包裝上

找到。 這些圖示可協助您找出每個組裝過程所需的零件。 由於我們有提供備用螺絲,因此完成印表機組裝後仍會有多 Diperlukan 4 orang untuk menjalankan tugas tertentu.

餘的未用螺絲。 附註: 未提供墨水耗材。 您將需要耗材 (x4) 才能完成安裝程序。 請查閱《使用指南》以取得「 訂購 耗材」的詳細資訊。 特定の作業を行うために、4名必要です。JP

KO 이 설명서를 주의깊게 읽으십시오. 이 조립 지침에서는 프린터 조립 방법을 설명합니다. 이 문서에서 사용된 아이콘은 프린 터 포장에도 표시되어 있습니다. 아이콘으로 각 조립 단계에 필요한 부품을 쉽게 찾을 수 있습니다. 나사는 여유 있게 제공되 므로 프린터 조립이 끝난 뒤 남을 수 있습니다. 참고: 잉크 소모품은 제공되지 않습니다. 설치 과정을 마치려면 소모품(x4)이 필요합니다. 소모품 주문에 대한 자세한 내용은 사용 설명서를 참조하십시오. 2.25h

EN Time required for assembly of the printer is approxi- mately 132 minutes.

Baca petunjuk ini dengan cermat. Petunjuk pemasangan ini menjelaskan tentang cara memasang printer. Perhatikan bahwa ikon yang digunakan dalam dokumen ini juga terdapat pada kemasan printer. Ikon ini akan membantu Anda menemukan suku ZHCN cadang yang diperlukan pada setiap tahap pemasangan. Beberapa sekrup mungkin tidak akan digunakan setelah pemasan-gan printer karena sekrup cadangan disediakan. CATATAN: Persediaan tinta tidak diberikan. Anda memerlukan persediaan

(x4) untuk menyelesaikan proses pemasangan. Baca Panduan Pengguna untuk informasi lebih lanjut tentang Pemesanan Persediaan.

Wakt u yang diperlukan untuk pemasangan printer adalah

JP 以下の指示をよくお読みください。 - 以下の手順では、プリンタを組み立てる方法について説明します。このマニ

sekitar 132 m enit.

© Copyright 2014, 2016, 2018 ュアルで使用されているアイコンは、プリンタのパッケージにも表示されています。アイコンにより、組み立ての HP Development Company, L.P.

Large Format Division 各段階で必要な部品を確認できます。予備のネジが同梱されているため、プリンタの組み立て後、何本かのネジが

Camí de Can Graells 1-21 · 08174 使用されないまま残ります。

Sant Cugat del Vallès プリンタの組み立て所要時間は約 160分です。JP

Barcelona · Spain All rights reserved

Printed in XXX

HP Development Company, L.P - Learning Products - Barcelona

Page Summary Contents For HP DesignJet D5800 Production Printer - 60 Assembly Instructions for Printing Systems

Page 1 1. Printer engine / 3.5ft HP Design Jet D5800 / Mesin printer/ 3.5ft Production Printer プリンタ エンジン / EN The space required for assembly is 3m 2. Stand / 3m (10 feet) in front and 1m (3.5 feet) at the E...
Page 2 EN Remove the packaging ZHCN ZHTW Lepaskan kemasan パッケージの開梱JP Carefully cut the strap around the boxes. Make Remove the boxes shown. EN sure that the boxes don’t fall when the strap is cut. ID Dengan ...
Page 3 Assemble the stand ID Memasang dudukan スタンドの組み立てJP EN Remove the first tray from the box shown. Lower the left side of the cross-brace onto the box Locate the bag of screws and the screwdriver provide...
Page 4 EN Remove the left leg from the box, and then remove the Lower the left leg onto the left side of the cross-brace. The Use four screws on the inside of the left leg to attach the Use two screws on the...
Page 5 Lower the right leg onto the right side of the cross-brace. Use four screws on the inside of the right leg to attach Use two screws on the outside of the right leg to attach Use four screws to attach ...
Page 6 EN Notice that there is anti-slip material around two of the Place a foot on the left leg. There are pins to help you Use four screws to attach the foot to the left leg. Tighten Position the other foo...
Page 7 EN Use four screws to attach the foot to the right leg. Roll the stand assembly into its upright position. Attach the left stand spacer to the top of the left leg. It Attach the right stand spacer to ...
Page 8 EN Attach the printer engine to the stand ZHCN ID Pasang mesin printer ke dudukan JP スタンドへのプリンタ エンジンの 取り付け Position the left and right leg covers on the front of the Remove the two packing pieces show...
Page 9 Lift the stand assembly onto the printer engine. The Use one screw to attach the right side of the stand to Use two screws to attach the left side of the stand to the Place the spare box and the comsu...
Page 10 Rotate the printer onto the spare box and the Rotate the printer until the back of the printer rests on Remove the pallet before lifting the printer to its Use the hand holds at the rear of the printe...
Page 11 EN Assemble the deflector ZHCN 组装导向器 ZHTW KO 터 조립 ID Memasang deflektor JP デフレクターを組み立てる Remove the two foam end-packs, and then remove the Remove the anti-slip material from the two rear wheels Use fo...
Page 12 At the back of the printer, place one bar with the label At the back of the printer, place the 2nd bar with the label IMPORTANT Move the printer to its final location and lock Remove the deflector fro...
Page 13 EN Unpack more components ZHCN ID Membuka kemasan komponen lain その他のコンポーネントの開梱JP Attach the deflector by inserting the left side into the left Attach the grounding cable to the metal plate installed R...
Page 14 Remove the packing tapes marked 1 to 7 from the Open the printer window, and then remove the packing Remove the packing tape (1), then remove the packing Plug the Gigabit Ethernet cable into the Gigab...
Page 15 EN Install the ink supplies ZHCN ZHTW Memasang persediaan tinta JP インク サプライ品の取り付け Pass the Gigabit Ethernet cable through the hook at the Plug the power cable into the rear of the printer, and then Tu...
Page 16 If the power light on the front panel remains o , press the Wait until this message appears on the front panel (~1 Wait until this message appears. The front panel guides To release the ink cartridge...
Page 17 Shake the ink cartridge vigorously for about 15 seconds. Place the ink cartridge in the ink cartridge drawer. The Push the ink cartridge drawer back into the printer until The printer “beeps” when the...
Page 18 Follow the same instructions to insert the other ink Open the printer window, and then remove the packing Remove the packing tape that is holding down the Pull up and release the blue latch on top of ...
Page 19 Remove the big yellow label that covers the setup Open the window. When the above question appears on the front panel of Open window and printhead cover to access printheads. EN purgers. Ensure Setup ...
Page 20 Lower the blue latch to close the printhead cover. Pull Select: Wait until this message appears on the front panel. Pull open the maintenance cartridge door, which is down to lock the blue latch on to...
Page 21 Remove the transparent shipping tray. PH Replacement. Warning: Replace printheads Wait until this message appears on the front panel Remove all the setup purgers. EN Insert the maintenance cartridge, ...
Page 22 EN Insert 2 printheads into the magenta slot. Remove the two protective covers on the new printhead. Lower the 2 printheads you are installing into their When both color printhead are properly inserte...
Page 23 EN Follow the printer instructions on the front panel in If a “Reseat” message appears on the front panel, check Close the carriage assembly cover. Make sure that the blue latch is correctly engaged, ...
Page 24 EN Load the paper ZHCN ZHTW Isikan kertas 用紙の取り付けJP EN Close the printer window. Wait until the Ready for paper message appears on the Select the altitude where the printer is located. To select front...
Page 25 EN Lift the spindle lock lever. Remove the spindle from the printer. Unlock and remove the blue hub from the left end of the Place a roll of paper in the middle of the de ector. spindle. Keep the spi...
Page 26 Make sure that the black hub on the right side of the The right hub of the spindle has two positions: one for Slide the blue hub onto the spindle. Make sure that the With the blue hub on the left, lif...
Page 27 From the front panel, select the paper icon and then Select Load roll and then press the OK button. Insert the lead-edge of the paper into the printer, above EN Confim the ype and length of the paper ...
Page 28 Macintosh* Windows** The printer automatically aligns the printheads using the On the front panel, select the paper type and paper Please do not try to stop the paper advance; it is loaded media, the ...
Page 29 EN ZHCN ZHTW KO Note for MAC & Windows: MAC 和 Windows MAC 和 Windows 的注意事項: Mac 및 Windows 참고: You must fist install the printer driver software on the 注意事项: 必须先在计算机上安装打印机驱动程序软 您必須先在電腦上安裝印表機驅動程式軟體。(...
Page 30 HP Development Company, L.P - Learning Products - Barcelona
Page 31 Legal notices © Copyright 2014, 2016 ,2018 HP Development Company, L.P. The information contained herein is subject to change without notice. The only warranties for HP products and services are set f...

Manual Details

Brand HP
Pages 31
File Size 10.93 MB
Published June 06, 2026
59 views

Enter the captcha to get the download link:

captcha

Frequently Asked Questions

How long is the approximate assembly time for the printer?

The assembly time is approximately 132 minutes.

What physical space is required around the assembled stand?

You need 3m at the front, and 1m on the side and rear of the unit.

Are consumables like ink supplies included in the box?

No, ink supplies are not provided; you will need to order four (x4) supplies.

What is recommended after physical assembly is complete?

You must first install the printer driver software on a computer connected to the Internet.