Dell AP-270-МNT-H2 Mounting Kit Installation Guide
Summary
This installation guide provides comprehensive documentation for the AP-270-MNT-H2 Mounting Kit Installation Guide The AP-270-MNT-H2 mounting kit supports. The document covers installation procedures. This documentation is intended for end users and system administrators, system installers and administrators. The manual provides detailed guidance to ensure proper operation and maintenance of the AP-270-MNT-H2 Mounting Kit Installation Guide The AP-270-MNT-H2 mounting kit supports. Users will find step-by-step instructions and technical details necessary for effective utilization of the product.
Page 1 Text Content
AP-270-MNT-H2 Mounting Kit
Installation Guide
The AP-270-MNT-H2 mounting kit supports multiple access point (AP) models. All installation images show the 277 AP.
Package Content AP-270-MNT-H2 Mounting Bracket x 1 M6x20 Screws x 2 Installation Guide (this document)
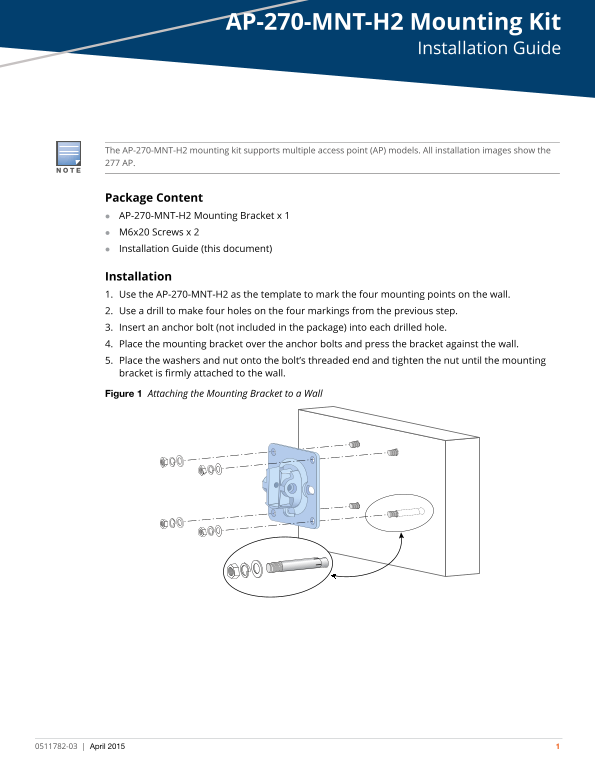
Installation 1. Use the AP-270-MNT-H2 as the template to mark the four mounting points on the wall. 2. Use a drill to make four holes on the four markings from the previous step. 3. Insert an anchor bolt (not included in the package) into each drilled hole. 4. Place the mounting bracket over the anchor bolts and press the bracket against the wall. 5. Place the washers and nut onto the bolt’s threaded end and tighten the nut until the mounting bracket is firmly attached to the wall.
Figure 1 Attaching the Mounting Bracket to a Wall
0511782-03 April 2015
Page Summary Contents For Dell AP-270-МNT-H2 Mounting Kit Installation Guide
Manual Details
| Brand | Dell |
|---|---|
| Pages | 2 |
| File Size | 310.51 KB |
| Published | June 16, 2026 |
Enter the captcha to get the download link:

Frequently Asked Questions
What items are included in the package?
It includes one Mounting Bracket, two M6x20 Screws, and the Installation Guide.
What tools are required for installation?
You need a drill, wall anchors (not included), washers, and a nut.
How is the AP secured to the bracket?
Slide the holder into the opening and use two M6x20 screws to fix it.