Panasonic WV-BP140 WV-BP142 WV-BP144 CCTV Cameras Owner's Manual User Guide
Summary
This comprehensive guide provides essential operating instructions, safety precautions, and mounting standards for professional CCTV Security Cameras. It details proper installation techniques, electrical guidelines, and maintenance protocols to ensure optimal camera performance and prevent misuse or damage. Designed for technicians, installers, and skilled users, this manual ensures safe handling, correct power connection, and reliable operation within challenging environments.
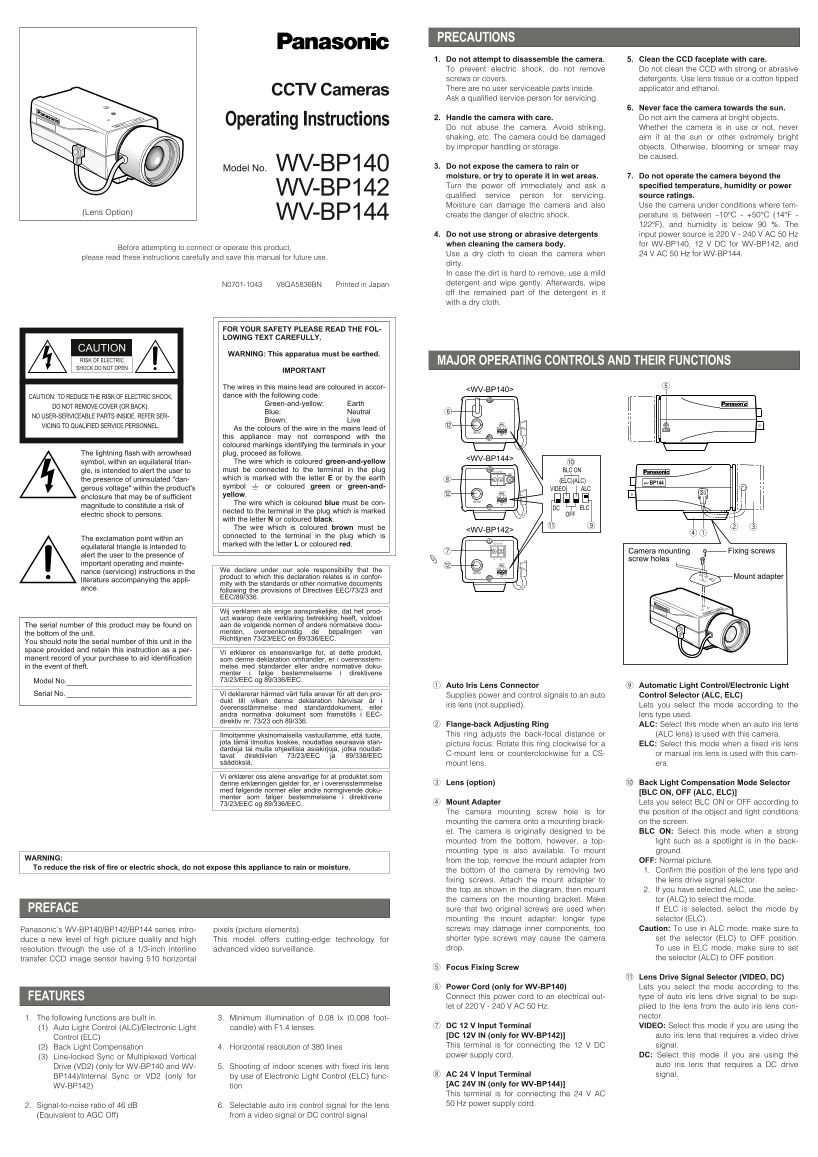
Page 1 Text Content
PRECAUTIONS 1. Do not attempt to disassemble the camera. 5. Clean the CCD faceplate with care. To prevent electric shock, do not remove Do not clean the CCD with strong or abrasive screws or covers. detergents. Use lens tissue or a cotton tipped There are no user serviceable parts inside. applicator and ethanol.
CCTV Cameras
Ask a qualified service person for servicing.
6. Never face the camera towards the sun.
2. Handle the camera with care. Do not aim the camera at bright objects.
Operating Instructionscs
Do not abuse the camera. Avoid striking, Whether the camera is in use or not, never shaking, etc. The camera could be damaged aim it at the sun or other extremely bright by improper handling or storage. objects. Otherwise, blooming or smear may
be caused.
WV-BP140 3. Do not expose the camera to rain or
Model No.
moisture, or try to operate it in wet areas. 7. Do not operate the camera beyond the Turn the power off immediately and ask a specified temperature, humidity or power
WV-BP142
qualified service person for servicing. source ratings. Moisture can damage the camera and also Use the camera under conditions where tem-
(Lens Option) WV-BP144
create the danger of electric shock. perature is between –10°C - +50°C (14°F -
122°F), and humidity is below 90 %. The
4. Do not use strong or abrasive detergents input power source is 220 V - 240 V AC 50 Hz when cleaning the camera body. for WV-BP140, 12 V DC for WV-BP142, and
Before attempting to connect or operate this product,
Use a dry cloth to clean the camera when 24 V AC 50 Hz for WV-BP144.
please read these instructions carefully and save this manual for future use.
dirty. In case the dirt is hard to remove, use a mild N0701-1043 V8QA5836BN Printed in Japan detergent and wipe gently. Afterwards, wipe off the remained part of the detergent in it with a dry cloth.
FOR YOUR SAFETY PLEASE READ THE FOL- LOWING TEXT CAREFULLY.
CAUTION
WARNING: This apparatus must be earthed.
RISK OF ELECTRIC MAJOR OPERATING CONTROLS AND THEIR FUNCTIONS SHOCK DO NOT OPEN
IMPORTANT
The wires in this mains lead are coloured in accor-
<WV-BP140>
CAUTION: TO REDUCE THE RISK OF ELECTRIC SHOCK, dance with the following code.
Green-and-yellow: Earth
DO NOT REMOVE COVER (OR BACK).
Blue: Neutral
NO USER-SERVICEABLE PARTS INSIDE. REFER SER-
Brown: Live BLC ON
VICING TO QUALIFIED SERVICE PERSONNEL. (ELC)(ALC) VIDEO ALC
As the colours of the wire in the mains lead of LOCK
VIDEO OUT DC ELC
this appliance may not correspond with the coloured markings identifying the terminals in your
The lightning flash with arrowhead plug, proceed as follows.
<WV-BP144>
symbol, within an equilateral trian- The wire which is coloured green-and-yellow gle, is intended to alert the user to must be connected to the terminal in the plug AC 24V IN BLC ON
the presence of uninsulated "dan- which is marked with the letter E or by the earth
(ELC)(ALC) WV–BP144
gerous voltage" within the product's symbol I or coloured green or green-and-
BLC ON VIDEO ALC
yellow. (ELC)(ALC) enclosure that may be of sufficient VIDEO ALC
VIDEO OUT DC ELC
The wire which is coloured blue must be con- OFF
magnitude to constitute a risk of
DC ELC
nected to the terminal in the plug which is marked
electric shock to persons. OFF
with the letter N or coloured black. The wire which is coloured brown must be
<WV-BP142>
connected to the terminal in the plug which is
The exclamation point within an
DC 12V IN
marked with the letter L or coloured red.
equilateral triangle is intended to
Fixing screws Camera mounting
alert the user to the presence of
screw holes
important operating and mainte- BLC ON (ELC)(ALC) VIDEO ALC
nance (servicing) instructions in the We declare under our sole responsibility that the
VIDEO OUT DC ELC
product to which this declaration relates is in confor- OFF Mount adapter
literature accompanying the appli-
mity with the standards or other normative documents
ance.
following the provisions of Directives EEC/73/23 and EEC/89/336.
Wij verklaren als enige aansprakelijke, dat het prod- cs
uct waarop deze verklaring betrekking heeft, voldoet The serial number of this product may be found on aan de volgende normen of andere normatieve docu- the bottom of the unit. menten, overeenkomstig de bepalingen van Richtlijnen 73/23/EEC en 89/336/EEC.
You should note the serial number of this unit in the space provided and retain this instruction as a per-
Vi erklærer os eneansvarlige for, at dette produkt,
manent record of your purchase to aid identification som denne deklaration omhandler, er i overensstem-
in the event of theft. melse med standarder eller andre normative doku- menter i følge bestemmelserne i direktivene Model No. 73/23/EEC og 89/336/EEC.
Auto Iris Lens Connector Automatic Light Control/Electronic Light
Serial No. Vi deklarerar härmed värt fulla ansvar för att den pro- Supplies power and control signals to an auto Control Selector (ALC, ELC)
dukt till vilken denna deklaration hänvisar är i
iris lens (not supplied). Lets you select the mode according to the
överensstämmelse med standarddokument, eller andra normativa dokument som framstölls i EEC- lens type used. direktiv nr. 73/23 och 89/336.
Flange-back Adjusting Ring ALC: Select this mode when an auto iris lens Ilmoitamme yksinomaisella vastuullamme, että tuote, This ring adjusts the back-focal distance or (ALC lens) is used with this camera.
jota tämä ilmoitus koskee, noudattaa seuraavia stan- picture focus. Rotate this ring clockwise for a ELC: Select this mode when a fixed iris lens dardeja tai muita ohjeellisia asiakirjoja, jotka noudat-
C-mount lens or counterclockwise for a CS- or manual iris lens is used with this cam-
tavat direktiivien 73/23/EEC ja 89/336/EEC säädöksiä. mount lens. era. Vi erklærer oss alene ansvarlige for at produktet som
denne erklæringen gjelder for, er i overensstemmelse Lens (option) !0 Back Light Compensation Mode Selector
med følgende normer eller andre normgivende doku-
[BLC ON, OFF (ALC, ELC)]
menter som følger bestemmelsene i direktivene
73/23/EEC og 89/336/EEC. Mount Adapter Lets you select BLC ON or OFF according to The camera mounting screw hole is for the position of the object and light conditions mounting the camera onto a mounting brack- on the screen. et. The camera is originally designed to be BLC ON: Select this mode when a strong mounted from the bottom, however, a top- light such as a spotlight is in the back- mounting type is also available. To mount ground.
WARNING:
from the top, remove the mount adapter from OFF: Normal picture.
To reduce the risk of fire or electric shock, do not expose this appliance to rain or moisture.
the bottom of the camera by removing two 1. Confirm the position of the lens type and fixing screws. Attach the mount adapter to the lens drive signal selector. the top as shown in the diagram, then mount 2. If you have selected ALC, use the selec- the camera on the mounting bracket. Make tor (ALC) to select the mode. PREFACE sure that two original screws are used when If ELC is selected, select the mode by mounting the mount adapter; longer type selector (ELC). Panasonic’s WV-BP140/BP142/BP144 series intro- pixels (picture elements). screws may damage inner components, too Caution: To use in ALC mode, make sure to duce a new level of high picture quality and high This model offers cutting-edge technology for shorter type screws may cause the camera set the selector (ELC) to OFF position. resolution through the use of a 1/3-inch interline advanced video surveillance. drop. To use in ELC mode, make sure to set transfer CCD image sensor having 510 horizontal the selector (ALC) to OFF position.
Focus Fixing Screw
!1 Lens Drive Signal Selector (VIDEO, DC) Power Cord (only for WV-BP140) Lets you select the mode according to the FEATURES Connect this power cord to an electrical out- type of auto iris lens drive signal to be sup- let of 220 V - 240 V AC 50 Hz. plied to the lens from the auto iris lens con- 1. The following functions are built in. 3. Minimum illumination of 0.08 lx (0.008 foot- nector. (1) Auto Light Control (ALC)/Electronic Light candle) with F1.4 lenses DC 12 V Input Terminal VIDEO: Select this mode if you are using the Control (ELC) [DC 12V IN (only for WV-BP142)] auto iris lens that requires a video drive (2) Back Light Compensation 4. Horizontal resolution of 380 lines This terminal is for connecting the 12 V DC signal. (3) Line-locked Sync or Multiplexed Vertical power supply cord. DC: Select this mode if you are using the Drive (VD2) (only for WV-BP140 and WV- 5. Shooting of indoor scenes with fixed iris lens auto iris lens that requires a DC drive BP144)/Internal Sync or VD2 (only for by use of Electronic Light Control (ELC) func- AC 24 V Input Terminal signal.
WV-BP142) tion [AC 24V IN (only for WV-BP144)] This terminal is for connecting the 24 V AC 2. Signal-to-noise ratio of 46 d B 6. Selectable auto iris control signal for the lens 50 Hz power supply cord.
(Equivalent to AGC Off) from a video signal or DC control signal
Page Summary Contents For Panasonic WV-BP140 WV-BP142 WV-BP144 CCTV Cameras Owner's Manual User Guide
Manual Details
| Brand | Panasonic |
|---|---|
| Pages | 2 |
| File Size | 112.36 KB |
| Published | June 01, 2026 |
Enter the captcha to get the download link:

Frequently Asked Questions
What is the recommended mounting type for the lens?
The lens mount should be a C-mount or CS-mount.
How do I connect the power source for all models?
For WV-BP144, connect to 24 V AC 50 Hz. For WV-BP140, use 12 V DC. For WV-BP142, use 24 V AC 50 Hz.
What are the operating temperature and humidity limits?
Temperature must be between –10°C to +50°C (14°F - 122°F), and humidity must be below 90%.
Is cleaning the CCD faceplate safe?
Use lens tissue or a cotton tipped applicator with ethanol. Do not use strong, abrasive detergents.