HP Deskjet D2400 Series Printer Setup Guide
Summary
Getting started with your HP Deskjet D2400 series printer is simple thanks to this comprehensive setup manual. This guide offers clear, step-by-step instructions for new users, covering everything from safely unboxing and loading ink cartridges and paper, to physically connecting the unit via USB. Furthermore, it provides detailed technical walkthroughs for installing all necessary HP software on both Windows 10 and Macintosh operating systems, ensuring a smooth printing experience right out of the box.
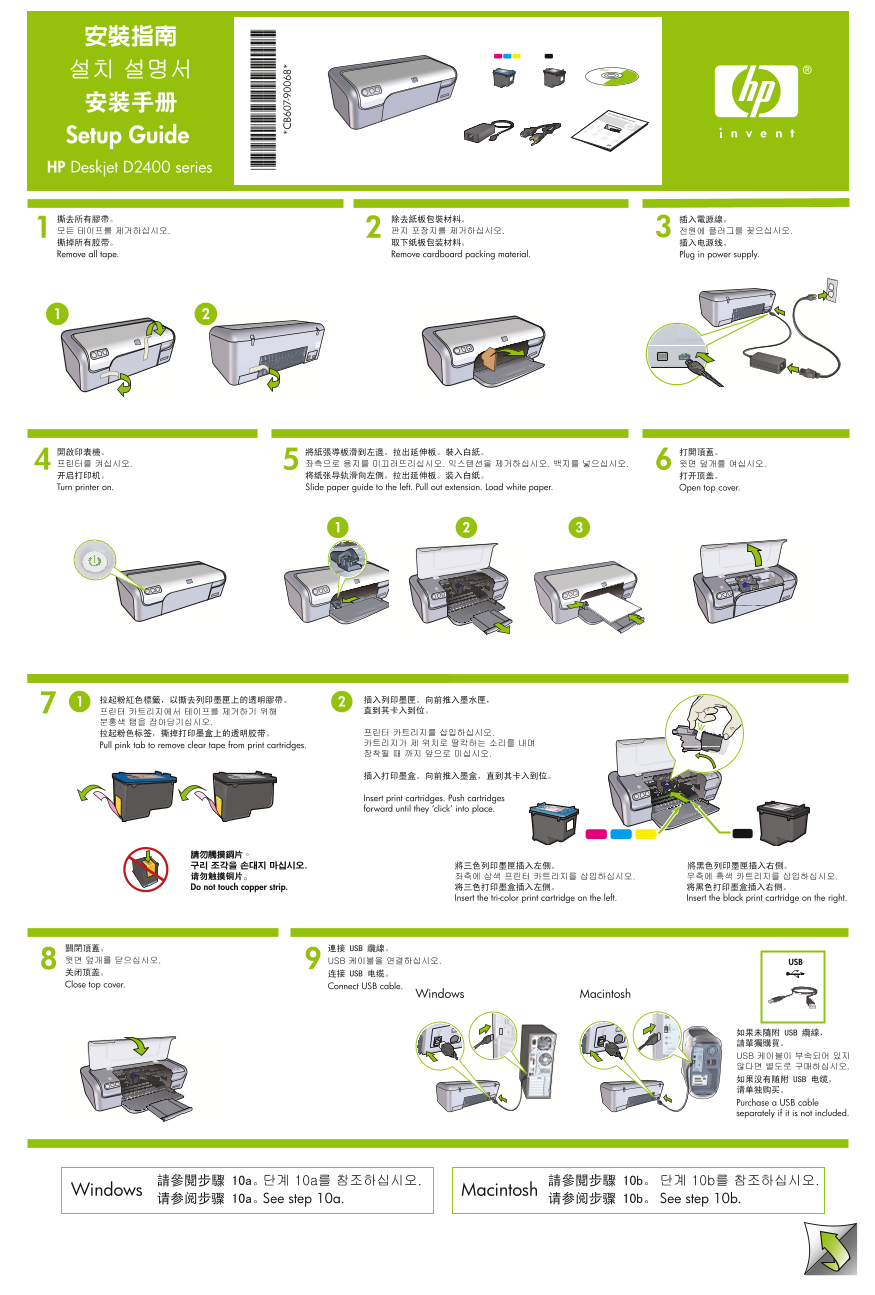
Page 1 Text Content
Setup Guide HP Deskjet D2400 series
Remove all tape. Remove cardboard packing material. Plug in power supply.
Turn printer on. Slide paper guide to the left. Pull out extension. Load white paper. Open top cover.
Pull pink tab to remove clear tape from print cartridges.
Insert print cartridges. Push cartridges forward until they ‘click‘ into place.
Do not touch copper strip.
Insert the tri-color print cartridge on the left. Insert the black print cartridge on the right.
Close top cover. Connect USB cable.
Windows Macintosh
Purchase a USB cable separately if it is not included.
Windows Macintosh
See step 10a. See step 10b.
Page Summary Contents For HP Deskjet D2400 Series Printer Setup Guide
Manual Details
| Brand | HP |
|---|---|
| Pages | 2 |
| File Size | 2.69 MB |
| Published | June 18, 2026 |
Enter the captcha to get the download link:

Frequently Asked Questions
Where should I insert the black and tri-color print cartridges?
Insert the tri-color print cartridge on the left, and insert the black print cartridge on the right.
What is required after completing the entire printer installation process?
After all installations are finished, you must restart the computer to finalize setup and ensure proper function.
How do I troubleshoot a Windows software failure due to CD-ROM errors?
Remove the CD and disconnect the USB cable. Restart the computer, temporarily disable any firewalls or anti-virus programs, then reattempt the installation.