HP Deskjet D4300 Series Printer Setup Guide
Summary
Get comprehensive setup instructions for your HP Deskjet D4300 series printer. This guide walks new users through every step, from unboxing and installing ink cartridges to physically connecting power and USB cables. It provides detailed procedures for loading paper, assembling the hardware, and installing necessary software on both Windows 10 and Mac computers, ensuring a smooth start to digital printing.
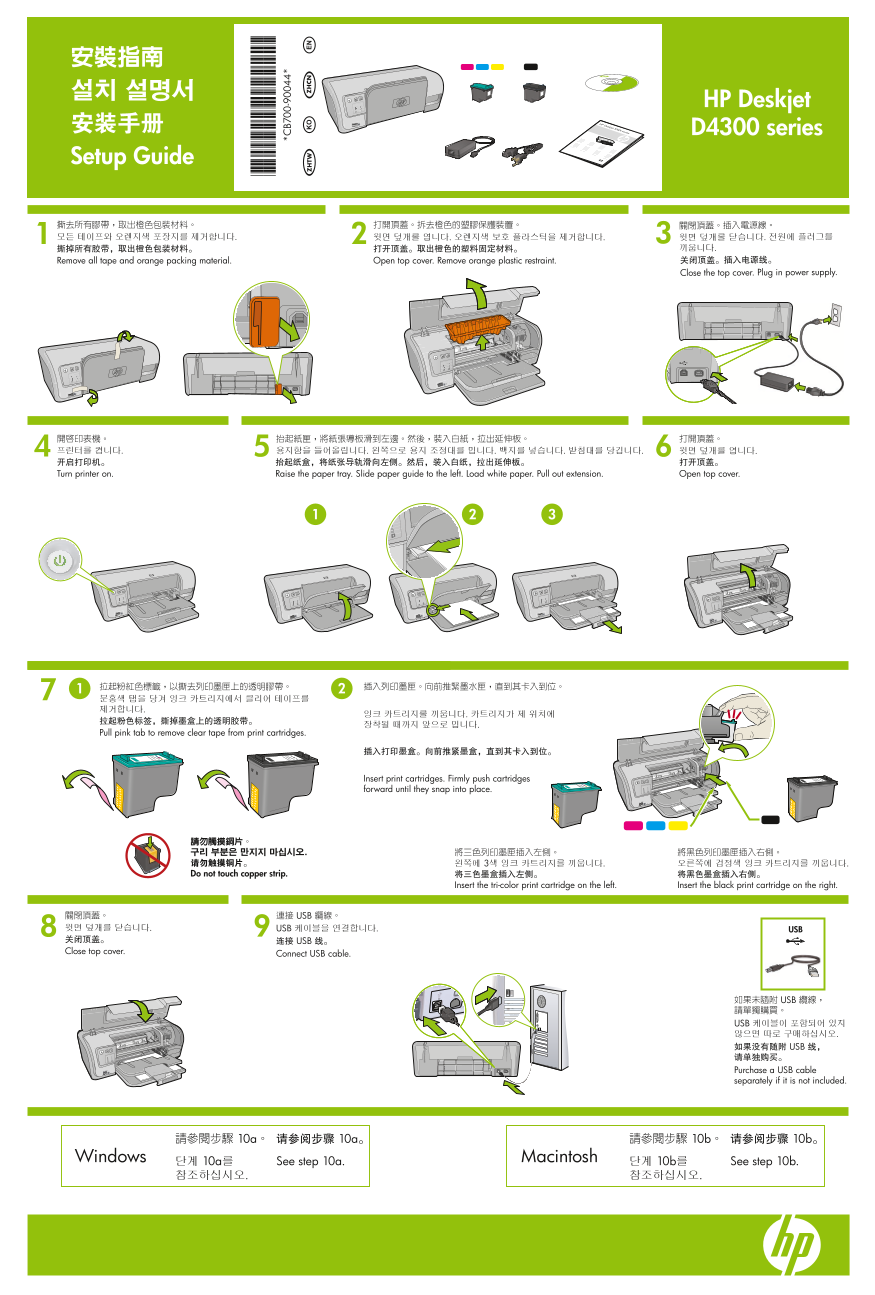
Page 1 Text Content
安裝指南 설치 설명서 HP Deskjet 安装手册 D4300 series Setup Guide
撕掉所有胶带,取出橙色包装材料。 打开顶盖。取出橙色的塑料固定材料。 끼웁니다. Remove all tape and orange packing material. Open top cover. Remove orange plastic restraint. 关闭顶盖。插入电源线。 Close the top cover. Plug in power supply.
프린터를 켭니다. 윗면 덮개를 엽니다.용지함을 들어올립니다. 왼쪽으로 용지 조정대를 밉니다. 백지를 넣습니다. 받침대를 당깁니다. 开启打印机。 打开顶盖。抬起纸盒,将纸张导轨滑向左侧。然后,装入白纸,拉出延伸板。 Turn printer on. Open top cover.Raise the paper tray. Slide paper guide to the left. Load white paper. Pull out extension.
Pull pink tab to remove clear tape from print cartridges.
Insert print cartridges. Firmly push cartridges forward until they snap into place.
請勿觸摸銅片。 구리 부분은 만지지 마십시오. 將三色列印墨匣插入左側。 將黑色列印墨匣插入右側。 请勿触摸铜片。 왼쪽에 3색 잉크 카트리지를 끼웁니다. 오른쪽에 검정색 잉크 카트리지를 끼웁니다. Do not touch copper strip. 将三色墨盒插入左侧。 将黑色墨盒插入右侧。
Insert the tri-color print cartridge on the left. Insert the black print cartridge on the right.
關閉頂蓋。 連接 USB 纜線。 윗면 덮개를 닫습니다. USB 케이블을 연결합니다. USB 关闭顶盖。 连接 USB 线。 Close top cover.
Connect USB cable.
如果未隨附 USB 纜線, 請單獨購買。 USB 케이블이 포함되어 있지 않으면 따로 구매하십시오. 如果没有随附 USB 线, 请单独购买。 Purchase a USB cable separately if it is not included.
Windows Macintosh
단계 10a를 See step 10a. 단계 10b를 See step 10b. 참조하십시오. 참조하십시오.
Page Summary Contents For HP Deskjet D4300 Series Printer Setup Guide
Manual Details
| Brand | HP |
|---|---|
| Pages | 2 |
| File Size | 9.35 MB |
| Published | June 18, 2026 |
Enter the captcha to get the download link:
