Toshiba IK-WB21A Quick Guide
Summary
This quick guide is essential reading for installation and setup of the TOSHIBA IK‑WB21A Network Camera system. It provides step-by-step instructions covering initial connection to a PC, obtaining IP addresses, and configuring user credentials for secure operation. The manual details every aspect from basic viewing controls (zoom, focus) to advanced features like Auto Patrol, alarm management, multi-view display setup, and factory reset procedures. It is designed for technical users needing comprehensive guidance for the camera’s first connection and system integration.
Page 1 Text Content
STOP!
BEFORE INSTALLING OR CONNECTING IK-WB21A TO
YOUR PC, READ THIS QUICK GUIDE
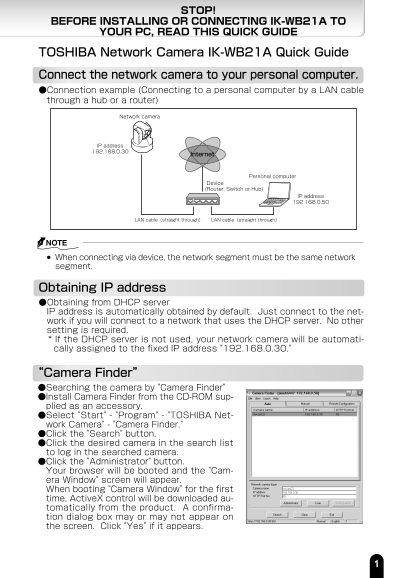
TOSHIBA Network Camera IK-WB21A Quick Guide Connect the network camera to your personal computer. ●Connection example (Connecting to a personal computer by a LAN cable through a hub or a router)
Network camera
IP address� 192.168.0.30
Internet
Personal computer
Device� (Router, Switch or Hub)
IP address� 192.168.0.50
LAN cable(straight through)� LAN cable(straight through)�
When connecting via device, the network segment must be the same network segment.
Obtaining IP address ●Obtaining from DHCP server IP address is automatically obtained by default. Just connect to the net- work if you will connect to a network that uses the DHCP server. No other setting is required. * If the DHCP server is not used, your network camera will be automati- cally assigned to the fixed IP address "192.168.0.30."
“Camera Finder” ●Searching the camera by "Camera Finder" ●Install Camera Finder from the CD-ROM sup- plied as an accessory. ●Select "Start" - "Program" - "TOSHIBA Net- work Camera" - "Camera Finder." ●Click the "Search" button. ●Click the desired camera in the search list to log in the searched camera. ●Click the "Administrator" button. Your browser will be booted and the "Cam- era Window" screen will appear. When booting "Camera Window" for the first time, Active X control will be downloaded au- tomatically from the product. A confirma- tion dialog box may or may not appear on the screen. Click "Yes" if it appears.
Page Summary Contents For Toshiba IK-WB21A Quick Guide
Manual Details
| Brand | Toshiba |
|---|---|
| Pages | 8 |
| File Size | 744.79 KB |
| Published | May 28, 2026 |
Enter the captcha to get the download link:
