SHARP XG-NV6XU Quick User Guide Projector Owner's Manual
Summary
This comprehensive manual guide provides step-by-step instructions for operating and setting up your projector (XG-NV6XU/QR). It is designed for users needing to connect diverse external devices, including PCs (PS/2, serial), DVD players, VCRs, and Mac computers. The guide details professional connections via VGA, component, and S-Video cables, covers all input mode selections, and ensures optimal picture quality from start to finish.
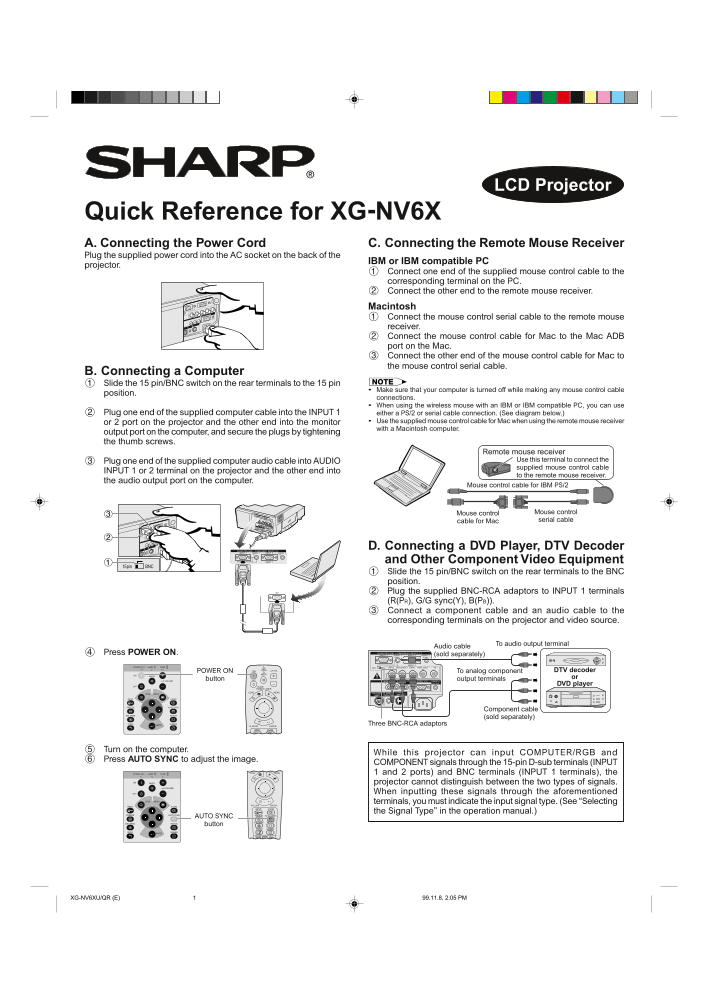
Page 1 Text Content
LCD Projector
Quick Reference for XG-NV6X A. Connecting the Power Cord C. Connecting the Remote Mouse Receiver Plug the supplied power cord into the AC socket on the back of the
IBM or IBM compatible PC
projector.
Connect one end of the supplied mouse control cable to the corresponding terminal on the PC. Connect the other end to the remote mouse receiver. Macintosh Connect the mouse control serial cable to the remote mouse receiver. Connect the mouse control cable for Mac to the Mac ADB port on the Mac. Connect the other end of the mouse control cable for Mac to the mouse control serial cable.
B. Connecting a Computer Slide the 15 pin/BNC switch on the rear terminals to the 15 pin
Make sure that your computer is turned off while making any mouse control cable
position.
connections. When using the wireless mouse with an IBM or IBM compatible PC, you can use
Plug one end of the supplied computer cable into the INPUT 1 either a PS/2 or serial cable connection. (See diagram below.)
or 2 port on the projector and the other end into the monitor Use the supplied mouse control cable for Mac when using the remote mouse receiver with a Macintosh computer.
output port on the computer, and secure the plugs by tightening the thumb screws.
Remote mouse receiver
Plug one end of the supplied computer audio cable into AUDIO Use this terminal to connect the supplied mouse control cable
INPUT 1 or 2 terminal on the projector and the other end into
to the remote mouse receiver.
the audio output port on the computer.
Mouse control cable for IBM PS/2
Mouse control Mouse control cable for Mac serial cable
D. Connecting a DVD Player, DTV Decoder and Other Component Video Equipment Slide the 15 pin/BNC switch on the rear terminals to the BNC position. Plug the supplied BNC-RCA adaptors to INPUT 1 terminals (R(PR), G/G sync(Y), B(PB)). Connect a component cable and an audio cable to the corresponding terminals on the projector and video source.
To audio output terminal
Audio cable
Press POWER ON. (sold separately)
POWER ON To analog component DTV decoder button output terminals or DVD player
Component cable (sold separately)
Three BNC-RCA adaptors
Turn on the computer.
While this projector can input COMPUTER/RGB and
Press AUTO SYNC to adjust the image.
COMPONENT signals through the 15-pin D-sub terminals (INPUT 1 and 2 ports) and BNC terminals (INPUT 1 terminals), the projector cannot distinguish between the two types of signals. When inputting these signals through the aforementioned terminals, you must indicate the input signal type. (See “Selecting the Signal Type” in the operation manual.)
AUTO SYNC button
XG-NV6XU/QR (E) 99.11.8, 2:05 PM1
Page Summary Contents For SHARP XG-NV6XU Quick User Guide Projector Owner's Manual
Manual Details
| Brand | Sharp |
|---|---|
| Pages | 2 |
| File Size | 612.78 KB |
| Published | May 31, 2026 |
Enter the captcha to get the download link:

Frequently Asked Questions
How do I change the input mode on this projector?
Press the INPUT button to select a desired input mode, then press ¶/Ä/§/© to make any necessary adjustments.
What must be done when connecting Component signals through the terminals?
When using INPUT 1 and INPUT 2, you must indicate the correct input signal type as detailed in the operation manual.
Should I touch the lens while making focus or zoom adjustments?
No, do not touch the lens at any time while adjusting the focus or zoom settings.