Roland DP-900 Designer Piano Addendum User's Guide
Summary
Essential guide for setting up and maintaining your DP-900 digital keyboard system. This manual provides comprehensive instructions, detailing everything from initial component assembly and securing side boards to connecting vital elements like pedal boards and speakers. It also offers expert advice on safely moving the unit, proper cable connection, required stability checks, and detailed disassembly procedures for both installation and relocation. Designed for owners who require a professional understanding of system setup and safe operational handling.
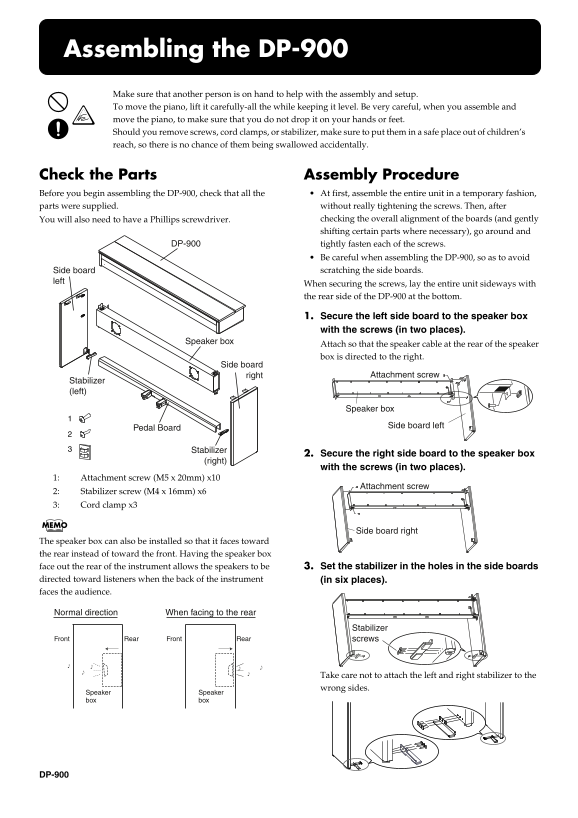
Page 1 Text Content
Intro_e.fm 10ページ 2004年6月3日 木曜日 午後4時48分
Assembling the DP-900 Make sure that another person is on hand to help with the assembly and setup.
To move the piano, lift it carefully-all the while keeping it level. Be very careful, when you assemble and move the piano, to make sure that you do not drop it on your hands or feet. Should you remove screws, cord clamps, or stabilizer, make sure to put them in a safe place out of children’s reach, so there is no chance of them being swallowed accidentally.
Check the Parts Assembly Procedure Before you begin assembling the DP-900, check that all the At first, assemble the entire unit in a temporary fashion, parts were supplied. without really tightening the screws. Then, after
You will also need to have a Phillips screwdriver. checking the overall alignment of the boards (and gently
fig.st900parts.e
shifting certain parts where necessary), go around and
DP-900 tightly fasten each of the screws.
Be careful when assembling the DP-900, so as to avoid Side board scratching the side boards. When securing the screws, lay the entire unit sideways with the rear side of the DP-900 at the bottom.
1. Secure the left side board to the speaker box with the screws (in two places).
Speaker box
Attach so that the speaker cable at the rear of the speaker box is directed to the right.
Side board fig.st1.e
Attachment screw
Stabilizer (left)
Speaker box
Side board left
Pedal Board
Stabilizer
2. Secure the right side board to the speaker box
(right)
with the screws (in two places). 1: Attachment screw (M5 x 20mm) x10 fig.st2.e
Attachment screw
2: Stabilizer screw (M4 x 16mm) x6 3: Cord clamp x3
Side board right
The speaker box can also be installed so that it faces toward the rear instead of toward the front. Having the speaker box face out the rear of the instrument allows the speakers to be 3. Set the stabilizer in the holes in the side boards directed toward listeners when the back of the instrument (in six places).
fig.st3.e
faces the audience. fig.stsp.e
Normal direction When facing to the rear
Stabilizer
Rear Front Rear Front screws
Take care not to attach the left and right stabilizer to the wrong sides.
Speaker Speaker
fig.st900SAP
box box
DP-900
Page Summary Contents For Roland DP-900 Designer Piano Addendum User's Guide
Manual Details
| Brand | Roland |
|---|---|
| Pages | 2 |
| File Size | 320.09 KB |
| Published | May 29, 2026 |
Enter the captcha to get the download link:

Frequently Asked Questions
How must I handle the keyboard and piano during assembly or moving?
Lift the piano carefully while keeping it level. Never drop it on your hands or feet.
Where should loose components like screws be kept?
Put removed screws, cord clamps, or stabilizers in a safe place, out of children’s reach.
How do I connect the pedal cables after assembly?
The brown plug connects to the Damper jack, and the black plug connects to the Soft jack.
What is the procedure for changing the speaker box orientation?
Completely disassemble the unit by reversing steps 1-10, change the attachment screws, then reassemble it.