Roland DP-970 User Guide
Summary
This comprehensive guide details the assembly and stabilization process for your DP-970 digital piano system. It covers critical steps such as attaching side boards, securing speaker boxes, installing stabilizers, and safely positioning the unit for optimal performance. The manual provides step-by-step instructions on proper setup from initial component placement to safe transport. It is essential reading for all new owners who want to ensure their instrument is assembled correctly, stable, and fully functional.
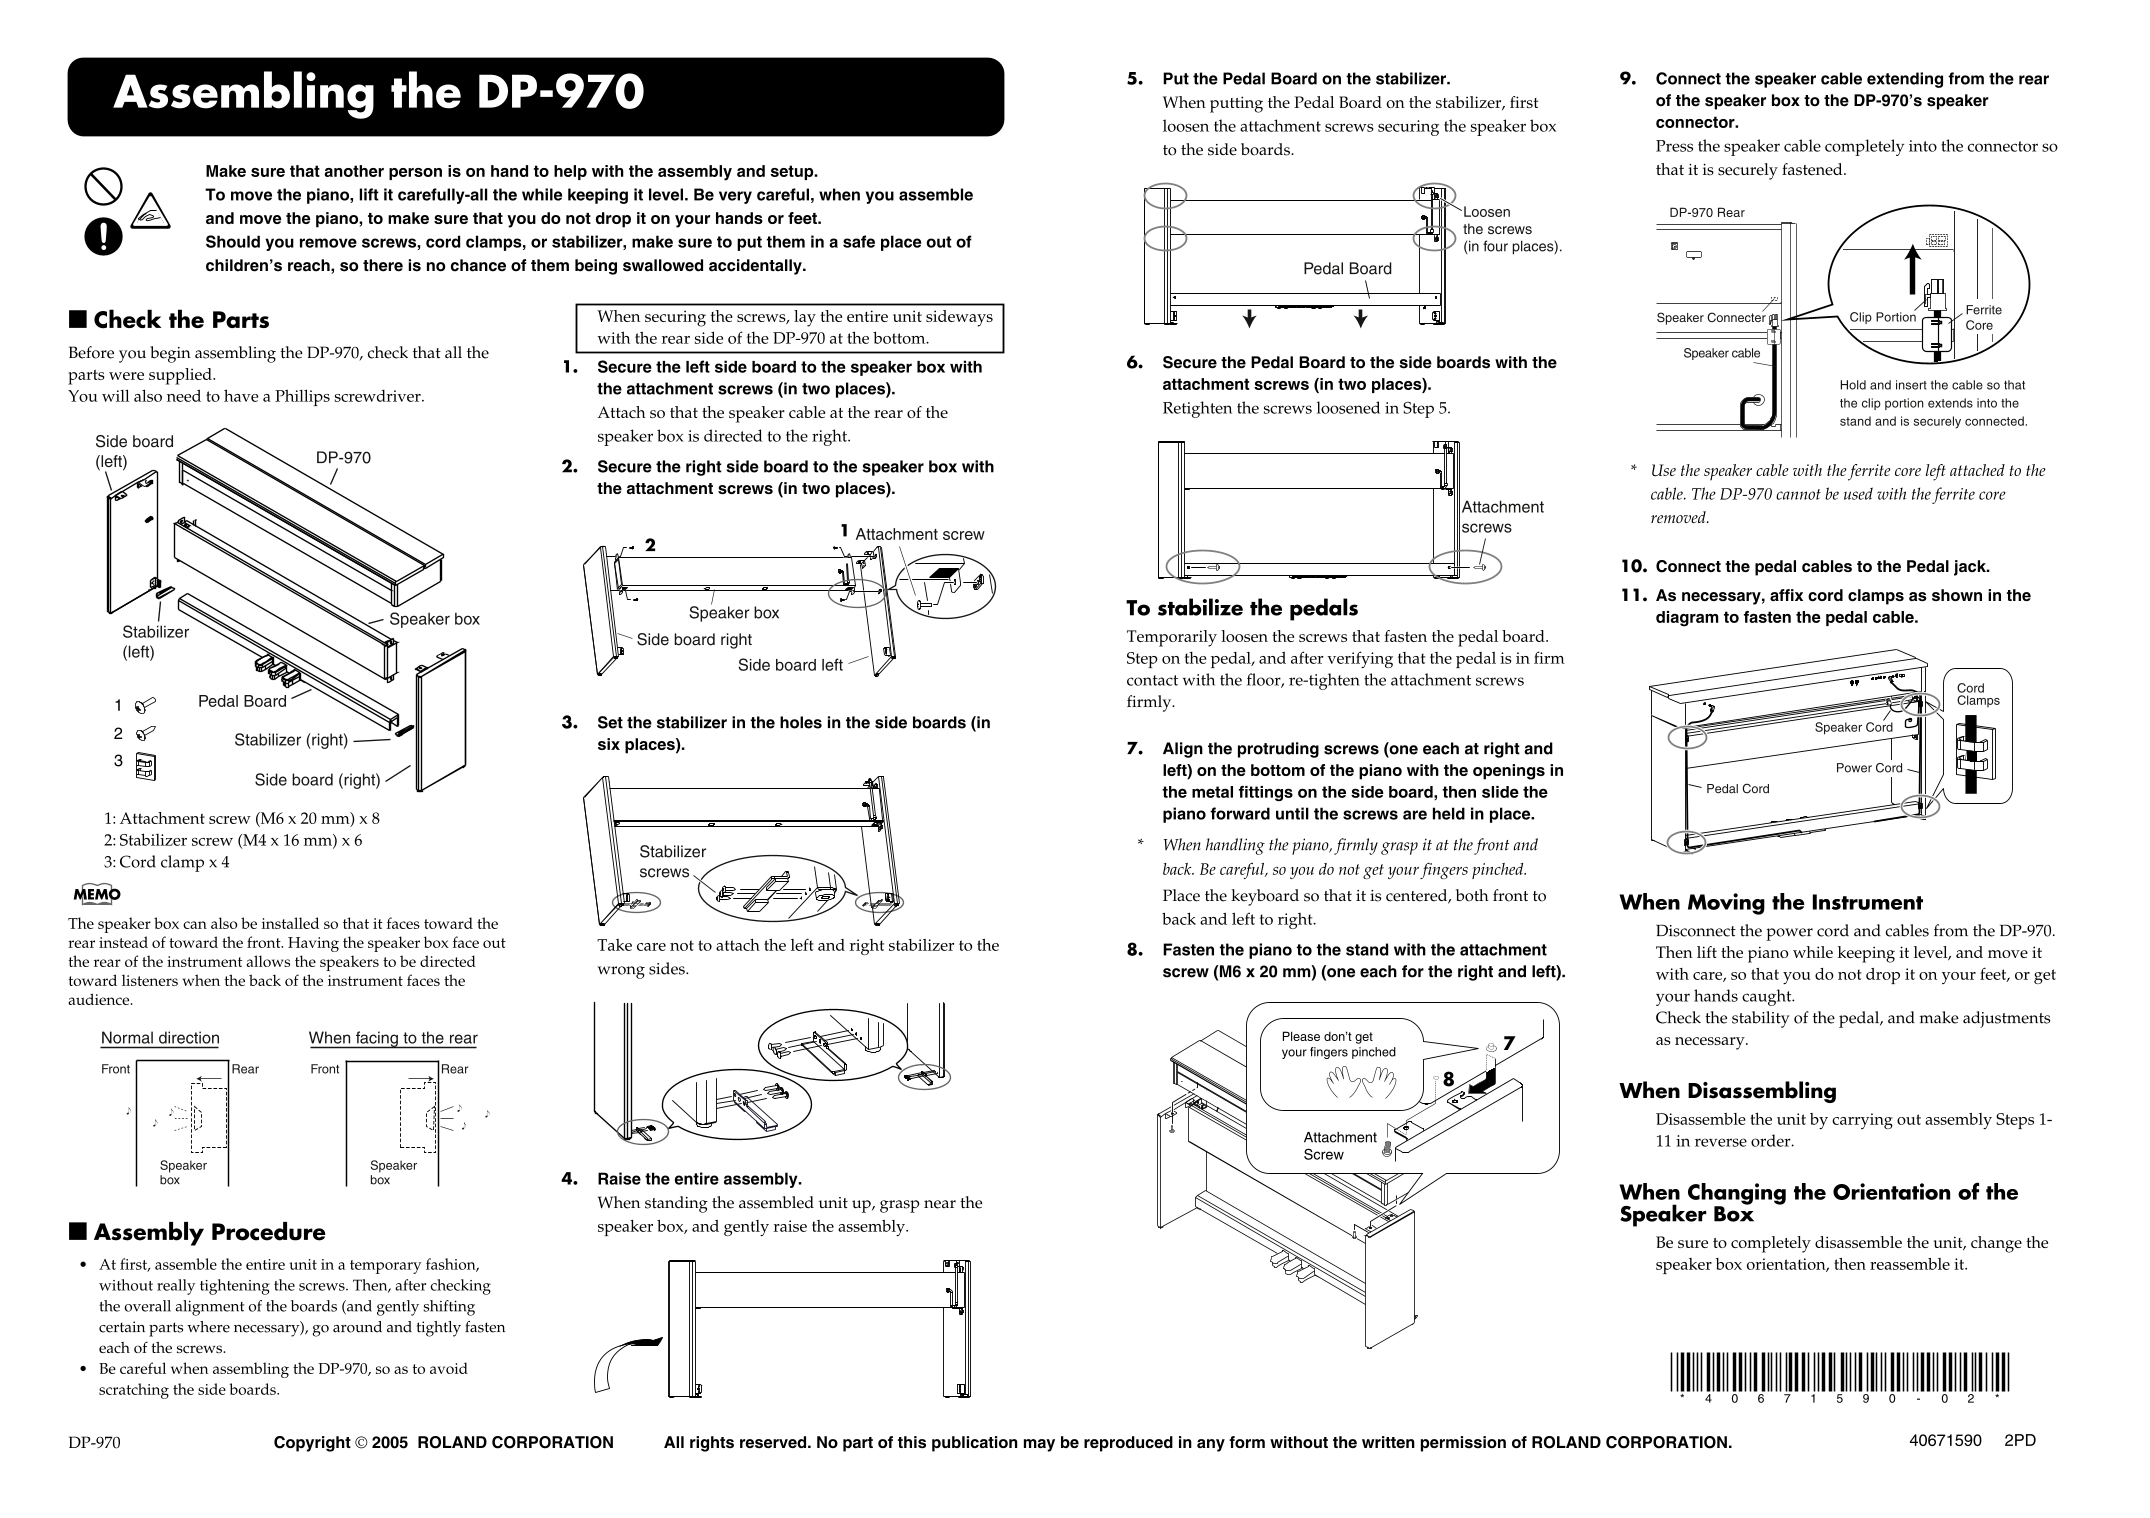
Page 1 Text Content
5. Put the Pedal Board on the stabilizer. 9. Connect the speaker cable extending from the rear
Assembling the DP-970 When putting the Pedal Boar on the stab ilizer, first of the speaker box to the DP-970’s speaker loosen the attachment screws securing th e speaker box connector. to the side boards. Press the speaker cable completely into the connector so
Make sure that another person is on hand to help with the assembly and setup. fig.st5.e that it is securely fastened.
fig.st8.e
To move the piano, lift it carefully-all the while keeping it level. Be very careful, when you assemble
Loosen DP-970 Rear
and move the piano, to make sure that you do not drop it on your hands or feet.
the screws
Should you remove screws, cord clamps, or stabilizer, make sure to put them in a safe place out of (in four places). children’s reach, so there is no chance of them being swallowed accidentally. Pedal Boa rd
Ferrite
When securing the screws, lay the entire unit sideways Speaker Connecter Clip Portion
Check the Parts Core
with the rear side of the DP-970 at the bottom.
efore you begin assembling the DP-970, check that all the Speaker cable
6. Secure the Pedal Board to he side boa rds with the
1. Secure the left side board to the speaker box with
arts were supplied.
attachment screws (in two laces). Hold and insert the cable so that
the attachment screws (in two places).
ou will also need to have a Phillips screwdriver.
the clip portion extends into the
Retighten the screws loosene in Step 5.
fig .st900parts.e Attach so that the speaker cable at the rear of the
stand and is securely connected.
fig.st6.e
speaker box is directed to the right.
Side board
(left) DP-970
2. Secure the right side board to the speaker box with Use the speaker cable with the ferrite core left attached to the the attachment screws (in two places).
cable. The DP-970 cannot be used with the ferrite core
fig.st1.e Attachment
removed.
screws
Attachment screw
10. Connect the pedal cables to the Pedal jack. 11. As necessary, affix cord clamps as shown in the
Speaker box To stabilize the pedals
Speaker box diagram to fasten the pedal cable.
Stabilizer fig.st9.e
Side board right Temporarily loosen the screws tha t fasten the pedal board.
(left)
Step on the pedal, and after verify ng that the p edal is in firm
Side board left
contact with the floor, re-tighten t e attachme nt screws
Cord Pedal Board firmly. Clamps
3. Set the stabilizer in the holes in the side boards (in Speaker Cord
Stabilizer (right)
six places).
7. Align the protruding screw (one each at right and
fig.st3.e
left) on the bottom of the pi ano with th e openings in Power Cord
Side board (right)
Pedal Cord
the metal fittings on the sid e board, th en slide the piano forward until the scre ws are held in place.
1: Attachment screw (M6 x 20 mm) x 8 2: Stabilizer screw (M4 x 16 mm) x 6
When handling the piano, firml grasp it at t he front and
Stabilizer
3: Cord clamp x 4
screws back. Be careful, so you do not g t your finger s pinched. Place the keyboard so that it s centered, b oth front to
When Moving the Instrument
he speaker box can also be installed so that it faces toward the back and left to right.
Disconnect the power cord and cables from the DP-970.
re ar instead of toward the front. Having the speaker box face out Take care not to attach the left and right stabilizer to the
8. Fasten the piano to the sta d with the attachment Then lift the piano while keeping it level, and move it
th e rear of the instrument allows the speakers to be directed
wrong sides. screw (M6 x 20 mm) (one e ch for the right and left).
with care, so that you do not drop it on your feet, or get
to ward listeners when the back of the instrument faces the
fig.st900SAP fig.st7.e
au dience. your hands caught.
fig.stsp.e Check the stability of the pedal, and make adjustments
Normal direction When facing to the rear Please don’t get as necessary. your fingers pinc hed
Rear Front Rear Front
When Disassembling Disassemble the unit by carrying out assembly Steps 1-
Attachment 11 in reverse order. Screw
Speaker Speaker box box 4. Raise the entire assembly.
When Changing the Orientation of the
When standing the assembled unit up, grasp near the
Speaker Box
speaker box, and gently raise the assembly.
Assembly Procedure
fig.st4 Be sure to completely disassemble the unit, change the
At first, assemble the entire unit in a temporary fashion, speaker box orientation, then reassemble it. without really tightening the screws. Then, after checking the overall alignment of the boards (and gently shifting certain parts where necessary), go around and tightly fasten each of the screws. Be careful when assembling the DP-970, so as to avoid scratching the side boards.
P-970 Copyright © 2005 ROLAND CORPORATION All rights reserved. No part of this publication may be reproduced in any form without the written permi ssion of ROLAND CORPORATION. 40671590 2PD
Page Summary Contents For Roland DP-970 User Guide
Manual Details
| Brand | Roland |
|---|---|
| Pages | 2 |
| File Size | 505.10 KB |
| Published | July 16, 2026 |
Enter the captcha to get the download link:

Frequently Asked Questions
How do I safely move the assembled DP-970 unit?
Grasp near the center of the speaker box, lift it while keeping it level, and be careful not to drop it on your hands or feet.
Where should loose assembly screws and small parts be kept?
Store them in a safe place, out of children's reach, preventing accidental swallowing.
Can I change which direction the speakers face?
Yes, the speaker box can be attached such that it faces either toward the front or toward the rear of the instrument.
What screws are used to attach the piano to the stand?
Use two M6 x 20mm attachment screws—one placed on the left and one placed on the right sides of the bottom of the piano.