Panasonic TYLA1000 Lamp Replacement User's Guide
Summary
This manual provides instructions for replacing the high-intensity discharge lamp in a projection display. It guides users through disassembly, installation, and resetting the lamp timer, while emphasizing safety precautions and proper disposal.
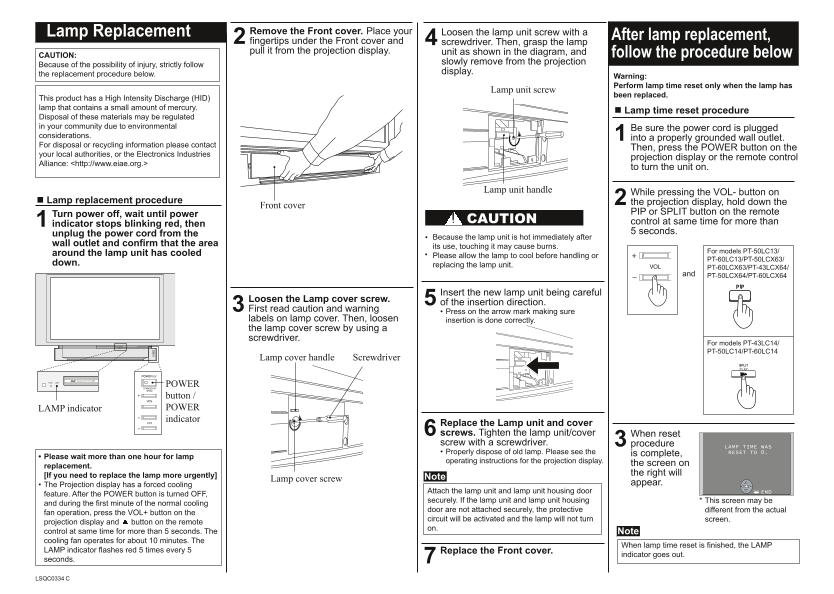
Page 1 Text Content
Lamp Re placement Loosen the lamp unit screw with a
2 Remove the Front cover. Place your After lamp re placement,
fingertips under the Front cover and screwdriver. Then, grasp the lamp pull it from the projection display. unit as shown in the diagram, and
CAUTION: follow the pro cedure below
slowly remove from the projection
Because of the possibility of injury, strictly follow
display.
the replacement procedure below.
Warning: Perform lamp time reset only when the lamp has
Lamp unit screw
been replaced.
This product has a High Intensity Discharge (HID) lamp that contains a small amount of mercury.
Lamp time reset procedure
Disposal of these materials may be regulated in your community due to environmental Be sure the power cord is plugged considerations.
into a properly grounded wall outlet.
For disposal or recycling information please contact
Then, press the POWER button on the
your local authorities, or the Electronics Industries
projection display or the remote control
Alliance: <http://www.eiae.org.>
to turn the unit on.
Lamp unit handle
While pressing the VOL- button on
Lamp replacement procedure the projection display, hold down the
Front cover
PIP or SPLIT button on the remote
1 Turn power off, wait until power CAUTION control at same time for more than
indicator stops blinking red, then
unplug the power cord from the 5 seconds.
Because the lamp unit is hot immediately after
wall outlet and confirm that the area
its use, touching it may cause burns.
For models PT-50LC13/
around the lamp unit has cooled
Please allow the lamp to cool before handling or
PT-60LC13/PT-50LCX63/
down. replacing the lamp unit.
PT-60LCX63/PT-43LCX64/ and PT-50LCX64/PT-60LCX64
Insert the new lamp unit being careful of the insertion direction.
3 Loosen the Lamp cover screw. First read caution and warn ing
• Press on the arrow mark making sure
labels on lamp cover. Then, loosen insertion is done correctly. the lamp cover screw by using a screwdriver.
For models PT-43LC14/ PT-50LC14/PT-60LC14
Lamp cover handle Screwdriver
POWER button / LAMP indicator POWER indicator
6 Replace the Lamp unit and cover screws. Tighten the lamp unit/cover When reset screw with a screwdriver. procedure
LAMP TIME WAS • Properly dispose of old lamp. Please see the is complete, RESET TO 0.
• Please wait more than one hour for lamp
operating instructions for the projection display.
the screen on
replacement.
the right will
[If you need to replace the lamp more urgently] Note
Lamp cover screw
• The Projection display has a forced cooling appear.
Attach the lamp unit and lamp unit housing door END
feature. After the POWER button is turned OFF,
securely. If the lamp unit and lamp unit housing * This screen may be
and during the first minute of the normal cooling
door are not attached securely, the protective different from the actual
fan operation, press the VOL+ button on the
circuit will be activated and the lamp will not turn screen.
projection display and button on the remote
control at same time for more than 5 seconds. The Note cooling fan operates for about 10 minutes. The
When lamp time reset is finished, the LAMP
LAMP indicator flashes red 5 times every 5
indicator goes out.
seconds. 7 Replace the Front cover. LSQC0334 C
Page Summary Contents For Panasonic TYLA1000 Lamp Replacement User's Guide
Manual Details
| Brand | Panasonic |
|---|---|
| Pages | 2 |
| File Size | 1.31 MB |
| Published | June 16, 2026 |
Enter the captcha to get the download link:

Frequently Asked Questions
How do I reset the lamp timer?
Press VOL- on the display while holding PIP/SPLIT on the remote for >5 seconds when unit is on.
How long should I wait to replace the lamp after use?
Wait at least one hour for the lamp to cool. For urgent replacement, use the forced cooling feature.
Is the lamp covered by a warranty?
Yes, the lamp unit has a one-year limited warranty covering defects in materials or workmanship.
What should I do if the lamp indicator is blinking red?
The lamp may need replacement. Ensure the lamp unit and its door are securely attached; if not, the protective circuit prevents operation.
How do I dispose of the old lamp?
The HID lamp contains mercury. Contact local authorities or visit www.eiae.org for disposal or recycling information.