Nikon D100 Help Guide
Summary
Optimize your diagnostic workflow with comprehensive instructions for using the Nikon D100 camera system in a clinical setting. This manual provides dental professionals and technicians with expert guidance on capturing high-resolution intraoral, extraoral photographs, and digital radiographs. Learn ideal setup protocols, lighting optimization, specific aperture settings, and precise positioning techniques to ensure accurate, consistent results suitable for diagnostic software.
Page 1 Text Content
Nikon D100 Help Guide Quick Ceph® Systems The camera settings shown below offer a starting point for taking pictures with the Nikon D100 digital camera.
Nikon includes a help manual with each camera. We encourage you to familiarize yourself
with the settings and usage of this camera.
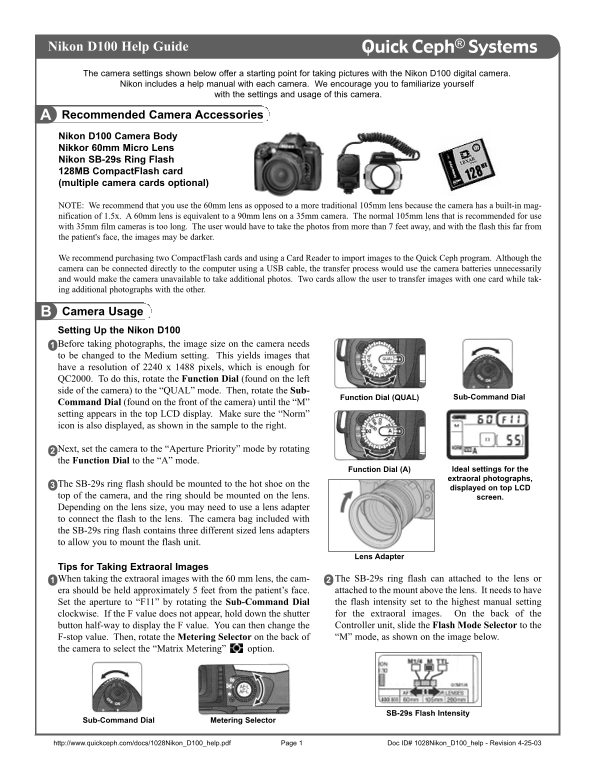
Recommended Camera Accessories A Nikon D100 Camera Body Nikkor 60mm Micro Lens Nikon SB-29s Ring Flash 128MB Compact Flash card (multiple camera cards optional)
NOTE: We recommend that you use the 60mm lens as opposed to a more traditional 105mm lens because the camera has a built-in mag- nification of 1.5x. A 60mm lens is equivalent to a 90mm lens on a 35mm camera. The normal 105mm lens that is recommended for use with 35mm film cameras is too long. The user would have to take the photos from more than 7 feet away, and with the flash this far from the patient's face, the images may be darker.
We recommend purchasing two Compact Flash cards and using a Card Reader to import images to the Quick Ceph program. Although the camera can be connected directly to the computer using a USB cable, the transfer process would use the camera batteries unnecessarily and would make the camera unavailable to take additional photos. Two cards allow the user to transfer images with one card while tak- ing additional photographs with the other.
Camera Usage B Setting Up the Nikon D100 Before taking photographs, the image size on the camera needs to be changed to the Medium setting. This yields images that have a resolution of 2240 x 1488 pixels, which is enough for QC2000. To do this, rotate the Function Dial (found on the left side of the camera) to the “QUAL” mode. Then, rotate the Sub-
Function Dial (QUAL) Sub-Command Dial
Command Dial (found on the front of the camera) until the “M” setting appears in the top LCD display. Make sure the “Norm” icon is also displayed, as shown in the sample to the right.
Next, set the camera to the “Aperture Priority” mode by rotating the Function Dial to the “A” mode.
Function Dial (A) Ideal settings for the extraoral photographs,
The SB-29s ring flash should be mounted to the hot shoe on the
displayed on top LCD
top of the camera, and the ring should be mounted on the lens. screen. Depending on the lens size, you may need to use a lens adapter to connect the flash to the lens. The camera bag included with the SB-29s ring flash contains three different sized lens adapters to allow you to mount the flash unit.
Lens Adapter
Tips for Taking Extraoral Images
When taking the extraoral images with the 60 mm lens, the cam- The SB-29s ring flash can attached to the lens or era should be held approximately 5 feet from the patient’s face. attached to the mount above the lens. It needs to have Set the aperture to “F11” by rotating the Sub-Command Dial the flash intensity set to the highest manual setting clockwise. If the F value does not appear, hold down the shutter for the extraoral images. On the back of the button half-way to display the F value. You can then change the Controller unit, slide the Flash Mode Selector to the F-stop value. Then, rotate the Metering Selector on the back of “M” mode, as shown on the image below.
the camera to select the “Matrix Metering” option.
SB-29s Flash Intensity
Sub-Command Dial Metering Selector
http://www.quickceph.com/docs/1028Nikon_D100_help.pdf Doc ID# 1028Nikon_D100_help - Revision 4-25-03
Page Summary Contents For Nikon D100 Help Guide
Manual Details
| Brand | Nikon |
|---|---|
| Pages | 2 |
| File Size | 108.78 KB |
| Published | June 01, 2026 |
Enter the captcha to get the download link:

Frequently Asked Questions
How must the Nikon D100 be set up for extraoral photographs?
Mount the SB-29s ring flash to the hot shoe, and hold the camera approximately 5 feet from the patient’s face. Set the aperture to F/11.
What is the ideal lens size for use with the Nikon D100?
A Nikkor 60mm Micro Lens is recommended because it is equivalent to a 90mm lens on a 35mm camera and avoids capturing images too far away.
How should I take intraoral photographs to ensure cropping accuracy?
Use the viewfinder to center the image while leaving a slight margin on both sides, and ensure you take photos at a 90º angle and align the camera's horizontal plane with the patient’s occlusal plane.