NETGEAR WNCE2001 Installation Guide
Summary
The Universal WiFi Internet Adapter (WNCE2001) provides an easy solution for expanding your home network coverage or enhancing wired connectivity. This manual serves as a comprehensive guide, covering both WPS and manual installation methods. It details various power connection options and includes detailed troubleshooting steps to ensure optimal performance. Ideal for homeowners who need reliable internet extension, the guide walks users through initial setup, status indicator interpretation, and solving common connection issues.
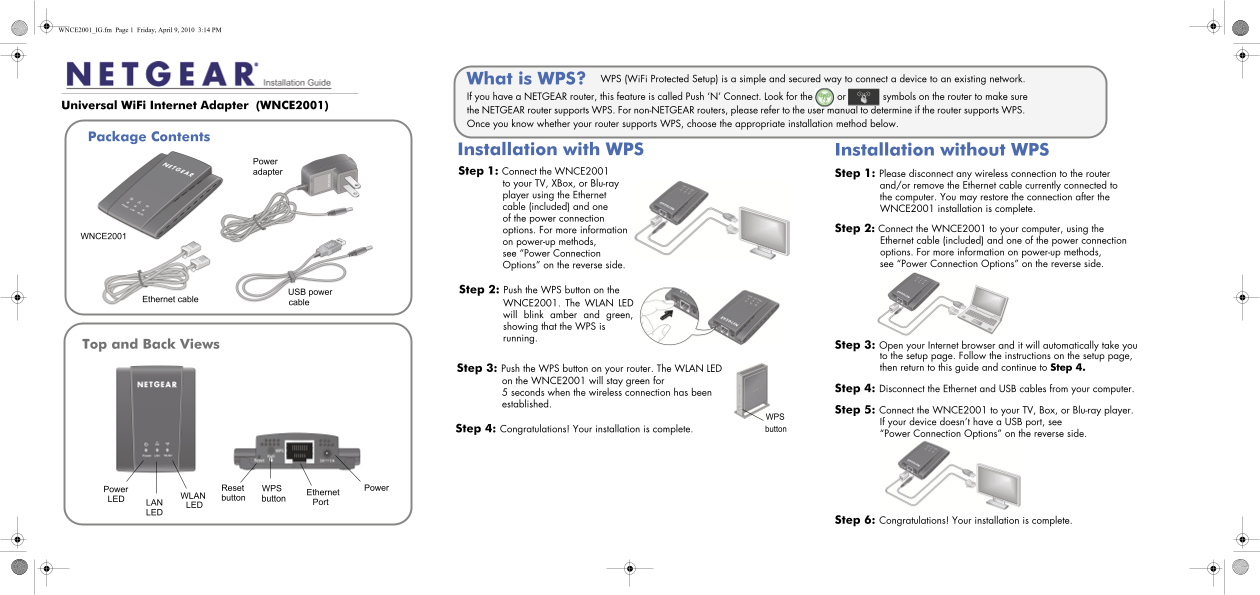
Page 1 Text Content
WNCE2001_IG.fm Page 1 Friday, April 9, 2010 3:14 PM
What is WPS? WPS (Wi Fi Protected Setup) is a simple and secured way to connect a device to an existing network.
If you have a NETGEAR router, this feature is called Push ‘N’ Connect. Look for the or symbols on the router to make sure
Universal Wi Fi Internet Adapter (WNCE2001)
the NETGEAR router supports WPS. For non-NETGEAR routers, please refer to the user manual to determine if the router supports WPS. Once you know whether your router supports WPS, choose the appropriate installation method below.
Package Contents
Installation with WPS Installation without WPS
Power
adapter Step 1: Connect the WNCE2001 Step 1: Please disconnect any wireless connection to the router
to your TV, XBox, or Blu-ray and/or remove the Ethernet cable currently connected to player using the Ethernet the computer. You may restore the connection after the cable (included) and one WNCE2001 installation is complete. of the power connection
options. For more information Step 2: Connect the WNCE2001 to your computer, using the
WNCE2001
on power-up methods, Ethernet cable (included) and one of the power connection see “Power Connection options. For more information on power-up methods, Options” on the reverse side. see “Power Connection Options” on the reverse side.
USB power Step 2: Push the WPS button on the
cable Ethernet cable WNCE2001. The WLAN LED
will blink amber and green, showing that the WPS is running.
Top and Back Views Step 3: Open your Internet browser and it will automatically take you
to the setup page. Follow the instructions on the setup page, Step 3: Push the WPS button on your router. The WLAN LED then return to this guide and continue to Step 4.
on the WNCE2001 will stay green for
Step 4: Disconnect the Ethernet and USB cables from your computer.
5 seconds when the wireless connection has been established.
Step 5: Connect the WNCE2001 to your TV, Box, or Blu-ray player.
If your device doesn’t have a USB port, see
Step 4: Congratulations! Your installation is complete. button
“Power Connection Options” on the reverse side.
Power Ethernet Reset WPS Power
WLAN button
LED button
LAN Port
Step 6: Congratulations! Your installation is complete.
Page Summary Contents For NETGEAR WNCE2001 Installation Guide
Manual Details
| Brand | NETGEAR |
|---|---|
| Pages | 2 |
| File Size | 1.30 MB |
| Published | June 04, 2026 |
Enter the captcha to get the download link:

Frequently Asked Questions
What is WPS and how do I use it for setup?
WPS (WiFi Protected Setup) links a device using the 'Push ‘N’ Connect' feature on a router, or by following specific steps which include pressing the WPS button.
How many power options are available for the WNCE2001?
You can power it using a physical adapter plugged into a wall outlet, or via USB connection to a neighboring device.
What does it mean if the WLAN LED is red?
A solid red WLAN LED usually indicates that no wireless connection has been established yet.
If I use USB power cable for the WNCE2001, are there limitations?
If the chosen USB port cannot provide enough reliable power, you should immediately switch to using the included AC adapter.