NETGEAR WG111 Installation Guide
Summary
Effortlessly connect your computer to your wireless network using the reliable WG111 54 Mbps Wireless USB Adapter. This comprehensive guide covers everything from initial hardware setup to advanced network configuration. Learn how to install drivers, optimize signal strength with placement tips, and verify a stable, continuous connection to any Wi-Fi access point. Designed for home or office users needing straightforward wireless internet access, it ensures guided success whether you're setting up your primary work profile or managing multiple connection types.
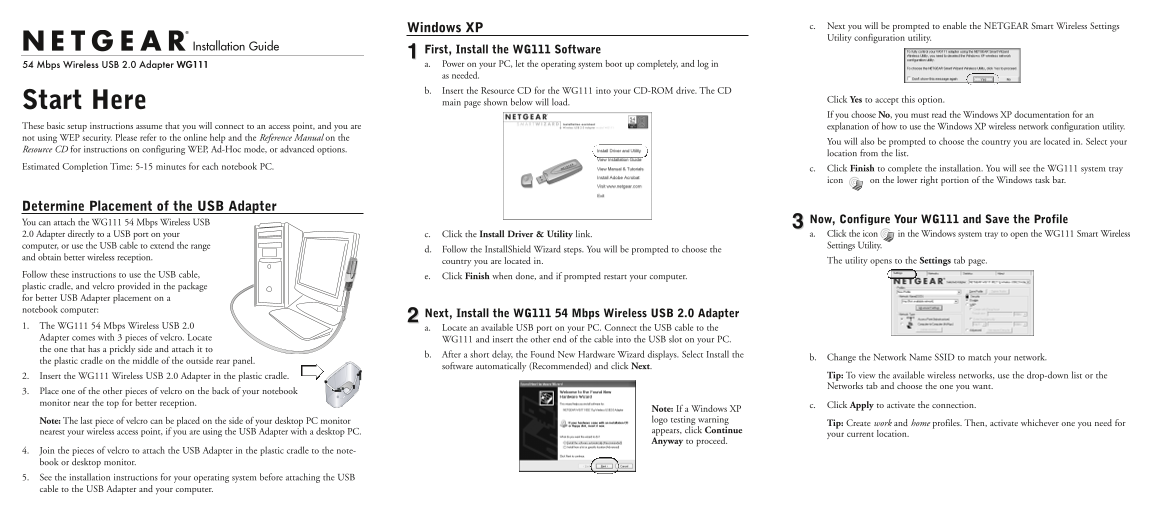
Page 1 Text Content
Windows XP c. Next you will be prompted to enable the NETGEAR Smart Wireless Settings Utility configuration utility.
Installation Guide
First, Install the WG111 Software 54 Mbps Wireless USB 2.0 Adapter WG111 a. Power on your PC, let the operating system boot up completely, and log in as needed. b. Insert the Resource CD for the WG111 into your CD-ROM drive. The CD
Click Yes to accept this option.
Start Here main page shown below will load.
If you choose No, you must read the Windows XP documentation for an
These basic setup instructions assume that you will connect to an access point, and you are explanation of how to use the Windows XP wireless network configuration utility. not using WEP security. Please refer to the online help and the Reference Manual on the
You will also be prompted to choose the country you are located in. Select your
Resource CD for instructions on configuring WEP, Ad-Hoc mode, or advanced options.
location from the list.
Estimated Completion Time: 5-15 minutes for each notebook PC. c. Click Finish to complete the installation. You will see the WG111 system tray
icon on the lower right portion of the Windows task bar.
Determine Placement of the USB Adapter
You can attach the WG111 54 Mbps Wireless USB Now, Configure Your WG111 and Save the Profile 2.0 Adapter directly to a USB port on your c. Click the Install Driver & Utility link. a. Click the icon in the Windows system tray to open the WG111 Smart Wireless computer, or use the USB cable to extend the range Settings Utility.
d. Follow the Install Shield Wizard steps. You will be prompted to choose the
and obtain better wireless reception.
country you are located in. The utility opens to the Settings tab page.
Follow these instructions to use the USB cable, e. Click Finish when done, and if prompted restart your computer. plastic cradle, and velcro provided in the package for better USB Adapter placement on a notebook computer:
Next, Install the WG111 54 Mbps Wireless USB 2.0 Adapter
1. The WG111 54 Mbps Wireless USB 2.0 a. Locate an available USB port on your PC. Connect the USB cable to the Adapter comes with 3 pieces of velcro. Locate WG111 and insert the other end of the cable into the USB slot on your PC. the one that has a prickly side and attach it to
b. After a short delay, the Found New Hardware Wizard displays. Select Install the
b. Change the Network Name SSID to match your network.
the plastic cradle on the middle of the outside rear panel.
software automatically (Recommended) and click Next.
2. Insert the WG111 Wireless USB 2.0 Adapter in the plastic cradle. Tip: To view the available wireless networks, use the drop-down list or the Networks tab and choose the one you want.
3. Place one of the other pieces of velcro on the back of your notebook monitor near the top for better reception. c. Click Apply to activate the connection.
Note: If a Windows XP Note: The last piece of velcro can be placed on the side of your desktop PC monitor logo testing warning
Tip: Create work and home profiles. Then, activate whichever one you need for
nearest your wireless access point, if you are using the USB Adapter with a desktop PC. appears, click Continue
your current location.
Anyway to proceed.
4. Join the pieces of velcro to attach the USB Adapter in the plastic cradle to the note- book or desktop monitor. 5. See the installation instructions for your operating system before attaching the USB cable to the USB Adapter and your computer.
Page Summary Contents For NETGEAR WG111 Installation Guide
Manual Details
| Brand | NETGEAR |
|---|---|
| Pages | 2 |
| File Size | 977.56 KB |
| Published | June 04, 2026 |
Enter the captcha to get the download link:

Frequently Asked Questions
How do I physically mount the USB adapter for better reception?
Use the provided plastic cradle and attach it securely using two of the velcro pieces, either on a notebook's rear panel or a desktop monitor's side/rear.
What indicates a successful wireless connection?
The WG111 LED must be solid (not blinking or off), and the system tray icon should show a green color, indicating a working connection.
If I can't connect to the internet, where should I look for help?
Refer to the Troubleshooting Chapter of the full Resource Manual.
What steps are needed after connecting the adapter initially?
Run the 'Find New Hardware Wizard,' select 'Install the software automatically (Recommended),' and complete the installation utility wizard.
How can I improve my chances of getting quick technical support?
Register your product at www.NETGEAR.com/register.