# A B C D E F G H I J K L M N O P Q R S T U V W X Y Z

Lexmark XM7155 Quick Reference (Lexmark XM7100 and XM7200 Series)

Summary

Empower your office workflow with this advanced multifunction printer (MFP). This comprehensive guide details every function available, including professional copying, scanning to email or USB, faxing, and network setup. Learn how to navigate the intuitive touchscreen interface, manage jobs, access settings, and efficiently resolve common paper jams. Ideal for small to large offices requiring reliable document management and versatile printing solutions.
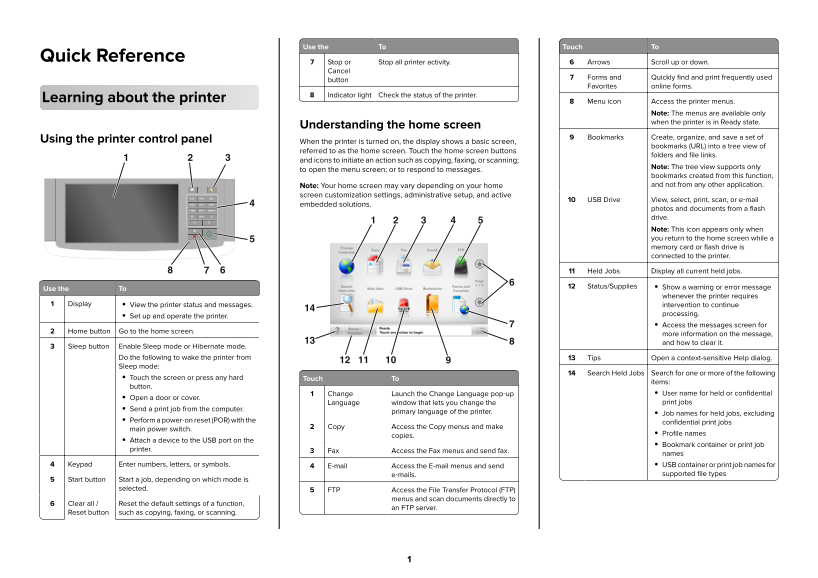
📄 Preview 📖 Table of Contents Contents PAGE OF 29

Page 1 Text Content

Use the To Touch To

Quick Reference

Stop or Stop all printer activity. Arrows Scroll up or down.

Cancel

Forms and Quickly find and print frequently used

button

Favorites online forms.

Indicator light Check the status of the printer.

Learning about the printer Menu icon Access the printer menus.

Note: The menus are available only when the printer is in Ready state.

Understanding the home screen

Bookmarks Create, organize, and save a set of

Using the printer control panel When the printer is turned on, the display shows a basic screen,

bookmarks (URL) into a tree view of

referred to as the home screen. Touch the home screen buttons

folders and file links.

and icons to initiate an action such as copying, faxing, or scanning;

Note: The tree view supports only

to open the menu screen; or to respond to messages.

bookmarks created from this function, Note: Your home screen may vary depending on your home and not from any other application.

A B C D E F screen customization settings, administrative setup, and active

USB Drive View, select, print, scan, or e‑mail

G H I J K L M N O embedded solutions.

P Q R S T U V W X Y Z photos and documents from a flash

drive. Note: This icon appears only when you return to the home screen while a memory card or flash drive is connected to the printer.

Held Jobs Display all current held jobs.

Status/Supplies Show a warning or error message

Use the To

whenever the printer requires

Display View the printer status and messages. intervention to continue

processing.

Set up and operate the printer.

Access the messages screen for

Home button Go to the home screen.

more information on the message, and how to clear it.

Sleep button Enable Sleep mode or Hibernate mode.

Do the following to wake the printer from Tips Open a context-sensitive Help dialog. Sleep mode:

Search Held Jobs Search for one or more of the following

Touch the screen or press any hard Touch To

items:

button.

Change Launch the Change Language pop‑up User name for held or confidential

Open a door or cover.

Language window that lets you change the print jobs

Send a print job from the computer.

primary language of the printer. Job names for held jobs, excluding

Perform a power‑on reset (POR) with the

confidential print jobs

Copy Access the Copy menus and make

main power switch.

Profile names

copies.

Attach a device to the USB port on the

Bookmark container or print job

printer. Fax Access the Fax menus and send fax.

names

Keypad Enter numbers, letters, or symbols. E-mail Access the E-mail menus and send USB container or print job names for

e‑mails. supported file types

Start button Start a job, depending on which mode is

selected. FTP Access the File Transfer Protocol (FTP)

menus and scan documents directly to

Clear all / Reset the default settings of a function,

an FTP server.

Reset button such as copying, faxing, or scanning.

Page Summary Contents For Lexmark XM7155 Quick Reference (Lexmark XM7100 and XM7200 Series)

Page 1 Use the To Touch To Quick Reference Stop or Stop all printer activity. Arrows Scroll up or down. Cancel Forms and Quickly find and print frequently used button Favorites online forms. Indicator light ...
Page 2 Features Touch To Feature Description Reset Reset values on the screen. Menu trail line A menu trail line is located at the top of each menu screen. This feature shows the path Example: taken to arriv...
Page 3 more information on accessing the Embedded Web Server, see Accessing the Embedded Web Server Understanding the different “Accessing the Embedded Web Server” on page 3. The Embedded Web Server is the p...
Page 4 computer, see “Finding the IP address of the computer” Setting up Card Copy Using My Shortcut on page 2. Use To Use To Click Apply. Quickly and easily copy insurance, Create shortcuts on the printer h...
Page 5 Make sure the printer has access rights to the folder Notes: Configuring Universal paper settings where the specified destination is located. When saving the configuration file, you can type a Univers...
Page 6 Squeeze and slide the width guide to the correct position for the size of the paper being loaded until it clicks into place. Note: Use the paper size indicators on the bottom of the tray to help posit...
Page 7 Unlock the length guide, and then squeeze and slide the guide Without an optional staple With an optional staple finisher to the correct position for the size of the paper being loaded. finisher ABC A...
Page 8 Do not slide the paper into the tray. Load paper as shown If you are loading envelopes, then make sure that the flap Make sure the paper is below the solid line, which is the in the illustration. side...
Page 9 When using card stock, labels, or other types of specialty Insert the tray. Loading A5‑size paper media, make sure the paper is below the dashed line, which Pull up and slide the width guide to the po...
Page 10 Squeeze and slide the length guide to the position for A5 Insert the A5 length guide into its designated slot. If the A5 length guide is still attached to the length guide, until it clicks into place....
Page 11 Squeeze the length guide and slide it to the correct position Flex sheets of paper back and forth to loosen them, and then One‑sided printing Two‑sided printing for the size of the paper being loaded ...
Page 12 Make sure the paper is below the maximum paper fill indicator. From the printer control panel, set the paper size and type in the Paper menu to match the paper loaded. Note: Set the correct paper size...
Page 13 Using the handle, pull the multipurpose feeder extender. Slide the width guide to the correct position for the size of the paper being loaded. Note: Use the paper size indicators on the bottom of tray...
Page 14 Flex the stack of envelopes back and forth to loosen Load envelopes with the flap side down and on the left of Without an optional staple With an optional staple finisher them, and then fan them. Stra...
Page 15 Make sure the paper or specialty media is below the Select a custom name, and then type a custom paper type Linking and unlinking trays maximum paper fill indicator. name. Click Submit. Linking and un...
Page 16 Select a custom paper type name, and then select a paper Click Settings > Print Settings > Quality Menu > Toner Notes: type. Darkness. A flash drive icon appears on the printer home screen No...
Page 17 If you leave the flash drive in the printer after leaving the Notes: Canceling a print job from the computer initial USB menu screen, then touch Held Jobs on the Do not load postcards, photos, small i...
Page 18 Click Settings > E-mail/FTP Settings > E-mail Settings. E-mail > Recipient > type an e‑mail address Canceling a copy job To create a group of recipients, touch Next address, and then Enter...
Page 19 Notes: Sending a fax using a shortcut number Sending a fax at a scheduled time Do not load postcards, photos, small items, Fax shortcuts are like the speed dial numbers on a telephone or Load an origi...
Page 20 Note: A password may be required. If you do not have an ID Notes: Scanning to an FTP address and password, then contact your system support person. Do not load postcards, photos, small items, Type a n...
Page 21 Note: Clicking Submit automatically assigns a shortcut Open the front cover and the multipurpose feeder. Scanning to a flash drive number. You can use this shortcut number when you are ready to scan y...
Page 22 Remove the toner cartridge. Warning—Potential Damage: Do not expose the imaging unit to direct light for more than 10 minutes. Extended exposure to light may cause print quality problems. Remove the j...
Page 23 Close the multipurpose feeder door and the front cover. Open the rear door. Close the rear door. Remove the jammed paper. Note: Make sure that all paper fragments are removed. Paper jam in the rear do...
Page 24 Push the back of the standard tray. Insert the standard tray. Paper jam in the standard bin Remove the jammed paper. Paper jam in the duplex unit Note: Make sure that all paper fragments are removed. ...
Page 25 Remove the tray. Insert the tray. Paper jam in trays Pull out the tray. Paper jam in the multipurpose feeder Remove paper from the multipurpose feeder. Remove the jammed paper. Note: Make sure that al...
Page 26 Reload paper, and then adjust the paper guide. Close the door. If the jam is in the mailbox bin, then remove the jammed paper. Paper jam in the mailbox Note: Make sure that all paper fragments are rem...
Page 27 Open the ADF cover. Remove the jammed paper. Note: Make sure that all paper fragments are removed. Close the ADF cover. Open the scanner cover. Close the scanner cover. Paper jam in the staple finishe...
Page 28 Open the staple finisher rear door, and then remove the Open the staple guard, and then remove the loose staples. Staple jam in the finisher jammed paper. Open the staple access door. Remove the stapl...
Page 29 Press the staples against the metal bracket. Note: If the staples are at the rear of the cartridge, then shake the cartridge downward to bring the staples near the metal bracket. Insert the staple car...

Manual Details

Brand Lexmark
Pages 29
File Size 8.00 MB
Published June 03, 2026
68 views

Enter the captcha to get the download link:

captcha

Frequently Asked Questions

How do I find the printer's IP address?

Go to the Network/Ports menu and touch To, then select the TCP/IP section.

What buttons can I use to connect to a network or print server?

The manual recommends printing a network setup page or using the Advanced Options menu for connection details.

How do I clear default settings on the printer?

For general functions, press the Clear all button; otherwise, follow specific reset instructions for that feature.

What does the 'Menu trail line' show in the menus?

It shows the path taken to arrive at the current menu (e.g., Menus > Settings > ...).