Page 1
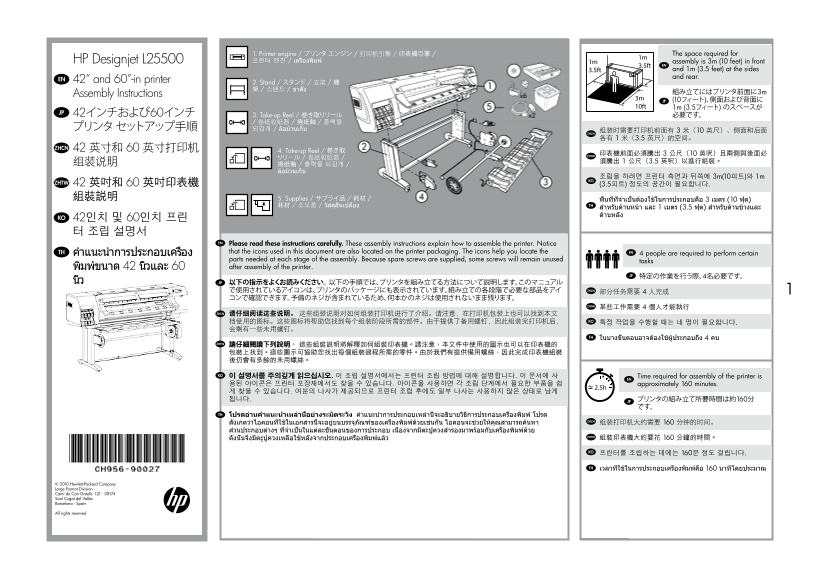
1. Printer engine / プリンタ エンジン / 打印机引擎 / 印表機引擎 / The space required for HP Designjet L25500 프린터 엔진 / เครื่องพิมพ์ assembly is 3m (10 feet) in front 3.5ft1m EN 3.5ft and 1m (3.5 feet) at the sides and r...
Page 2
EN Remove the packaging JP パッケージの開梱 ZHCN 拆开包装 ZHTW 從包裝中取出 KO 포장재 제거 TH ก�รถอดบรรจุภัณฑ์ออก 3m 10ft Cut the straps, open the box and remove the top cover Carefully cut the straps around the boxes. Make...
Page 3
EN Assemble the stand JP スタンドの組み立て ZHCN 组装支架 ZHTW 組裝機架 KO 스탠드 조립하기 TH ก�รประกอบข�ตั้ง Remove the boxes shown. Open the box that contains the stand. Lower the left side of the cross-brace onto the box ...
Page 4
Locate the bag of screws and the screwdriver Remove the left leg from the box, and then Lower the left leg onto the left side of the Use four screws on the inside of the left leg to attach provided. N...
Page 5
Use two screws on the outside of the left leg to attach Lower the right leg onto the right side of the cross- Use four screws on the inside of the right leg to attach Use two screws on the outside of ...
Page 6
Use four screws to attach the cross-bar to the legs. Notice that there is anti-slip material around two of the Place a foot on the left leg. There are pins to help you Use four screws to attach the fo...
Page 7
Position the other foot on the right leg. There are pins Use four screws to attach the foot to the right leg. Roll the stand assembly into its upright position. Attach the left stand spacer to the top...
Page 8
EN Attach the printer engine to the stand JP スタンドへのプリンタ エンジンの取り付け ZHCN 将打印机引擎固定到支架 ZHTW 將印表機引擎裝到機架上 KO 프린터 엔진을 스탠드에 연결하기 TH ติดตั้งเครื่องพิมพ์ลงบนข�ตั้ง Attach the right stand spacer to the top of th...
Page 9
Remove the four packing pieces from the top (60-inch Pull open the protective plastic from the base of the Lift the stand assembly onto the printer engine. The Use one screw to attach the right side o...
Page 10
Use two screws to attach the left side of the stand to Place the take-up reel box and the supplies box Rotate the printer onto the Take-up Reelbox and the Rotate the printer until the back of the prin...
Page 11
Remove the pallet before lifting the printer to its Use the hand holds at the rear of the printer engine Remove the two foam end-packs, and then remove the Remove the anti-slip material from the two r...
Page 12
EN Assemble the take-up reel JP 巻き取りリールの組み立て ZHCN 组装卷纸收纸器 ZHTW 組裝捲紙軸 KO 출력물 되감개 조립 TH ก�รประกอบล้อม้วนเก็บ Screw the printer tube to the stand. Identify the four holes on the inside of the right leg. ...
Page 13
Insert two screws into the two forward holes. Leave Attach the take-up reel motor to the two screws, and Use two screws to attach the rear of the take-up reel Use the parallel plug to connect the take...
Page 14
Identify the three holes on the inside of the left leg. The Insert two screws into the two forward holes. Leave Attach the left side of the take-up reel assembly to the Use one screw to attach the rea...
Page 15
Use four screws to attach the take-up reel IMPORTANT Move the printer to its final location. Move the front right wheel so that it faces forward, Slide the sensor unit onto the right foot, and then us...
Page 16
Attach the sensor unit onto the left side of the lower Connect the sensor cable to the rear of the Use the clips provided to attach the sensor cable to the Remove the take-up reel loading table from t...
Page 17
Attach the take-up reel loading table by inserting the Attach the grounding cable to the metal plate installed Carefully lift the central core tube. The central core Remove the take-up reel spindle fr...
Page 18
Remove the two take-up reel hubs. Remove the adhesive tape, and then loosen the plastic Slide the black hub onto the spindle up to one of the Tighten the plastic nut on the black hub. nut on the black...
Page 19
Remove the adhesive tape, and then loosen the plastic Slide the blue hub onto the spindle. Raise the take-up reel loading table to its upright Unlock the take-up reel by pushing the spindle lever to E...
Page 20
EN Unpack more components JP その他のコンポーネントの開梱 ZHCN 从包装箱取出其他组件 ZHTW 取出其他組件 KO 추가 구성 요소 포장 풀기 TH แกะส่วนประกอบอื่นๆ ออกจ�กกล่อง Load the take-up reel spindle into the printer by See the User´s Guide for i...
Page 21
Release the two latches and open the window. Remove the protective packaging from inside the Plug the Gigabit Ethernet cable into the Gigabit Pass the Gigabit Ethernet cable through the hook at EN pri...
Page 22
76Install the ink supplies JP インク サプライ品の取り付け ZHCN 安装墨水耗材 ZHTW 安裝墨水耗材 KO 잉크 소모품 설치 TH ก�รติดตั้งหมึกพิมพ์ Plug the two power cables into the rear of the printer, Turn the power switch to the On positio...
Page 23
Wait until this message appears on the front panel A message may appear asking you to upgrade the Wait until this message appears. The front panel To release the ink cartridge drawer, gently pull (~1 ...
Page 24
Shake the ink cartridge vigorously for about 15 Place the ink cartridge in the ink cartridge Push the ink cartridge drawer back into the Follow the same instructions to insert the other five ink secon...
Page 25
When the above question appears on the front panel Remove the packing foam from the top of the Pull up and release the blue latch on top of the Before removing the setup printheads, look at each of yo...
Page 26
Close latch & window and select: Wait until this message appears on the front panel. Pull open the printhead cleaning cartridge door, which Remove the transparent shipping tray. Insert the P All w...
Page 27
Open the window and locate the ink funnel housing. Insert the ink funnel (located inside the maintenance Press firmly until you hear a click. Close the window, secure latches. EN cartridge box ) into ...
Page 28
Insert the printhead cleaning container at the rear Wait until this message appears on the front panel. Open the window and pull up and release the blue Remove all of the setup printheads. of the prin...
Page 29
Shake the printhead vigorously for about 15 second. Remove the two protective covers on the new Lower all of the printheads vertically into their correct Make sure that the printheads are correctly Be...
Page 30
If a “Reinsert” message appears on the front panel, Close the carriage assembly cover. Lower and lock the blue latch. Make sure that the blue Close the printer window and secure the latches. then firm...
Page 31
EN Load the substrate JP 素材の取り付け ZHCN 装入基材 ZHTW 裝入紙材 KO 인쇄물 공급 TH ก�รใส่วัสดุพิมพ์ Wait until the Ready for substrate message Remove the adhesive tape, and lift the spindle lock Remove the spindle fro...
Page 32
Remove the wood part on the left of the spindle. Rest the roll of substrate that you want to load on the The right hub of the spindle has two positions: one for Fully insert the spindle into the subst...
Page 33
Slide the blue hub onto the spindle. Make sure that the With the blue hub on the left, lift the loading table to From the front panel, select the substrate icon and then Select Substrate load and then...
Page 34
Insert the lead-edge of the substrate into the printer, Wait until the substrate emerges from the printer as On the front panel, select the family of the subtrate The printer automatically performs su...
Page 35
EN In case of problems when loading JP 取り付け時に問題が発生する場合 ZHCN 如果装入时出现问题 ZHTW 裝入紙材時發生問題的情形 KO 인쇄물을 넣는 도중 문제가 발생 하는 경우 TH ในกรณีที่เกิดปัญห�ระหว่�งใส่วัสดุพิมพ์ Use the hubs to wind the excess substrate o...
Page 36
Align the substrate with the edge of the roll. Lower the substrate-adjustment lever. TH ปรับตำ�แหน่งวัสดุพิมพ์ด้วยขอบของม้วนวัสดุพิมพ์ ดึงก้�นปรับวัสดุพิมพ์ลง
Page 37
EN 1In case of no ink in setup printheads JP 付属のプリントヘッドにインクが ない場合 ZHCN 如果设置打印头没有墨水 ZHTW 設定印字頭中沒有墨水的情形 KO 셋업 프린트 헤드에 잉크가 없는 경우 TH ในกรณีที่ไม่มีหมึกอยู่ในชุดหัวพิมพ์ Do not remove the setup printheads,...
Page 38
Legal notices © Copyright 2010 Hewlett-Packard Development Company, L.P. The information contained herein is subject to change without notice. The only warranties for HP products and services are set ...