ESTES ASTRON ALPHA IV INSTRUCTIONS
Summary
This comprehensive guide provides expert instructions for assembling a model rocket kit from start to finish. Designed for rocketry hobbyists, the manual meticulously details every step of construction—from attaching fin units and mounting engine components to securing the shock cord system. It covers detailed assembly techniques and outlines critical safety protocols required before launching your finished rocket, ensuring a safe and successful flight experience using standard Estes launch supplies.
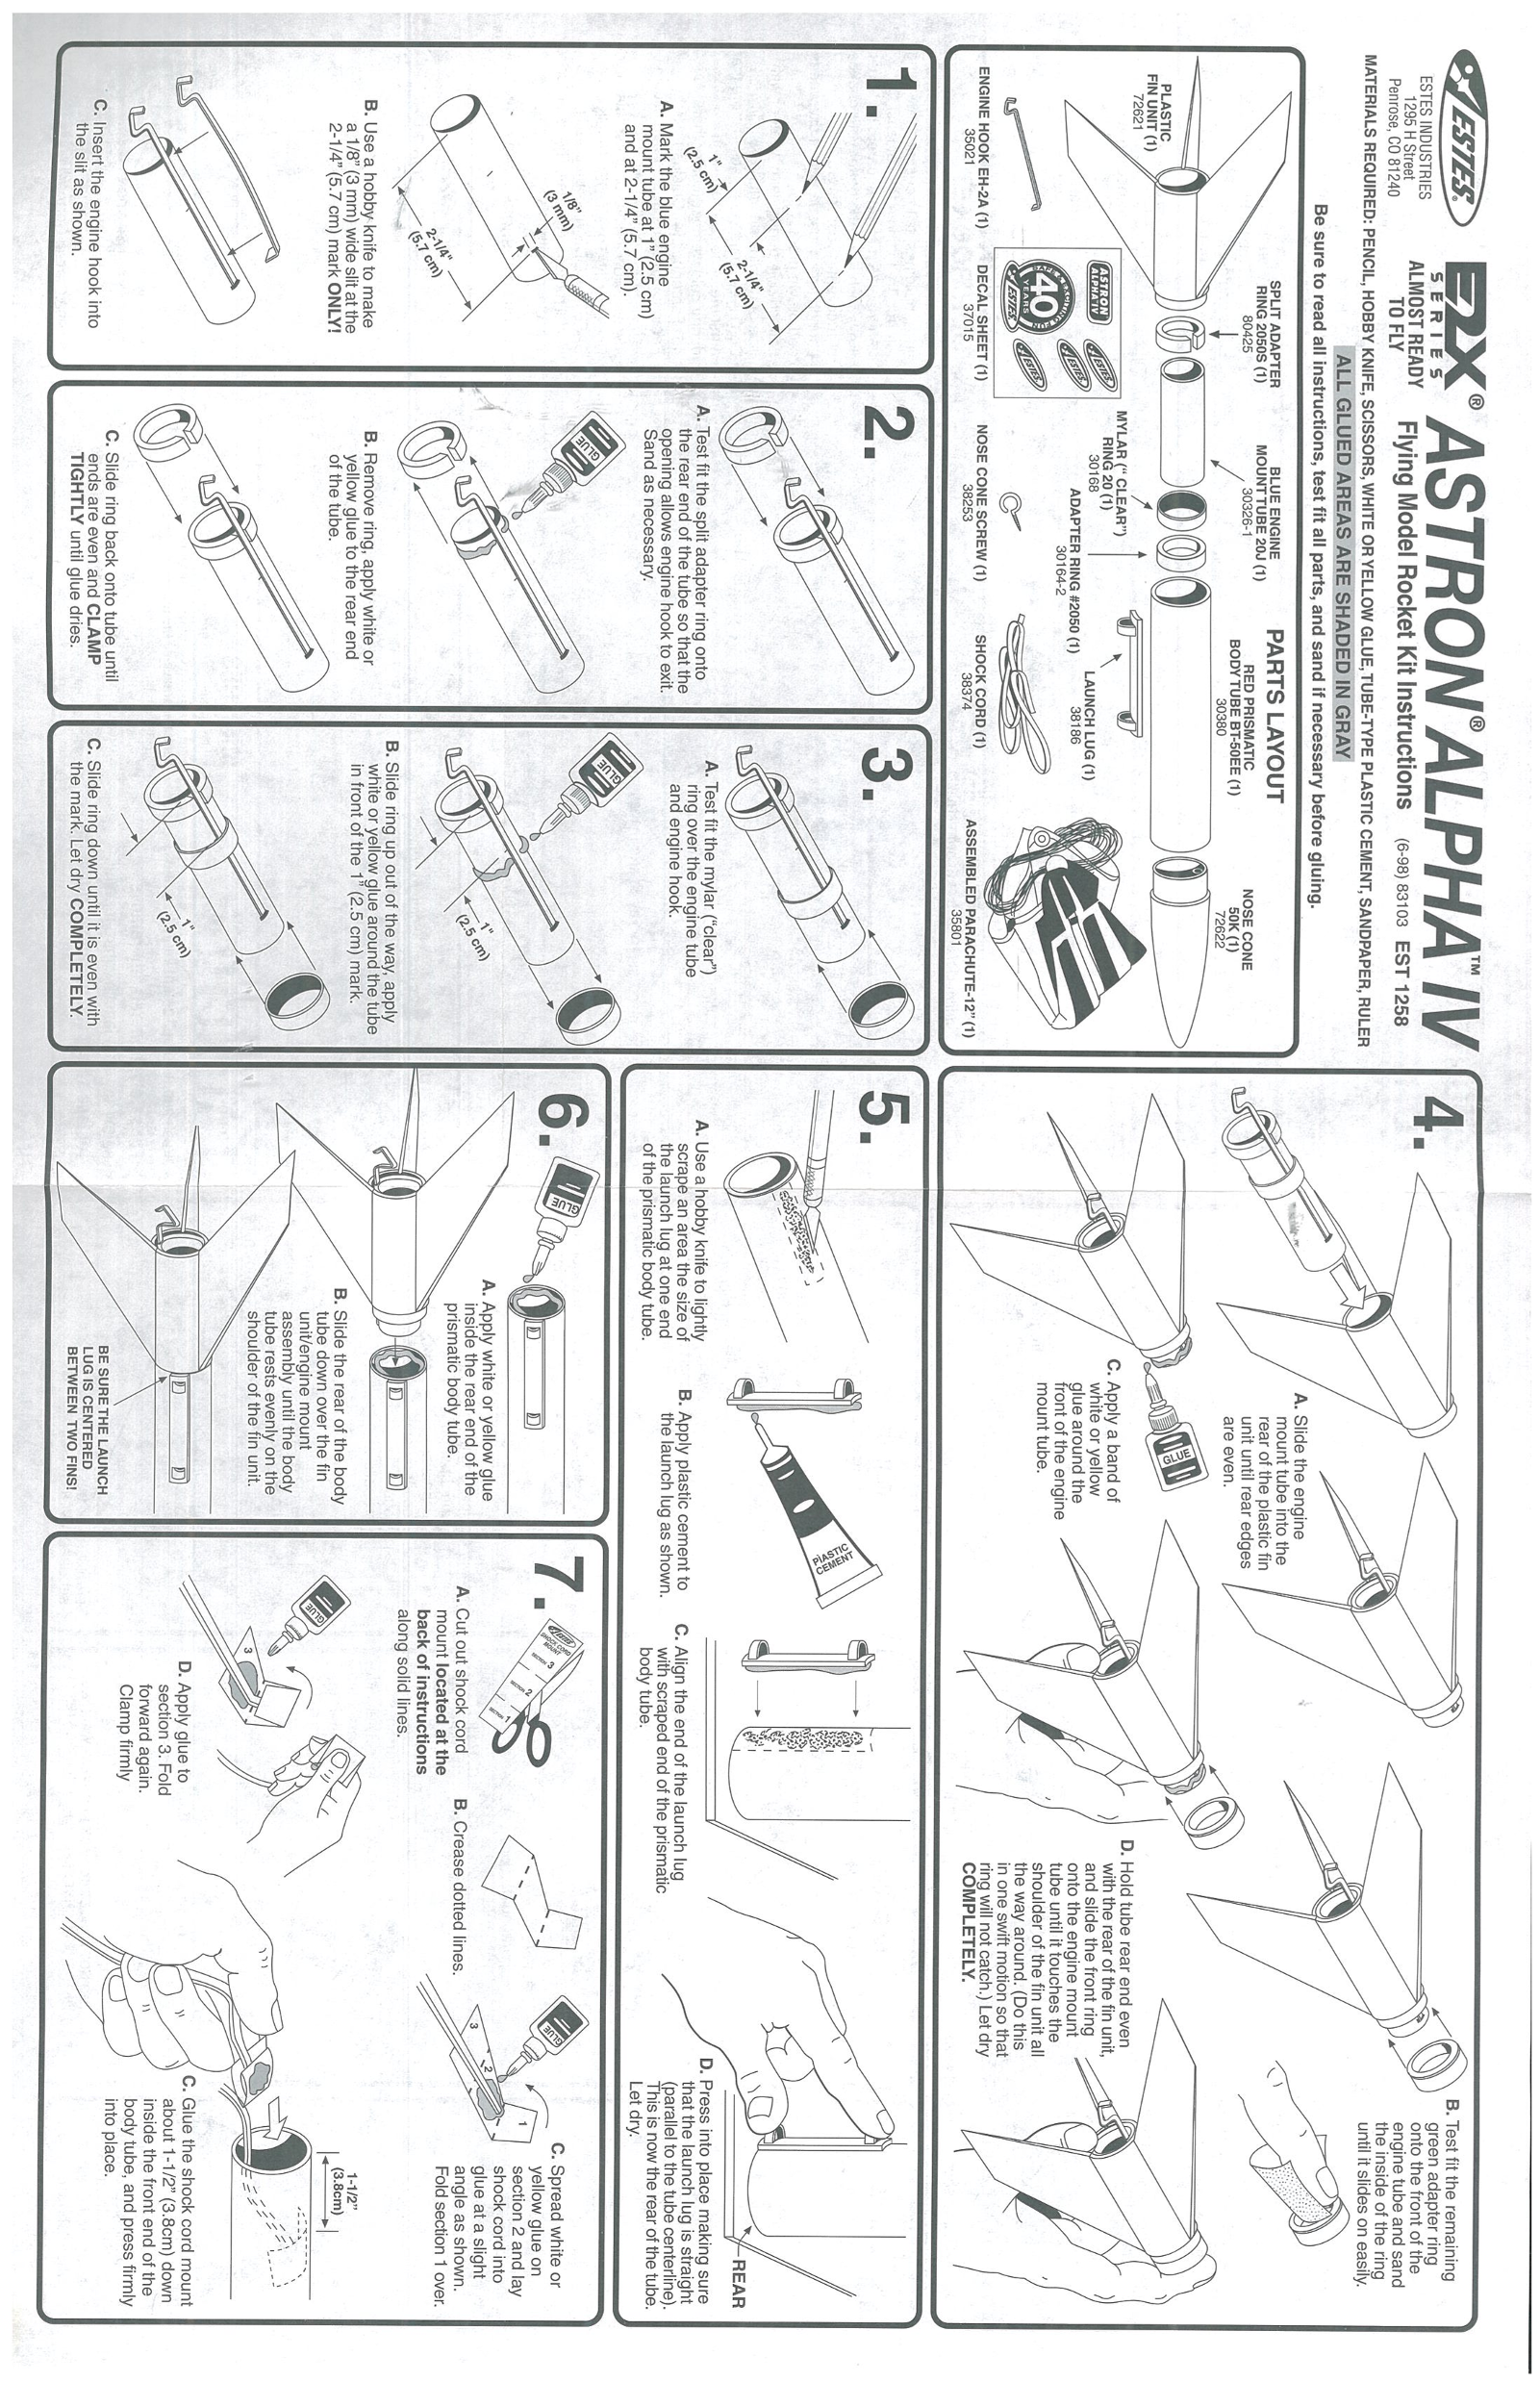
Page 1 Text Content
PLASTIC
FIN UNIT (1)
ESTES INDUSTRIES
the slit as shown,
A. Mark the blue engine
and at 2-1/4” (5.7 cm).
mount tube at 1 (2.5 cm)
C.Insertthe engine hook into
RING 2
a 1/8” (3 mm) wide slit at the2-1/4 (5.7 cm) mark ONLYI!
MYLAR CLEAR7)
of the tube.
Sand as necessary.
TIGHTLY until gtue dries.
yellow glue to the rear end
ends are even and CLAMP B. Remove ring, apply white or
C. Slide ring back onto tube un 只 . Test ft the split adapter ring onto
opening allows engine hook to exit. the rear end of the tube so that the
ALL GLUED AREAS ARE SHADED IN GRAY
ALMOST READY ] |
SPNKARARTER Wo BRESSINE , PARTS LAYOUT
1295 H Streef
Be sure to read all instructions, test fit all parts, and sand if necessary before gluing.
and engine hook.
BODYTUBE BT50EE (1) 50K (人
2 人 30328120 个) RED PRISMATIC No SE CONE
太 . Test ft the myiar (clear) 2 [| 3 虱 一 ring overthe engine tube
8 Use a hobby knite to make in front of the 1 (2.5 cm) mark.
the mark. Let dry COMPLETELY.
8. Slide ring up out of the way, apply
C. Slide ring down until it is even with pol25 eteet 0 TOFY Flying Model Rocket Kit Instructions (eea) saios EST 1258
White oryellow glue around the tube
MATERIALS REQUIRED: PENCIL, HOBBY KNIFE, SCISSORS, WHITE OR YELLOW GLUE,TUBE-TYPE PLASTIC CEMENT, SANDPAPER, RULER
< 攻 2( ASTRONALPHA/V
the launch Iug at one end
ofthe prismatic body tube. 用 .Use a hobby knife to lightly Scrape an area the size of
NS unitfengine mount
prismatic body tube.
LUGIS CENTERED
tube down over the fin
SA_shouldqer of the fin unit. are even.
BETWEEN TWO FINSI!
BE SURETHE LAUNCH assembly until the body
tube rests evenly on the inside the rear end of the
六. Apply white or yellow glue C.Apply abana of
B. Siide the rear of the body
body tube.
along solid lines.
及 . Cut out shock cord
mount located at theback of instructions
Clamp firmly D. Apply glue to
forward again.
Section 3. Fold
C.Align the end of the launch lug
with scraped end of the prismatic
B. Crease dotted lines.
35021 ) 5 人 38253 38374 ASSEMBLED RCHUTE 12 (1) COMPLETELY,
ADAPTER RING #2050 (1) 38186 glue around the onto the engine mount 0 ) LAu Ncu Lue dy) white or yellow and slide the front ring
30164-2 front ofthe engine , tube until it touches the
the way around. (Do this
人 一 in one swift motion so that ENGINE HOOK EH-2A (1 DECAL SHEET (f NOSE CONE SCREW (1) SHOCK CORD (1T) 和 teen) Letdry mount tube, Shoulder of the fin unit all AR ) with the rear of the fin unit,
Let dry.
into place,
green adapter ring
yellow glue on onto the front of the
glue at a siight the inside of the ring
shock cord into 昌 . Test fi the remaining
C. Spread white or until it slides on easily, engine tube and sand
angle as shown.
inside the front end of the section 2 and lay
about 1-1/2” (3.8cm) down D. Press into place making surethat the launch [ug is straight
body tube, and press firmly Fold section 1 over.C. Glue the shock cord mount
(parallelto the tube centerline).This is nowthe rear of the tube.
Page Summary Contents For ESTES ASTRON ALPHA IV INSTRUCTIONS
Manual Details
| Brand | Estes |
|---|---|
| Pages | 2 |
| File Size | 14.36 MB |
| Published | June 03, 2026 |
Enter the captcha to get the download link:

Frequently Asked Questions
How do I prepare the rocket for launch?
Ensure the parachute is packed and inserted, shock cord/recovery wadding are secured, and the igniter plug is installed.
What weather conditions are necessary for launching?
Launch only during calm weather with good visibility and no wind to ensure safety.
How should I handle the launch controller before firing?
Keep the safety key attached until the moment of launch. Move everyone back from the rocket prior to countdown.
If my rocket gets stuck, what should I do?
Wait until it is clear that there is no wind or wind picking up; never attempt to recover a failed flight.