ESTES 1848 – Snapshot
Summary
Elevate your hobby with this integrated high-altitude photography and model rocketry system. This comprehensive kit allows serious hobbyists to capture stunning images during rocket launch and recovery sequences. The user manual provides detailed instructions covering every stage: safe assembly of parachutes, precise pre-launch checks (including NAR safety codes), operational procedures for the SnapShotr camera during flight, and complete post-recovery maintenance. It is essential reading for anyone looking to safely document aerial rocketry achievements.
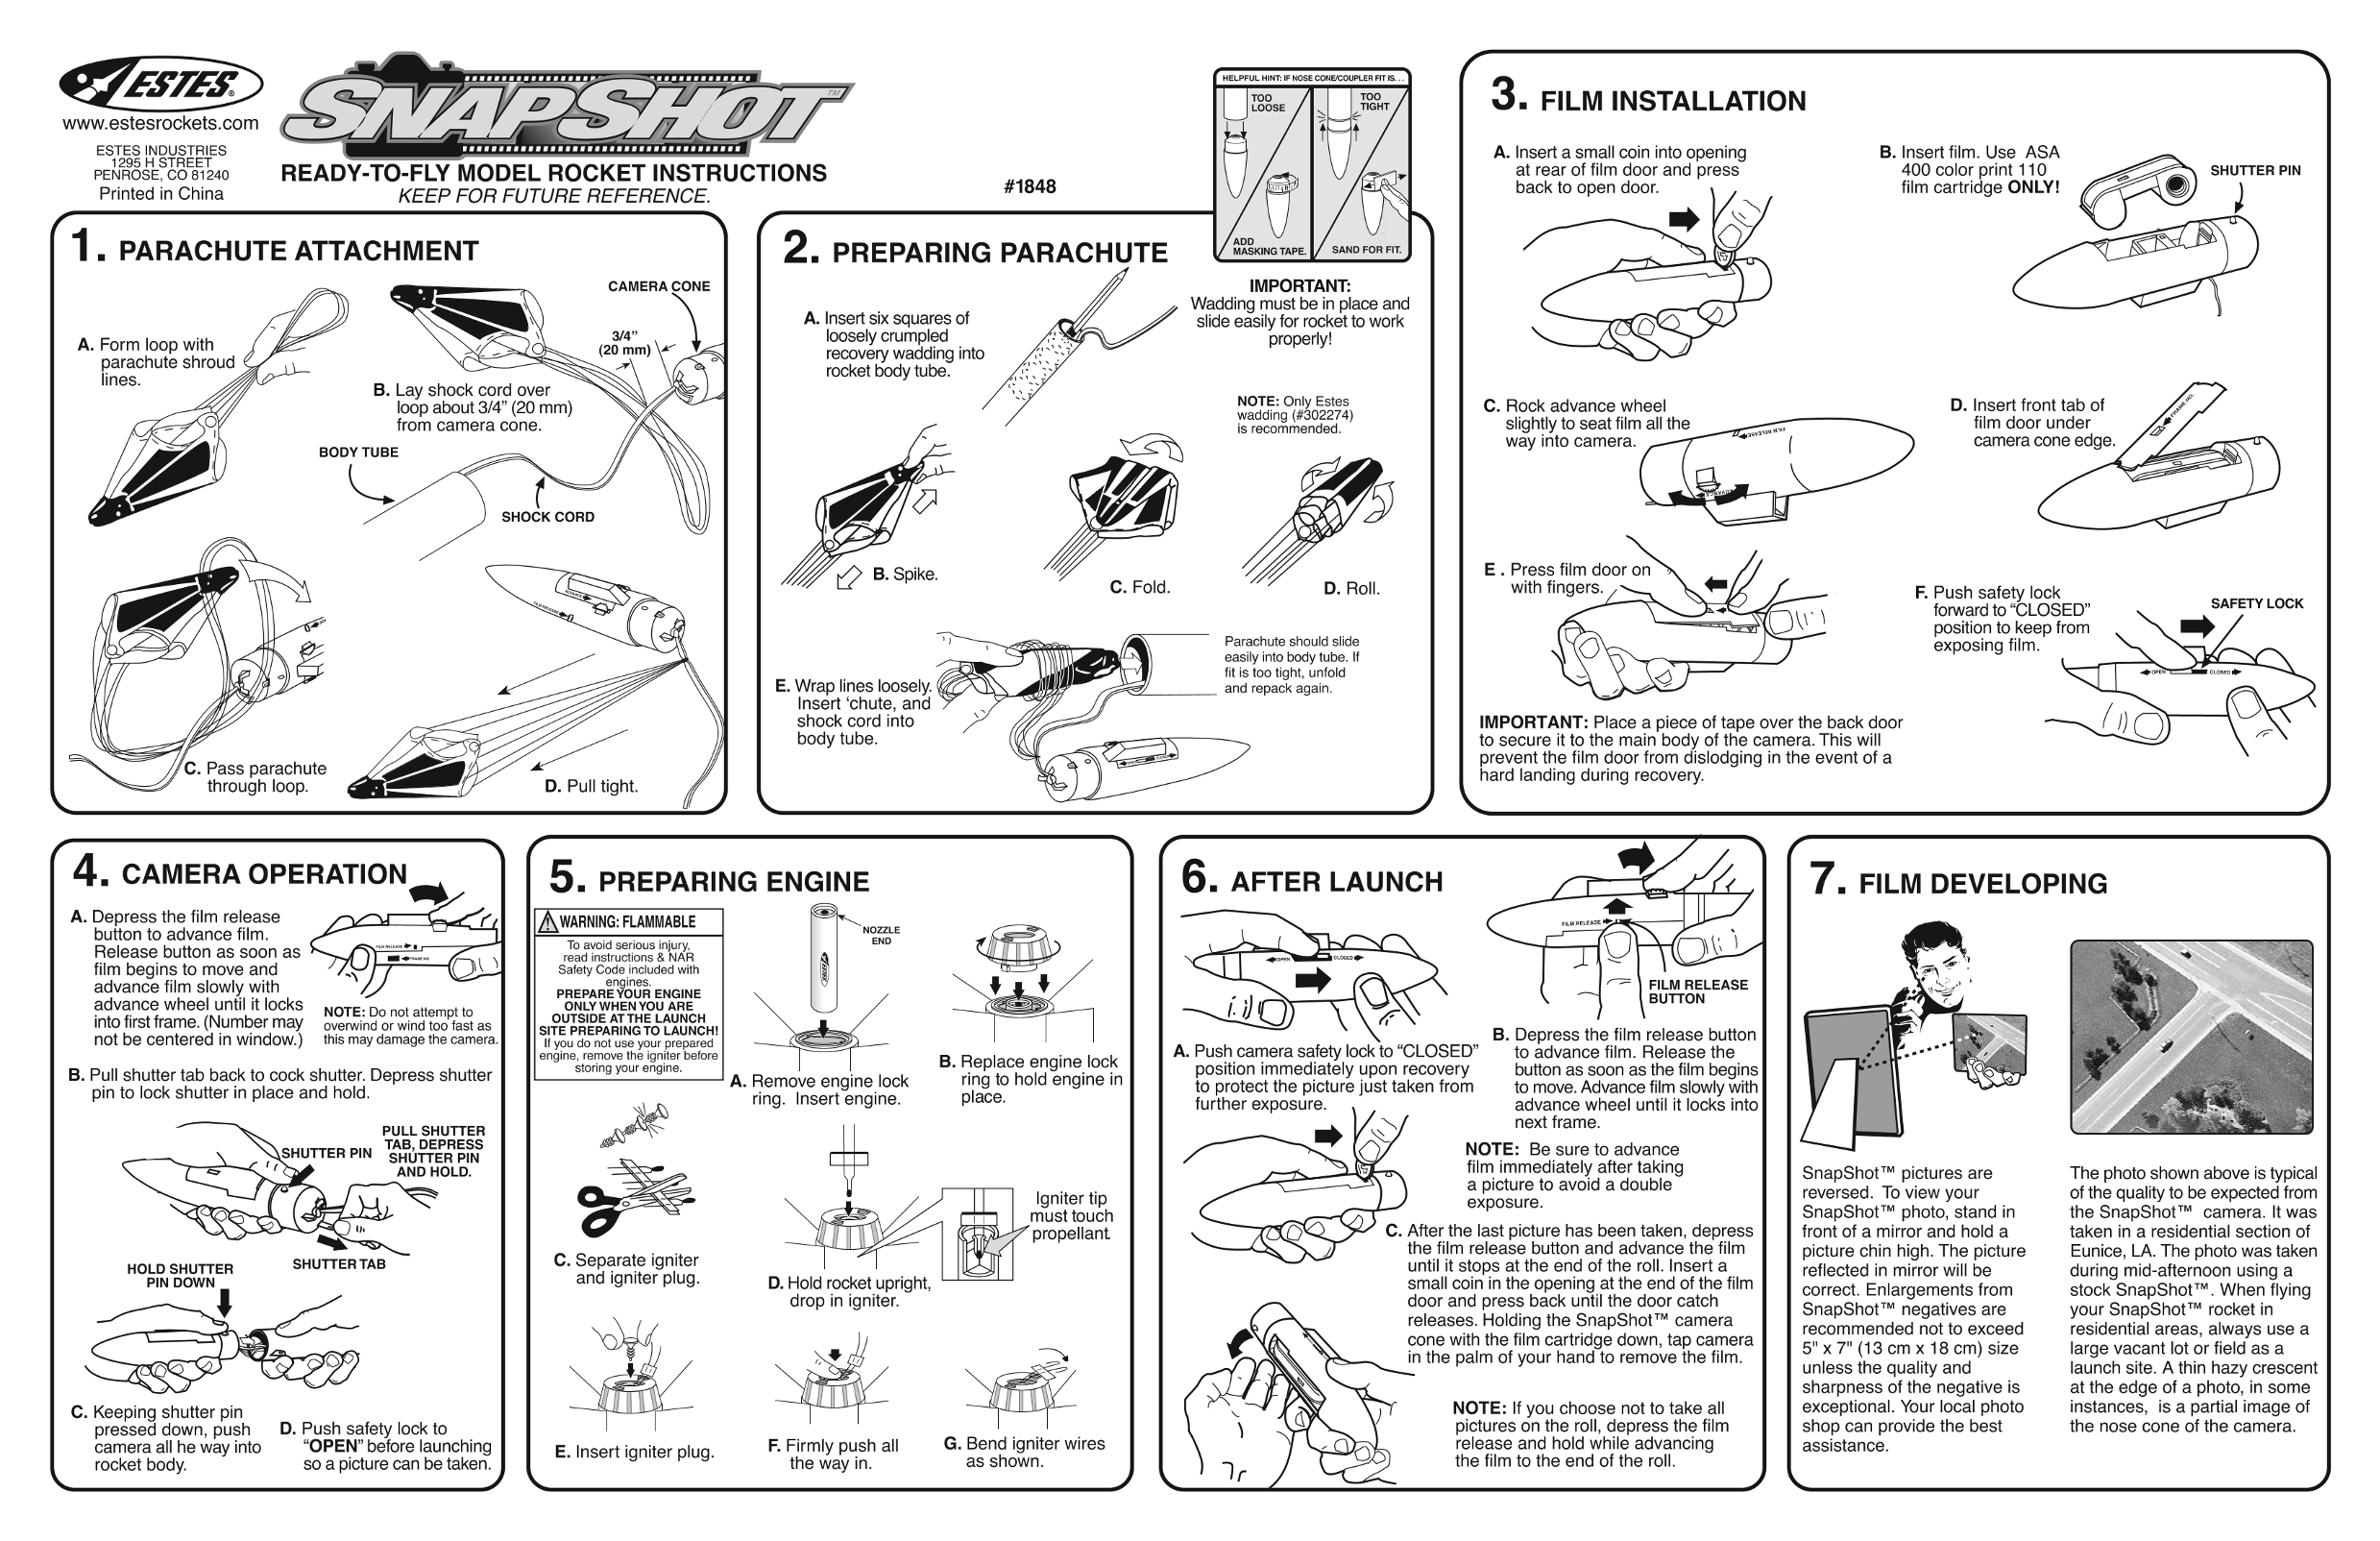
Page 1 Text Content
TREEURNTENOECORCOURERRT
国 到 、 | 柄 v 3 =。 FILM INSTALLATION
Www.estesrockets.com
ESTES INDUSTRIES
A.Insertasmall coin into opening B. Insertfilm. Use ASA
1295 H STREET
_ 加 at rear offilm door and press 400 color print 110
PENROSE, CO 81240
#1848 back to open door. film cartridge ONLY!
Printed in China
f . 人 入 员 DD WU 和 1 。 PARACHUTE ATTACHMENT 2. PREPARING PARACHUTE MASKING TAPE. SAND FOR FIT.
IMPORTANT:
Wadding must be in place and
入. Insert six squares of slide easily for rocketto work loosely crumpled
properly!
和. Form loop with
recovery wadding into
parachute shroud
rocket body tube.
NOTE: Only Estes
C, Rock advance wheel
wadding (#302274)
slightly to seatfilm allthe
is recommended.
way into camera.
BODY TUBE
E. Press film door on
with fingers.
Parachute should slide
easily into body tube. 上 人 fis too tight unfold E. Wrap lines loosely 狼 从 and repack again.
Insert chute, and shock cord into
IMPORTANT: Place a piece of tape over the back door
body tube. to secure itto the main body of the camera. This will
prevent the fm door from dislodging in the event of a
C. Pass parachute
hard landing during recovery.
through loop.
4. c AMERA OPERATION
6 。 AFTER LAUNCH
有 A, Depress the film release
< 一 一 和 一一 TO 全 本
button to advance film,
To avoid serious injury
Release button as soon as
read instructions & NAR
fm begins to move and Safety Code included with
engines. “一 | FILM RELEASE
advance 和 m slowly with
PREPARE YOUR ENGINE
BUTTON
advance wheel until it locks ONLY WHENYOU ARE
NOTE: Do not attempt to
OUTSIDE ATTHE LAUNCH
into firstframe. (Number may overwind or wind too fast as
B. Depress the film release button
not be centered in window.) this may damage the camera.
to advance film. Release the
B. Replace engine lock
storing your engine. position immediately upon recovery
button as soon as the film begins
B. Pull shutter tab back to cock shutter. Depress shutter
A. Remove engine lock ring to hold engine in
to protect the picture just taken from to move.Advance film slowly with
pin to lock shutter in place and hold.
ring,, Insert engine. place.
further exposure. advance wheel until it locks into next frame.
PULL SHUTTER
NOTE: Be sure to advance
film immediately after taking
Snap Shotm pictures are The photo shown above is typical
a picture to avolid a double
reversed. To view your ofthe quality to be expected from
lgniter tip
exposure,
musttiouch Snap Shot photo, stand in the Snap Shotr camera. lt was . After the last picture has been taken, depress front of a mirror and hold a taken in a residential section of
propellant
the film release button and advance the film
picture chin high. The picture Eunice, LA. The photo was taken
SHUTTER TAB C. Separate igniter
HOLD SHUTTER until it stops at the end of the roll. Insert a
reflected in mirror will be during mid-afternoon using a
and igniter plug.
PIN DOWN
D. Hold rocket upright, small coin in the opening at the end of the film
correct. Enlargements from stock Snap Shot. When flying
drop in igniter. door and press back until the door catch
Snap Shotr negatives are your Snap Shotr rocket in
releases. Holding the Snap Shotm camera
recommended not to exceed residential areas, always use a
cone with the film cartridge down, tap carmnera
5"x X7"(13 cm x 18 cm) size large vacant lot or field as a
in the palm of your hand to remove the film.
unless the quality and launch site. A thin hazy crescent sharpness of the negative is at the edge of a photo, in some NOTE: If you choose not to take all exceptional. Your local photo instances,is a partial image of
pictures on the roll, depress the film shop can provide the best the nose cone of the camera,
pressed down, push D. Push safety lock to
“OPEN" before launching F Firmly push all G.Bend igniter wires release and hold while advancing assistance.
camera all he way into
as shown. the film to the end of the rol,
rocket body so apicture can be taken the way in.
Page Summary Contents For ESTES 1848 – Snapshot
Manual Details
| Brand | Estes |
|---|---|
| Pages | 2 |
| File Size | 2.27 MB |
| Published | June 03, 2026 |
Enter the captcha to get the download link:

Frequently Asked Questions
What are the recommended engines for the SnapShotr rocket?
The only recommended engines are B6-4 (for low altitude photos) and C6-5 (for high altitude photos).
How do I clean the camera lens and mirror?
Use a new, clean, small camel hair brush. Never use any object other than the brush for cleaning.
What must be done before launching with the SnapShotr camera?
Always ensure the safety lock is in the closed position, remove loose wires or debris, and maintain proper launch procedures according to the NAR Safety Code.