ESTES 3026 – Photon Probe
Summary
Build your ideal model rocket with this comprehensive kit and manual. The instructions guide advanced hobbyists through every step, from precise component assembly—including gluing fins and attaching recovery systems—to detailed finishing work like priming, painting, and decal application. A complete resource covering mounting engines, preparing igniters, conducting pre-flight safety checks, and overseeing a controlled launch sequence. Ideal for dedicated rocketry enthusiasts seeking a hands-on building experience.
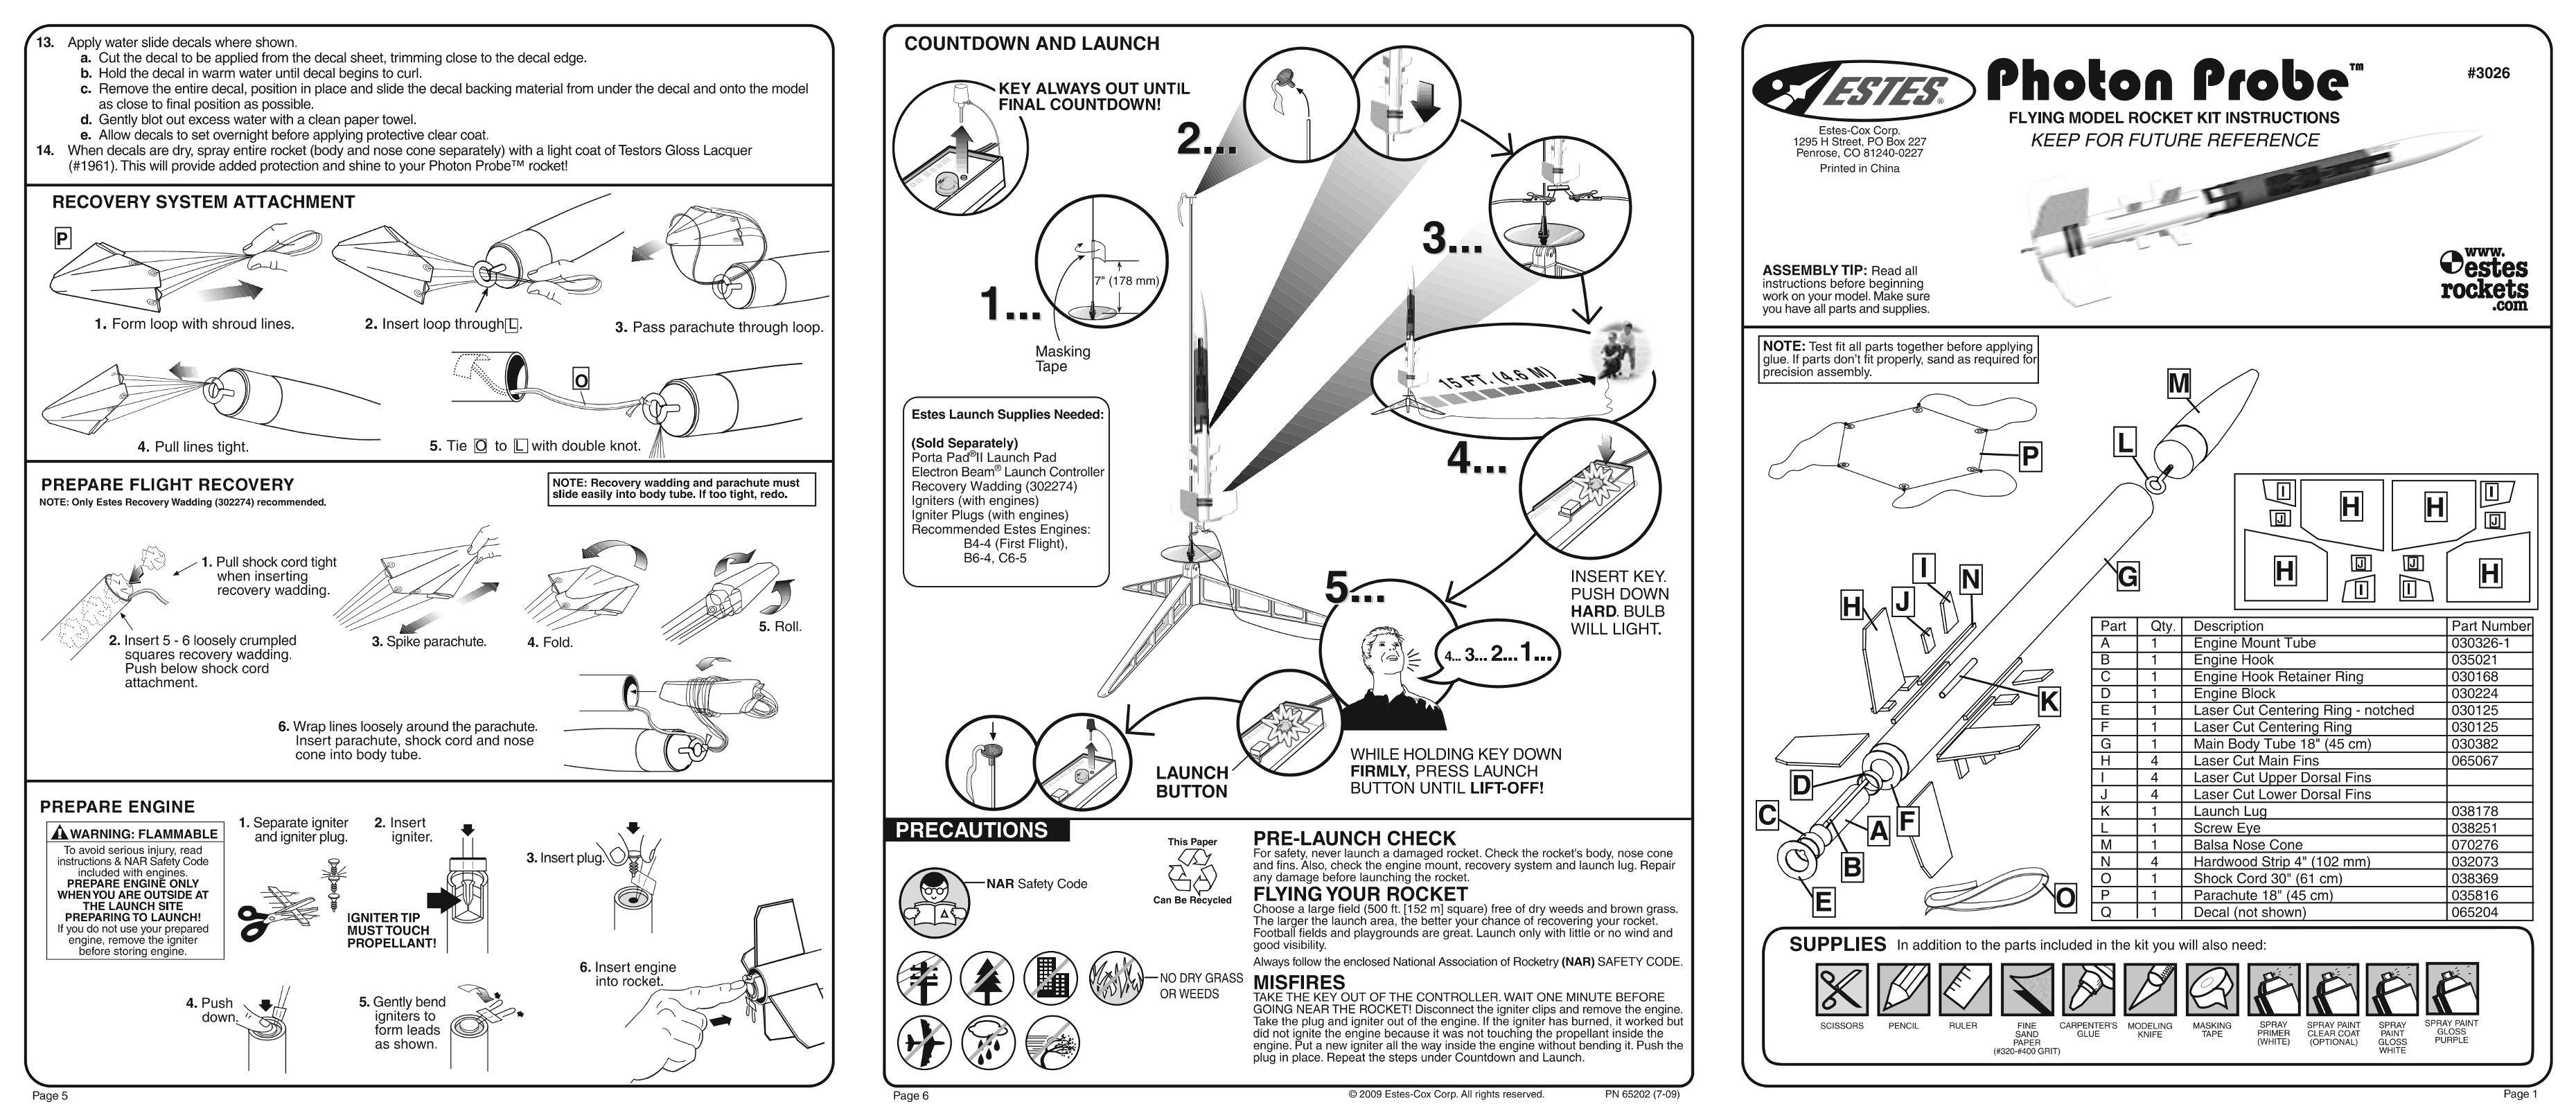
Page 1 Text Content
/13. Apply water slide decals where shown, f COUNTDOWN AND LAUNCH 1 人 a. Cutthe decal to be applied from the decal sheet, trimming close to the decal edge.
b. Hold the decal in warm water until decal begins to cur|. #3026
c. Remove the entire decal, position in place and slide the decal backing material from underthe decal and onto the model 户 KEY ALWAYS OUT UNTIL as close to final position as possible.
d. Gently blot out excess water with a clean paper towel. TAN FINAL COUNTDOWNI!
EC FLYING MODEL ROCKET KIT INSTRUCTIONS tes- .
e. Allow decals to set overnight before applying protective clear coatt, 1295 昌 Strect'PO BOx 227 KEEP FOR FUTURE REFERENCE 14, When decals are dry spray entire rocket (body and nose cone separately) with a light coat of Testors Gloss Lacquer Penrose, CO 81240-0227 ({#1961). This will provide added protection and shine to your Photon Prober M rocketl Printed in China
RECOVERY SYSTEM ATTACHMENT
一 一 一 - 一 TYWW.
ASSEMBLY ER Read all 电 estes instructions before beginningwork on your model. Make sure Tockets you have all parts and supplies. .0m
Masking NOTE: Test fit all parts together before applying Tape glue.lf parts domttfit properly sand as reduired for|
precision assembly.
人 AN\ Estes Launch Supplies Needed:
4. Pulllines tight, 5.Tie 加 to 加 with double knot 1 (Sold Separately)
Porta Padell Launch Pad Electron Beame Launch Controller
PREPARE FLIGHT RECOVERY NOTE: Recovery wadding and parachute must
Recovery Wadding (302274)
lid ily into body tube. If too tight, redo.
NOTE: Only Estes Recovery ing (302274)》 5 ee8s yy 0 re lgniters (with engines)
lgniter Plugs (with engines) Recommended Estes Engines:
B4-4 (First Flight),
、 RS .一 1. Pull sheck cord tight B6-4, C6-5 回 ] 奢 when inserting N INSERT KEY.
recovery wadding. PUSH DOWN
HARD. BULB
4 WILL LIGHT, Part | Qty. | Description Part Number
2. Insert 5 - 6 Iloosely crumpled 3. Spike parachute. 4. Fold. A 1 Engine Mount Tube 030326-1 squares recovery wadding. 局 1 Engine HOCK 035021 Push below shock cord CE 和 ERGi - -attachm
nt. ngine Ho k Retainer Ring
D 1 Engine Block 030224 E 1 Laser Cut Centering Ring - notched 030125
6. Wrap lines loosely around the parachute. F 1 Laser Cut Centering Ring 030125 Insert parachute, shock cord and nose 四 1 Main Body Tube 18" (45 cm 030382cone
into body tube. WHILE HOLDING KEY DOWN JS
H 4 Laser Cut Main Fins 065067
LAUNCH FIRMLY, PRESS LAUNCH
1 | 4 Laser Cut Upper Dorsal Fins
PREPARE ENGINE BUTTON BUTTION UNTIL LIFTOFF! JJ 4 Laser Cut Lower Dorsal Fins
K 1 Launch Lu 038178
1. Separate igniter 2. Insert L 1 Screw Eee 03825
个 w ARNING: FLAMMABLE| “andigniterplug, ”igniter me “PRE-LAUNCH CHECK ES 07026 _To avoid serious injury read For safety never launch a damaged rocket. Check the rocket's body, nose cone Ti instctons 和 IN Safety Code and fins. Also, check the engine mount, recovery system and launch lug. Repair N 4 Hardwood Strip 4 (102 mm) 032073PREPARE ENsi NESNiy 让 any damage before launching the rocket. 口 | Shock Cord 30" (61 cm) 038369 WHENYOUARE OUTSIDE AT can Be Rdeycled FLYING YOUR ROCKET P 1 Parachute 18' (45 cm) 035816
Choose alarge field (500 人 [152 m] square)j free of dry weeds and brown grass.
PREPARING TO LAUNCHI! IGNITERTIP The larger 计 8 launch area, the better your chance of covering your rock 引 所 1 Decal (not showm 065204 fyou ado not use 和 prepared MUSTTOUCH Footbalifields and playgrounds are great. Launch only with litle or no wind and ee PROPELLANTI good visibility. SUPPLIES In addition to the parts included in the kit you will also need:
6.Insert engine 人 Always follow the enclosed National Association of Rocketry (NAR) SAFETY CODE. SS -一 = 一 -一 -一 into rocket. /一 MODRY GRASS MISFIRES
4_Push 5. Gently bend 多 ORWEEDS TAKETHE KEY OUT OF THE CONTROLLER. WAIT ONE MINUTE BEFORE down 全 “ igniters to SR 一 * NG NEAR 和 ROCKE SConnect ieigniten cips and remgv the engipnei:
AE ake he plug and igniter out of h engine. If the igniter has burned, it worked bu SPRAY PAINT 2 form leads < did not ignite the engine because it was not touching the propellant inside the 8 CT 由 RE 训 E 人 SS
as Shown. 二 engine. Put a new igniter all the way inside the engine without bending it. Push the PAPER Ww WHTS OPTIONAD 8 让
plug in place, Repeat the steps under Countdown and Launch. (820Y00 GT) WE 区
Page 5 Page 6 加 2009 Estes-Cox Corp. All rights reserved. PN 65202 (7-09) Page 1
Page Summary Contents For ESTES 3026 – Photon Probe
Manual Details
| Brand | Estes |
|---|---|
| Pages | 2 |
| File Size | 3.01 MB |
| Published | June 03, 2026 |
Enter the captcha to get the download link:

Frequently Asked Questions
How do I prepare the launch area before flying?
Choose a large field (500 sq m) free of dry weeds and brown grass. Football fields and playgrounds are also suitable.
What should I use for protecting decals on my rocket model?
Allow decals to set overnight, then spray with Testors Gloss Lacquer to provide added protection and shine.
When is it safe to fire the igniter before flying the rocket?
After connecting igniters, removing engine parts, waiting one minute, and carefully following the countdown/launch procedure.
What type of engines are recommended for new flyers?
The B4-4 is recommended for first flights. Other options include RN or RS.