ESTES 2422 - Reflector Manual
Summary
This comprehensive assembly guide is essential for hobbyists interested in detailed model rocketry construction. The manual provides step-by-step instructions covering everything from fin preparation and main body sectioning to precise engine mount installation and payload integration. It includes technical guides on priming, painting techniques, and applying decals, ensuring your rocket reaches its full potential finish. Ideal for beginner to intermediate enthusiasts ready to undertake a complex, rewarding rocketry build.
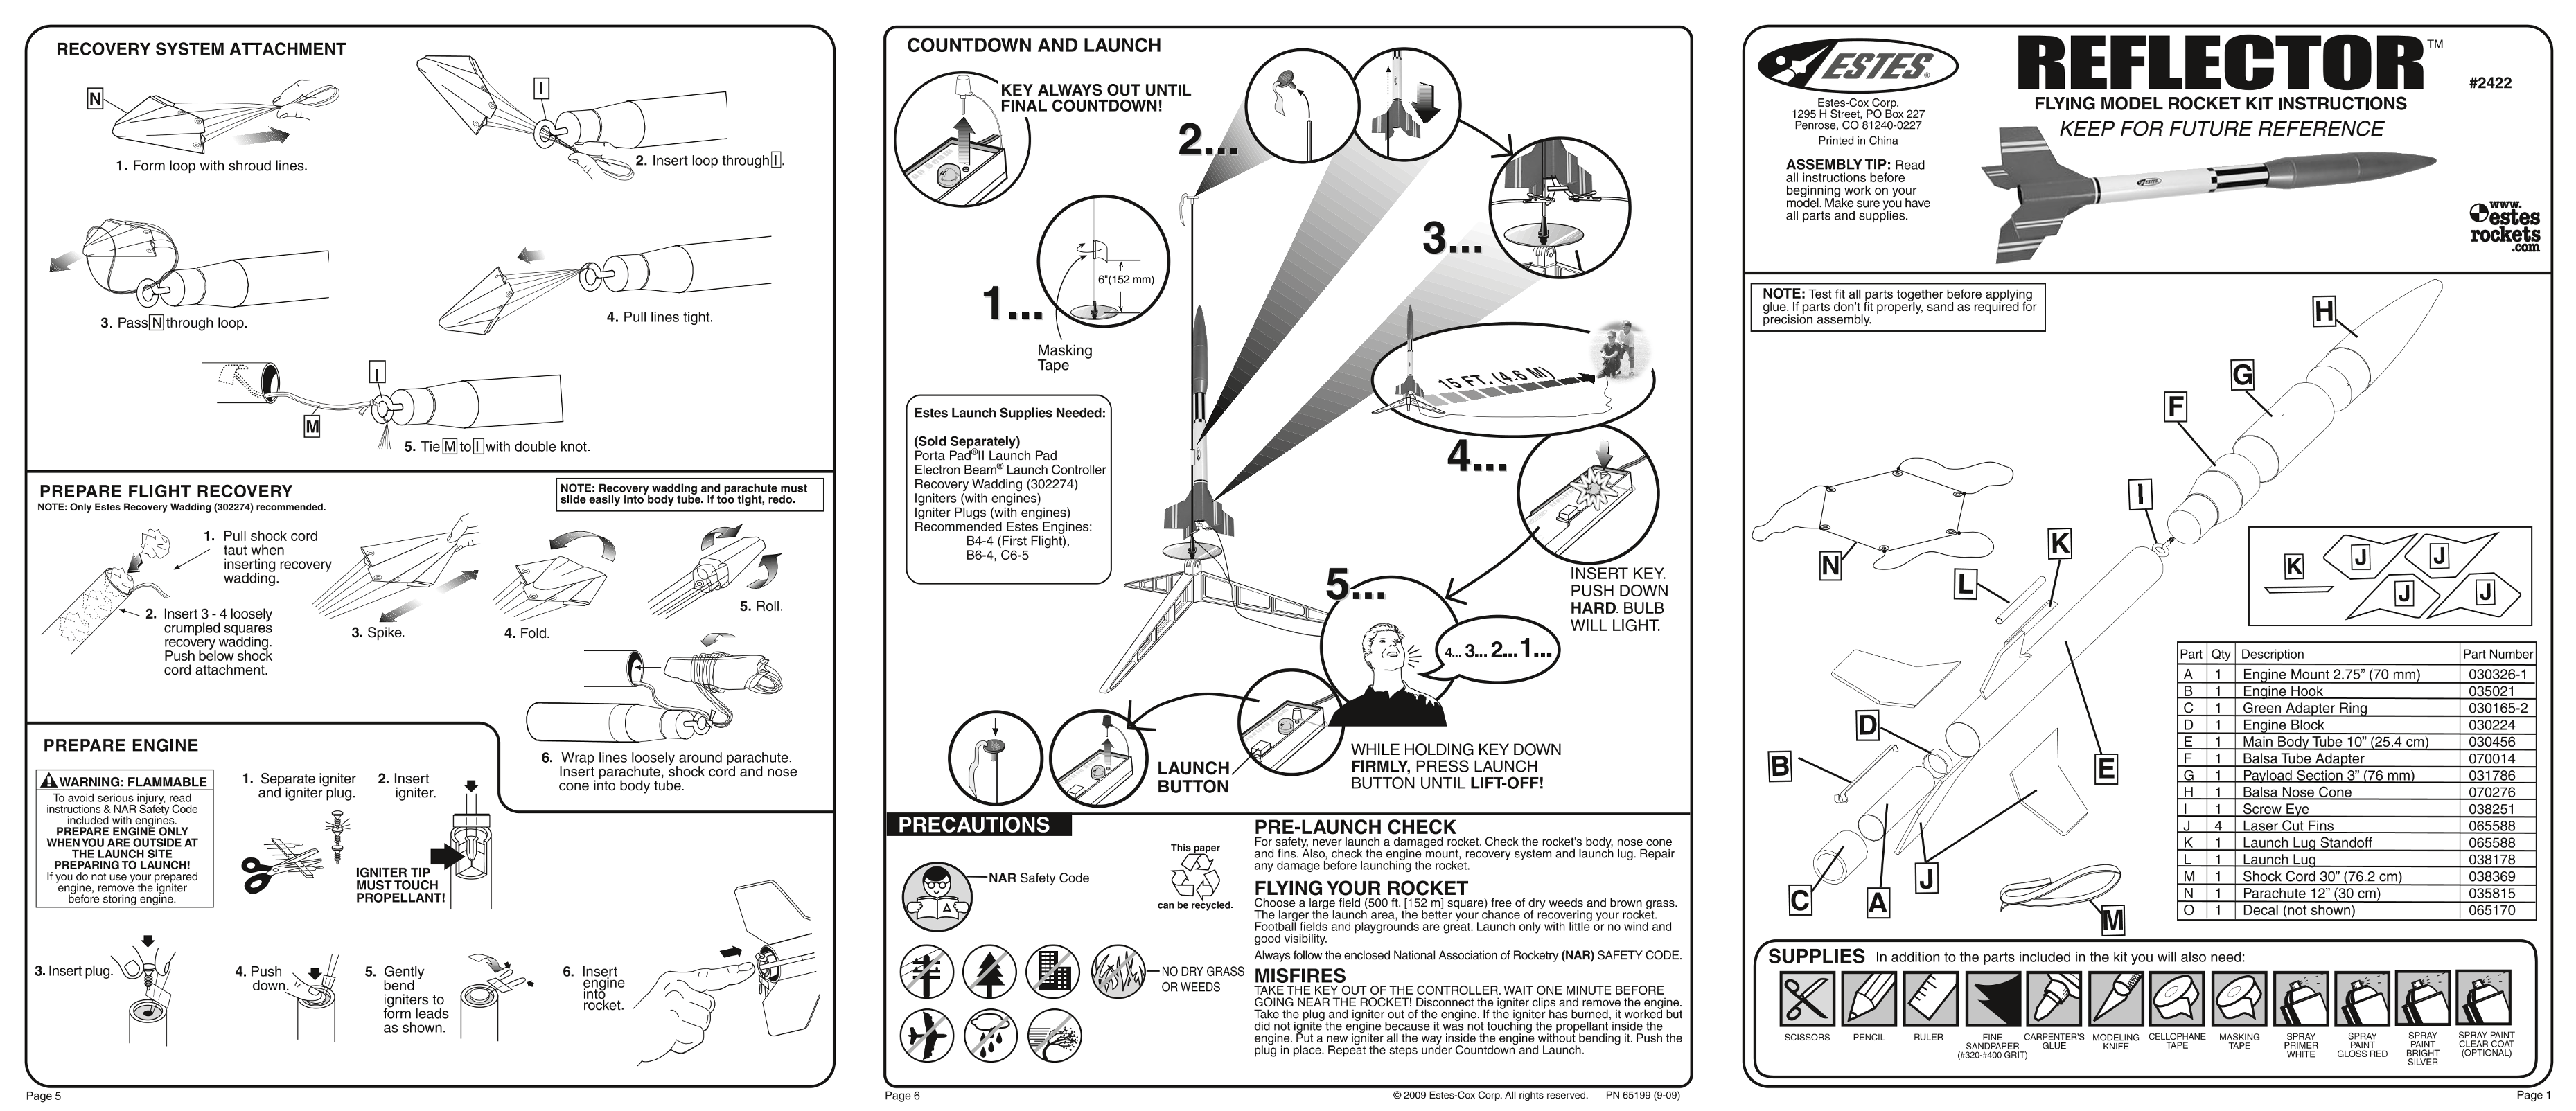
Page 1 Text Content
作 RECOVERY SYSTEM ATTACHMENT COUNTDOWN AND LAUNCH
KEY ALWAYS OUT UNTIL
Estes-Cox Corp.
FINAL COUNTDOWNI!
1295 H Street, PO Box 227 Penrose, CO 81240-0227
Printed in China
SS 2. Insert loop through 册 . ASSEMBLY TIP: Read allinstructions before beginning work on your model. Make sure you have all parts and supplies.
二 站 JE
6"(152 mm)
NOTE: Test ff all parts together before applying glue.lf parts dont 人 properly sand as required for
4. Pull lines tight. precision assembly.
Masking Tape
人 - AN\ Estes Launch Supplies Needed:
(Sold Separately) Porta Padell Launch Pad Electron Beame Launch Controller
Recovery Wadding (302274)
NOTE: Recovery wadding and parachute must
PREPARE FLIGHT RECOVERY
slide easily into body tube. ftoo tight redo. lgniters (with engines)
NOTE: Only Estes Recovery {302274)
lgniter Plugs (with engines) Recommended Estes Engines:
B4-4 (First Flight),
区 1. Pull shock cord, ta when
必 一 inserting recovery
INSERT KEY.
、 wadding. SN A
PUSH DOWN HARD. BULB
2. Insert3-4Ioosely
WILL LIGHT.
crumpled squares recovery wadding.
Push below shock Par | Qty | Description Part Number
cord attachment.
A_ |1 |Engine Moeunt2.75”(70 mm) 030326-1 B_ | 1 Engine Hook 035021
C_ |1 | Green Adapter Ring 030165-2 D_ |1 | Engine Block 030224
PREPARE ENGINE WHILE HOLDING KEY DOWN E_ | 1 Main Body Tube 10"”(25.4cm) 030456
6,Wrap lines loosely around parachute. F_ 11 |Balsa Tube Adapter 070014
LAUNCH FIRMLY, PRESS LAUNCH
Insert parachute, shock cord and nose
个 WARNING: FLAMMABLE 1. Separate igniter BUTTON UNTIL LIFTOFFI! 所 | 1 Payload Section 3 (76 mm) 031786
2 Insert cone into body tube.
BUTTON H 1 Balsa Nose Cone
and igniter plug. igniter.
To avoid serious injury read instructions & NAR Safety Code | 1_ Screw Eye 038251 included with engines,
PRE-LAUNCH CHECK J_ 14 |Laserc Cut Fins 065588
PREPARE ENGINE ONLY
WHENYOU ARE OUTSIDE AT This oaper For safety never launch a damaged rocket. Check the rockets body, nose cone K_| 1 | Launch Lug Standoff 065588 THE LAUNCH SITE BPR and fins. Also, check the engine mount, recovery system and launch lug. Repair L 1 | Launch L 038178 PREPARING TO LAUNCH!
any damage before launching the rocket. 站 加 本 KGC 站 307626T 038369
f you do net use your prepared
OC Of .CIm上 RMINGYQURR9S KET free of dry weeds and brown grass, N | 1 | Farachute 12 (30 cm 035815
engine, remove the igniter before storing engine,.
b led- 。 ,
人 The larger the launch area, the better your chance of recovering your rocket. O_ 11 | Decal (not showm) 065170
Football fields and playgrounds are great. Launch only with little or no wind and good visibility. Always follow the enclosed National Association of Rocketry (NAR) SAFETY CODE. SUPPLIES in addition to the parts included in the kit you will also need: 人
一 NODPy Y GRASS MISFIRES 一 一 一 一
Gently < 6. Insertbend FF 二 engine
OR WEFDS TAKETHE KEY OUT OF THE CONTROLLER. WAIT ONE MINUTE BEFORE NS 六 、 区 区
igniters to 和 me GOING NEARTHE ROCKET! Disconnect the igniter clips and remove the engine, form leads -
Take the plug and igniter out of the engine. If the igniter has burned, it worked but
as shown.
did not ignite the engine because it was not touching the propellant inside the CO SP ph RARANT engine. Put a new igniter all the way inside the engine without bending it. Push the SCISSORS PENCIL RULER FINE CARPENTER'S MODELING CEFLLOPHANE “MASKING PRAY plug in place. Repeat the steps under Countdown and Launch. PR LUE KNIFE TAPE TAPE RE ET CR
SILVER 区)
人 @@ 2009 Estes-Cox Corp. All rights reserved.。 PN 65199 (9-09) Page 1
Page Summary Contents For ESTES 2422 - Reflector Manual
Manual Details
| Brand | Estes |
|---|---|
| Pages | 2 |
| File Size | 2.67 MB |
| Published | June 05, 2026 |
Enter the captcha to get the download link:

Frequently Asked Questions
What materials are needed besides the main kit parts?
You need a launch pad, an electron beam controller, recovery wadding (302274), and separate engines.
How should I prepare the rocket body before assembly?
Sand both sides of balsa wood to smooth them out. Assemble the fin sections by stacking, gluing, and letting it dry.
What is the procedure for igniting an engine?
If an igniter has burned out, put a new one all the way inside the engine without bending it before re-launching.
Where should I launch my model rocket legally?
Launch in large areas like football fields or playgrounds with little to no wind and good visibility, following NAR safety codes.