ESTES 2151 - Big Dawg Manual
Summary
Assemble your powerful model rocket from scratch! This comprehensive manual guides rocketry enthusiasts through every stage, including cutting balsa materials, gluing and aligning fins, painting the body, and installing recovery systems like parachutes. Learn detailed safety protocols and proper launch procedures required for a successful flying experience. Ideal starting kit for hobbyists interested in building and launching their first sophisticated model rocket indoors or outdoors (with appropriate facilities).
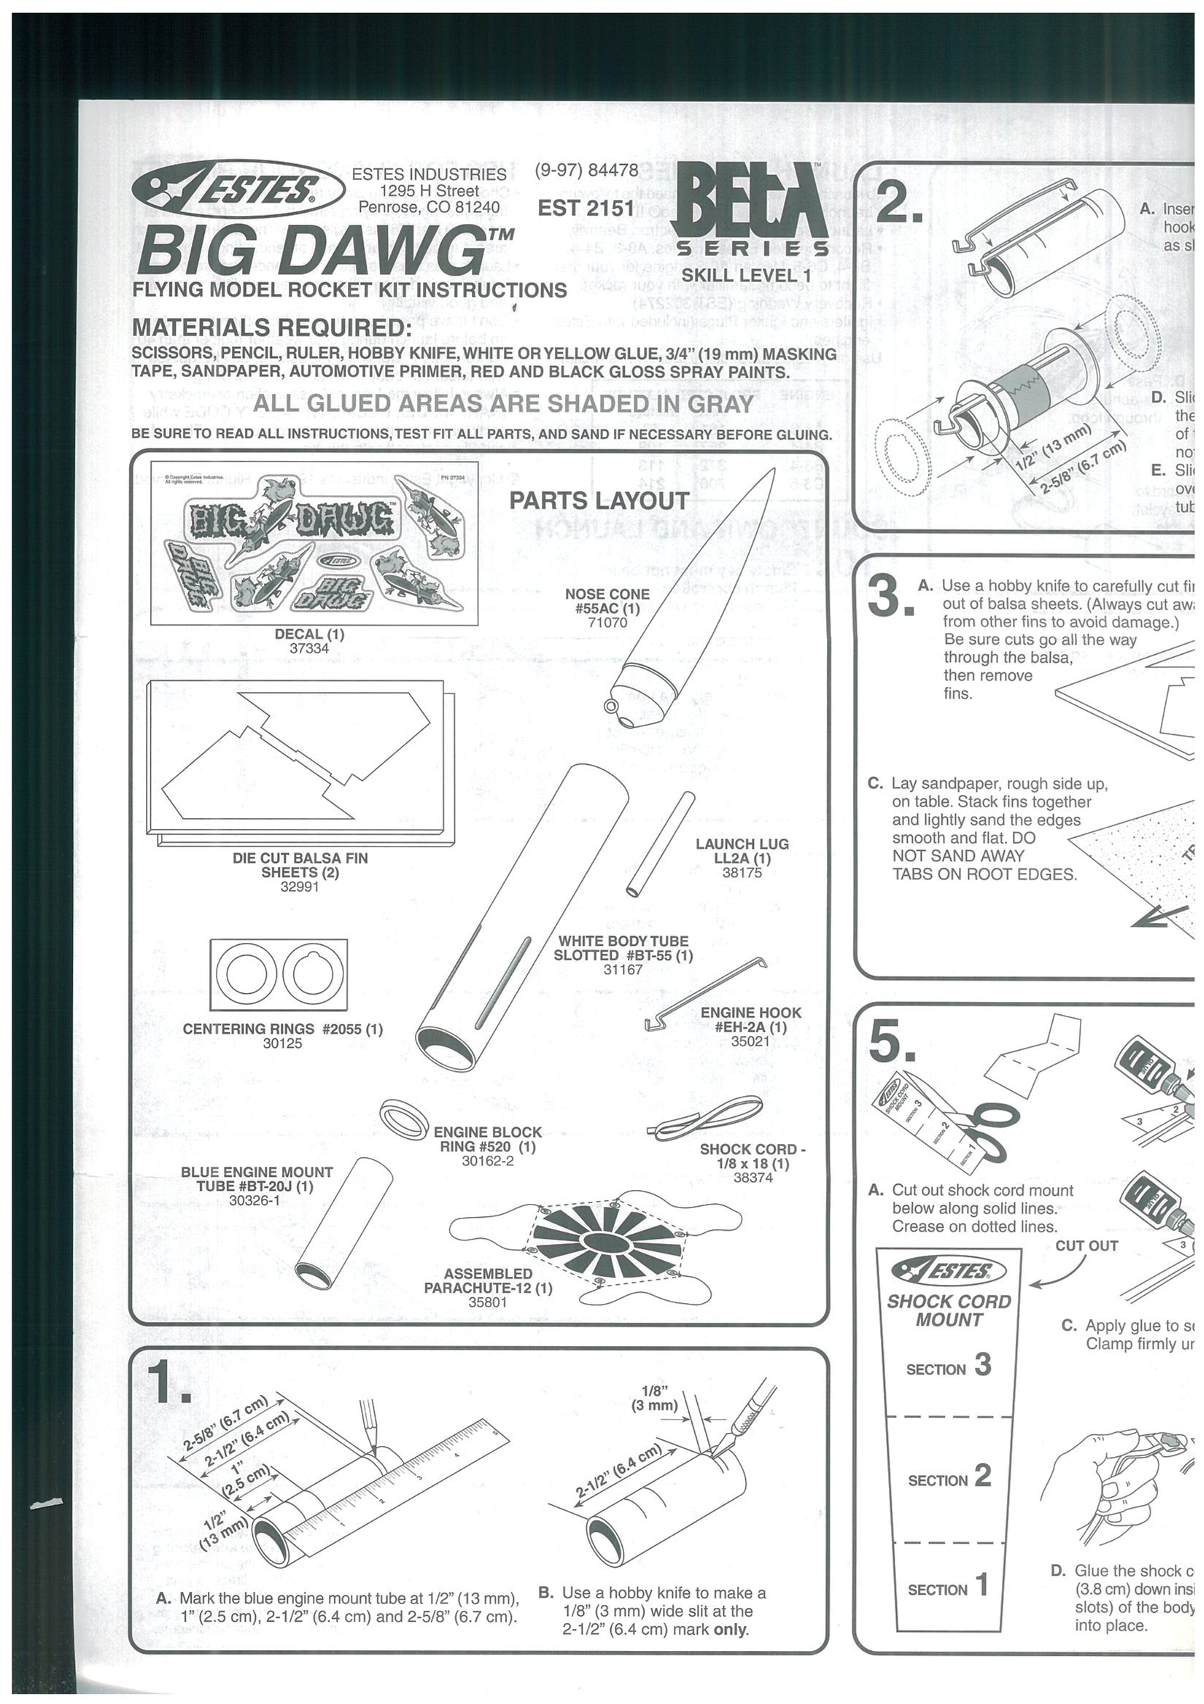
Page 1 Text Content
oz ESTES INDUSTRIES
1295 H Street
Penrose, CO 81240 EST 2151
SERIES
BJ1G DAWG-”
SKILL LEVEL 1
FLYING MODEL ROCKET KIT INSTRUCTIONS
MATERIALS REQUIRED: SCISSORS, PENCIL RULER, HOBBY KNIFE, WHITE ORYELLOW GLUE, 3/4" (19 mm) MASKING TAPE, SANDPAPER, AUTOMOTIVE PRIMER, RED AND BLACK GLOSS SPRAY PAINTS.
ALL GLUED AREAS ARE SHADED IN GRAY
BE SURETO READ ALL INSTRUCTIONS,TEST FIT ALL PARTS, AND SAND IF NECESSARY BEFORE GLUING.
PARTS LAYOUT
AUse a hobby knife to carefuily cut 全
NOSE CONE
四 out of balsa sheets. (Always cut aw;
#55AC (1)
from other fins to avoid damage
DECAL 1T)
Be sure cuts go alltne way through the balsa, then remove fins.
C. Lay sandpaper rough side up, on 雪 able. Stack fms together and lightly sang the edges smooth and flat, DO
LAUNCH LUG
DIE CUT BALSA FIN NOT SAND AWAY
LL2A (1)
SHEETS (2) TABS ON ROOT EDGES.
WHITE BODYTUBE
SLOTTED #BT55 ( 们
ENGINE HOOK
CENTERING RINGS #2055 (1) #EH-2A (1)
SS ENGINE BLOCK RING 520 () SHOCK CORD -
BLUE ENGINE MOUNT TD) TUBE#BT20J (1 由 Cut out shock cord mount
below along solid lines, Crease on dotted lines.
CUTOUT
ASSEMBLED
PARACHUTE-12 (1)
SHOCK CORD
MOUNT
C. Apply gilue to st Clamp firmly ur
SECTION 3
SECTION 2
DGlue the shockc
SECTION 1] (3.8 cm) down ins
B, Use a hobby knitfe to make a
A. Markthe blue engine mounttube at 1/2"(13 mm),
slots) of the body
人 (2.5 cm), 2-1/2" (6.4 cm) and 2-5/8" (6.7 cm),
into place.
2-1/2" (6.4 cm) mark only 1/8" (3 mm) wide slit at the 有
Page Summary Contents For ESTES 2151 - Big Dawg Manual
Manual Details
| Brand | Estes |
|---|---|
| Pages | 4 |
| File Size | 12.68 MB |
| Published | June 03, 2026 |
Enter the captcha to get the download link:

Frequently Asked Questions
Which tools are required for assembly?
Scissor, pencil, ruler, hobby knife, white or yellow glue, 3/4" masking tape, sandpaper, automotive primer, red and black gloss spray paints.
How should the fins be attached to the body tube?
Apply glue to the tabs on the fins along the root edges. Insert them into slots while ensuring they are straight and the end gaps are even, aligning the engine hook with the launch lug line.
What safety precautions must be followed when flying the rocket?
Follow the National Association of Rocketry (NAR) MODEL ROCKETRY SAFETY CODE. Launch from a large field away from power lines or buildings. Always maintain a safe distance during launch.
How do I paint the finished model?
Use automotive primer first. Paint the rocket body red, let it dry, then mask off the nose cone and paint it black.