ESTES 2149 - SM3 Seahawk Manual
Summary
This comprehensive guide provides detailed assembly instructions for a high-performance model rocket kit, covering both upper and lower structural sections. The manual walks builders through intricate component fitment, secure mounting techniques, and proper finishing procedures. It is designed for hobbyists who require professional guidance on construction integrity, concluding with essential safety protocols and the step-by-step launch sequence for safe rocketry operation.
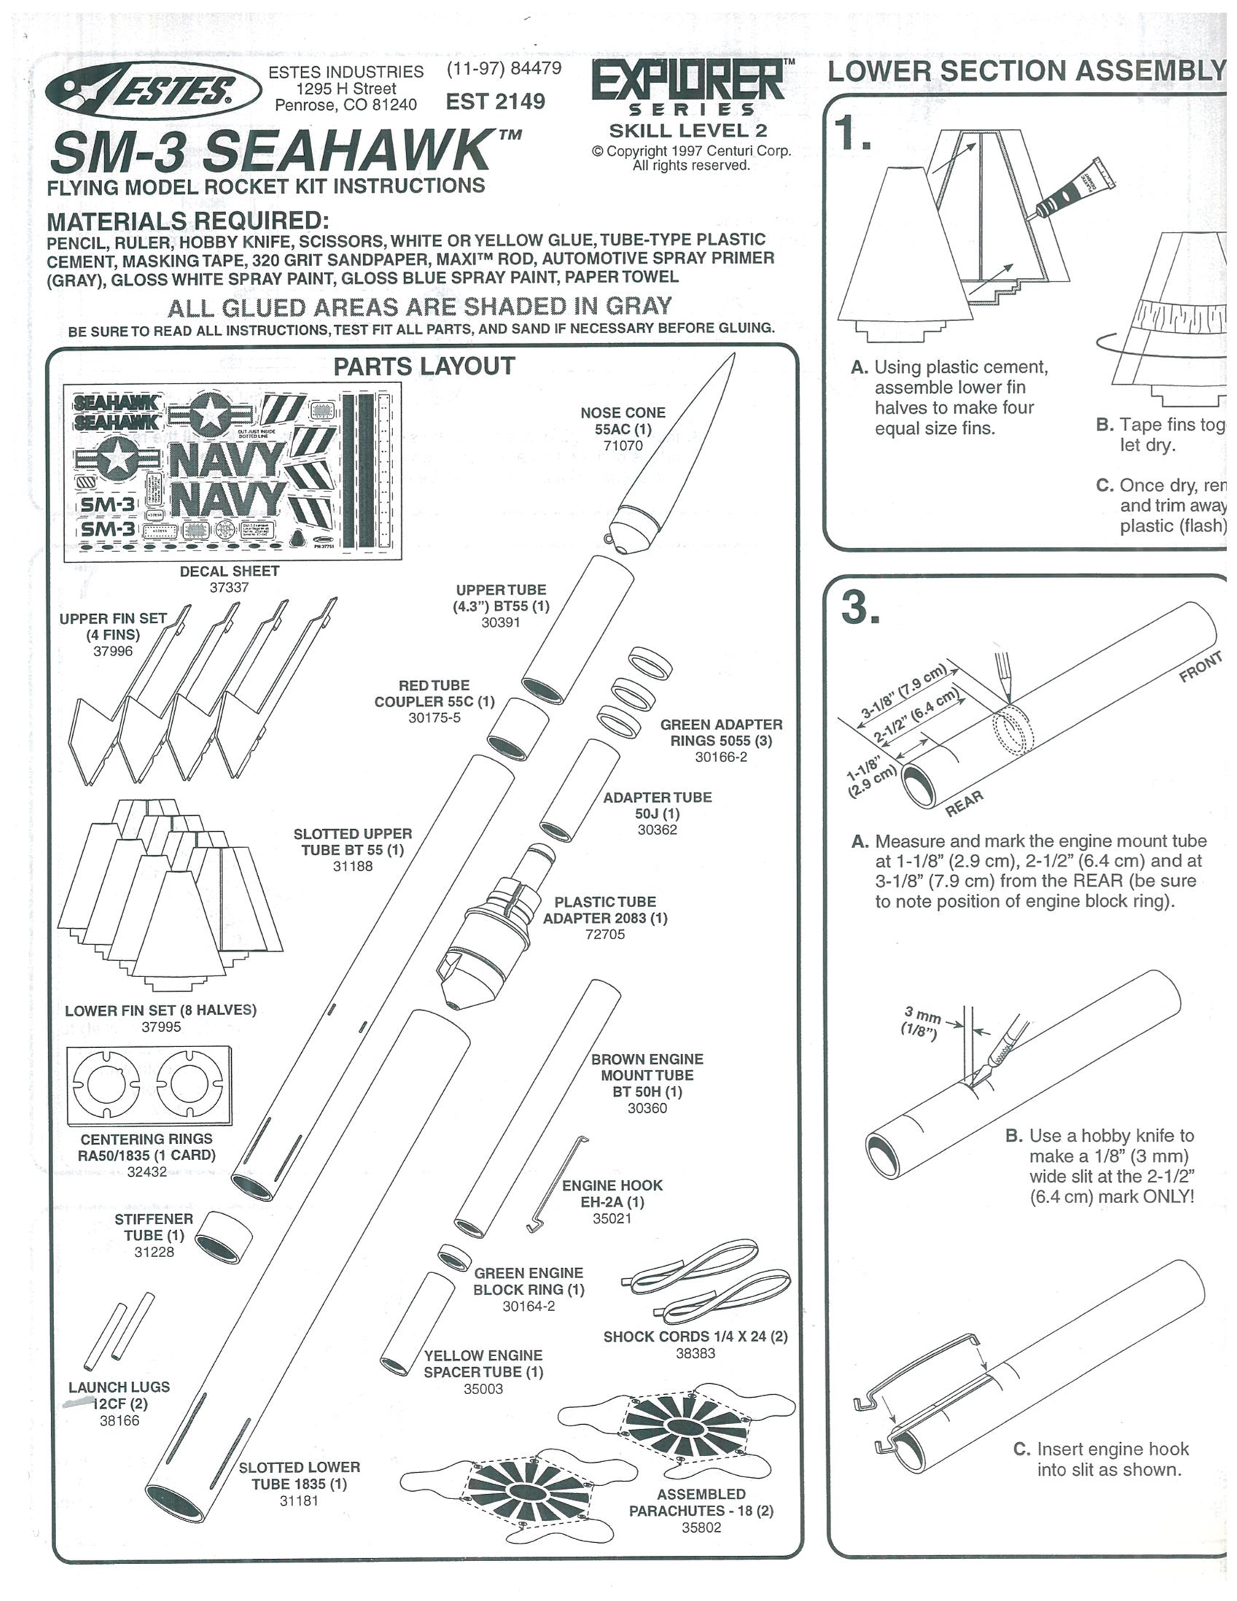
Page 1 Text Content
ESTES INDUSTRIES (11-97) 84479
LOWER SECTION ASSEMBLY
EXP 上 RER
CE pentcse'0g 2 EST 2149
SERIES
SKILL LEVEL 2 1. S11-3 SEAHAWK- @@Copyright 1997 Centuri Corp- Alrights reserved.
FLYING MODEL ROCKET KIT INSTRUCTIONS
MATERIALS REQUIRED: PENCIL, RULER, HOBBY KNIFE, SCISSORS,WHITE OR YELLOW GLUE,TUBE-TYPE PLASTIC CEMENT MASKING TAPE, 320 GRIT SANDPAPER, MAXIrw ROD, AUTOMOTIVE SPRAY PRIMER (GRAY),GLOSS WHITE SPRAY PAINT, GLOSS BLUE SPRAY PAINT PAPER TOWEL
ALL GLUED AREAS ARE SHADED IN GRAY
BE SURETO READ ALL INSTRUCTIONS,TEST FIT ALL PARTS, AND SAND IF NECESSARY BEFORE GLUING.
ff 本PARTS LAYOUT A. Using plastic cement,
assemble iower fin
NOSE CONE halves to make four 55AC (1 equal size fins. B. Tape fins tog 71070 let dry.
C. Once dry rer and trim away
本 plastic (flash)
37337 UPPERTUBE
(4.3") BT55 (1
REDTUBE S COUPLER 55C (人 ) 301755 ES GREEN ADAPTER
RINGS 5055 (3) 30166-2
ADAPTERTUBE
SLOTTED UPPER 30362 TUBE BT 55 (人 A. Measure and mark the engine mount tube
at 1-1/8"” (2.9 cm), 2-1/2”(6.4 cm) and at 3-1/8" (7.9 cm) from the REAR {be sure
PLASTICTUBE to note position of engine block ring). ADAPTER 2083 (1)
LOWER FIN SET (8 HALVES)
BROWN ENGINE
MOUNTTUBE
BT 50H (1)
CENTERING RINGS 8. Use a hopby knife to RA50/1835 (1 CARD) make a 1/8" (3 mm)
ENGINE Hook K wide slit at the 2-1/2, EH-2A (人 (6.4 cm) mark ONLY!
STIFFENER
TUBE () 他
GREEN ENGINE
BLOCK RING (1)30164-2 _EE AE 一
SHOCK CORDS 14X 24 人
YELLOW ENGINE 38383
SPACERTUBE (1)
LAUNCH Lu GS 35003
12CF (2)
C. Insert engine hook
SLOTTED LOWER
into siit as shown.
TUBE 1835 {1)
ASSEMBLED
PARACHUTES - 18 (2)
Page Summary Contents For ESTES 2149 - SM3 Seahawk Manual
Manual Details
| Brand | Estes |
|---|---|
| Pages | 8 |
| File Size | 19.34 MB |
| Published | June 03, 2026 |
Enter the captcha to get the download link:

Frequently Asked Questions
What materials are required for construction?
Pencil, ruler, hobby knife, scissors, white or yellow glue, tube-type plastic cement, masking tape, sandpaper (320 grit), Maxirw rod, spray primer, and paint.
How should I prepare the fins before assembly?
Test fit all parts, and sand if necessary before gluing. Plastic cementing is used to assemble lower fin sections and attach them together.
What safety steps must be followed after a misfire?
Remove the safety key from the launch control system, wait one minute, remove the expended igniter, replace it with a new one ensuring contact with the engine propellant, then repeat the countdown.