ESTES 2432 - Mix-It Up Manual
Summary
A comprehensive guide for model rocketry enthusiasts, detailing every step from prep to launch. This manual provides essential instructions for assembling your rocket kit, aligning fins, and safely operating the professional-grade launch controller system. Learn critical pre-flight safety checks, proper engine handling, and safe launching procedures required for reliable performance. Perfect for hobbyists seeking a complete understanding of miniature model rocketry operations.
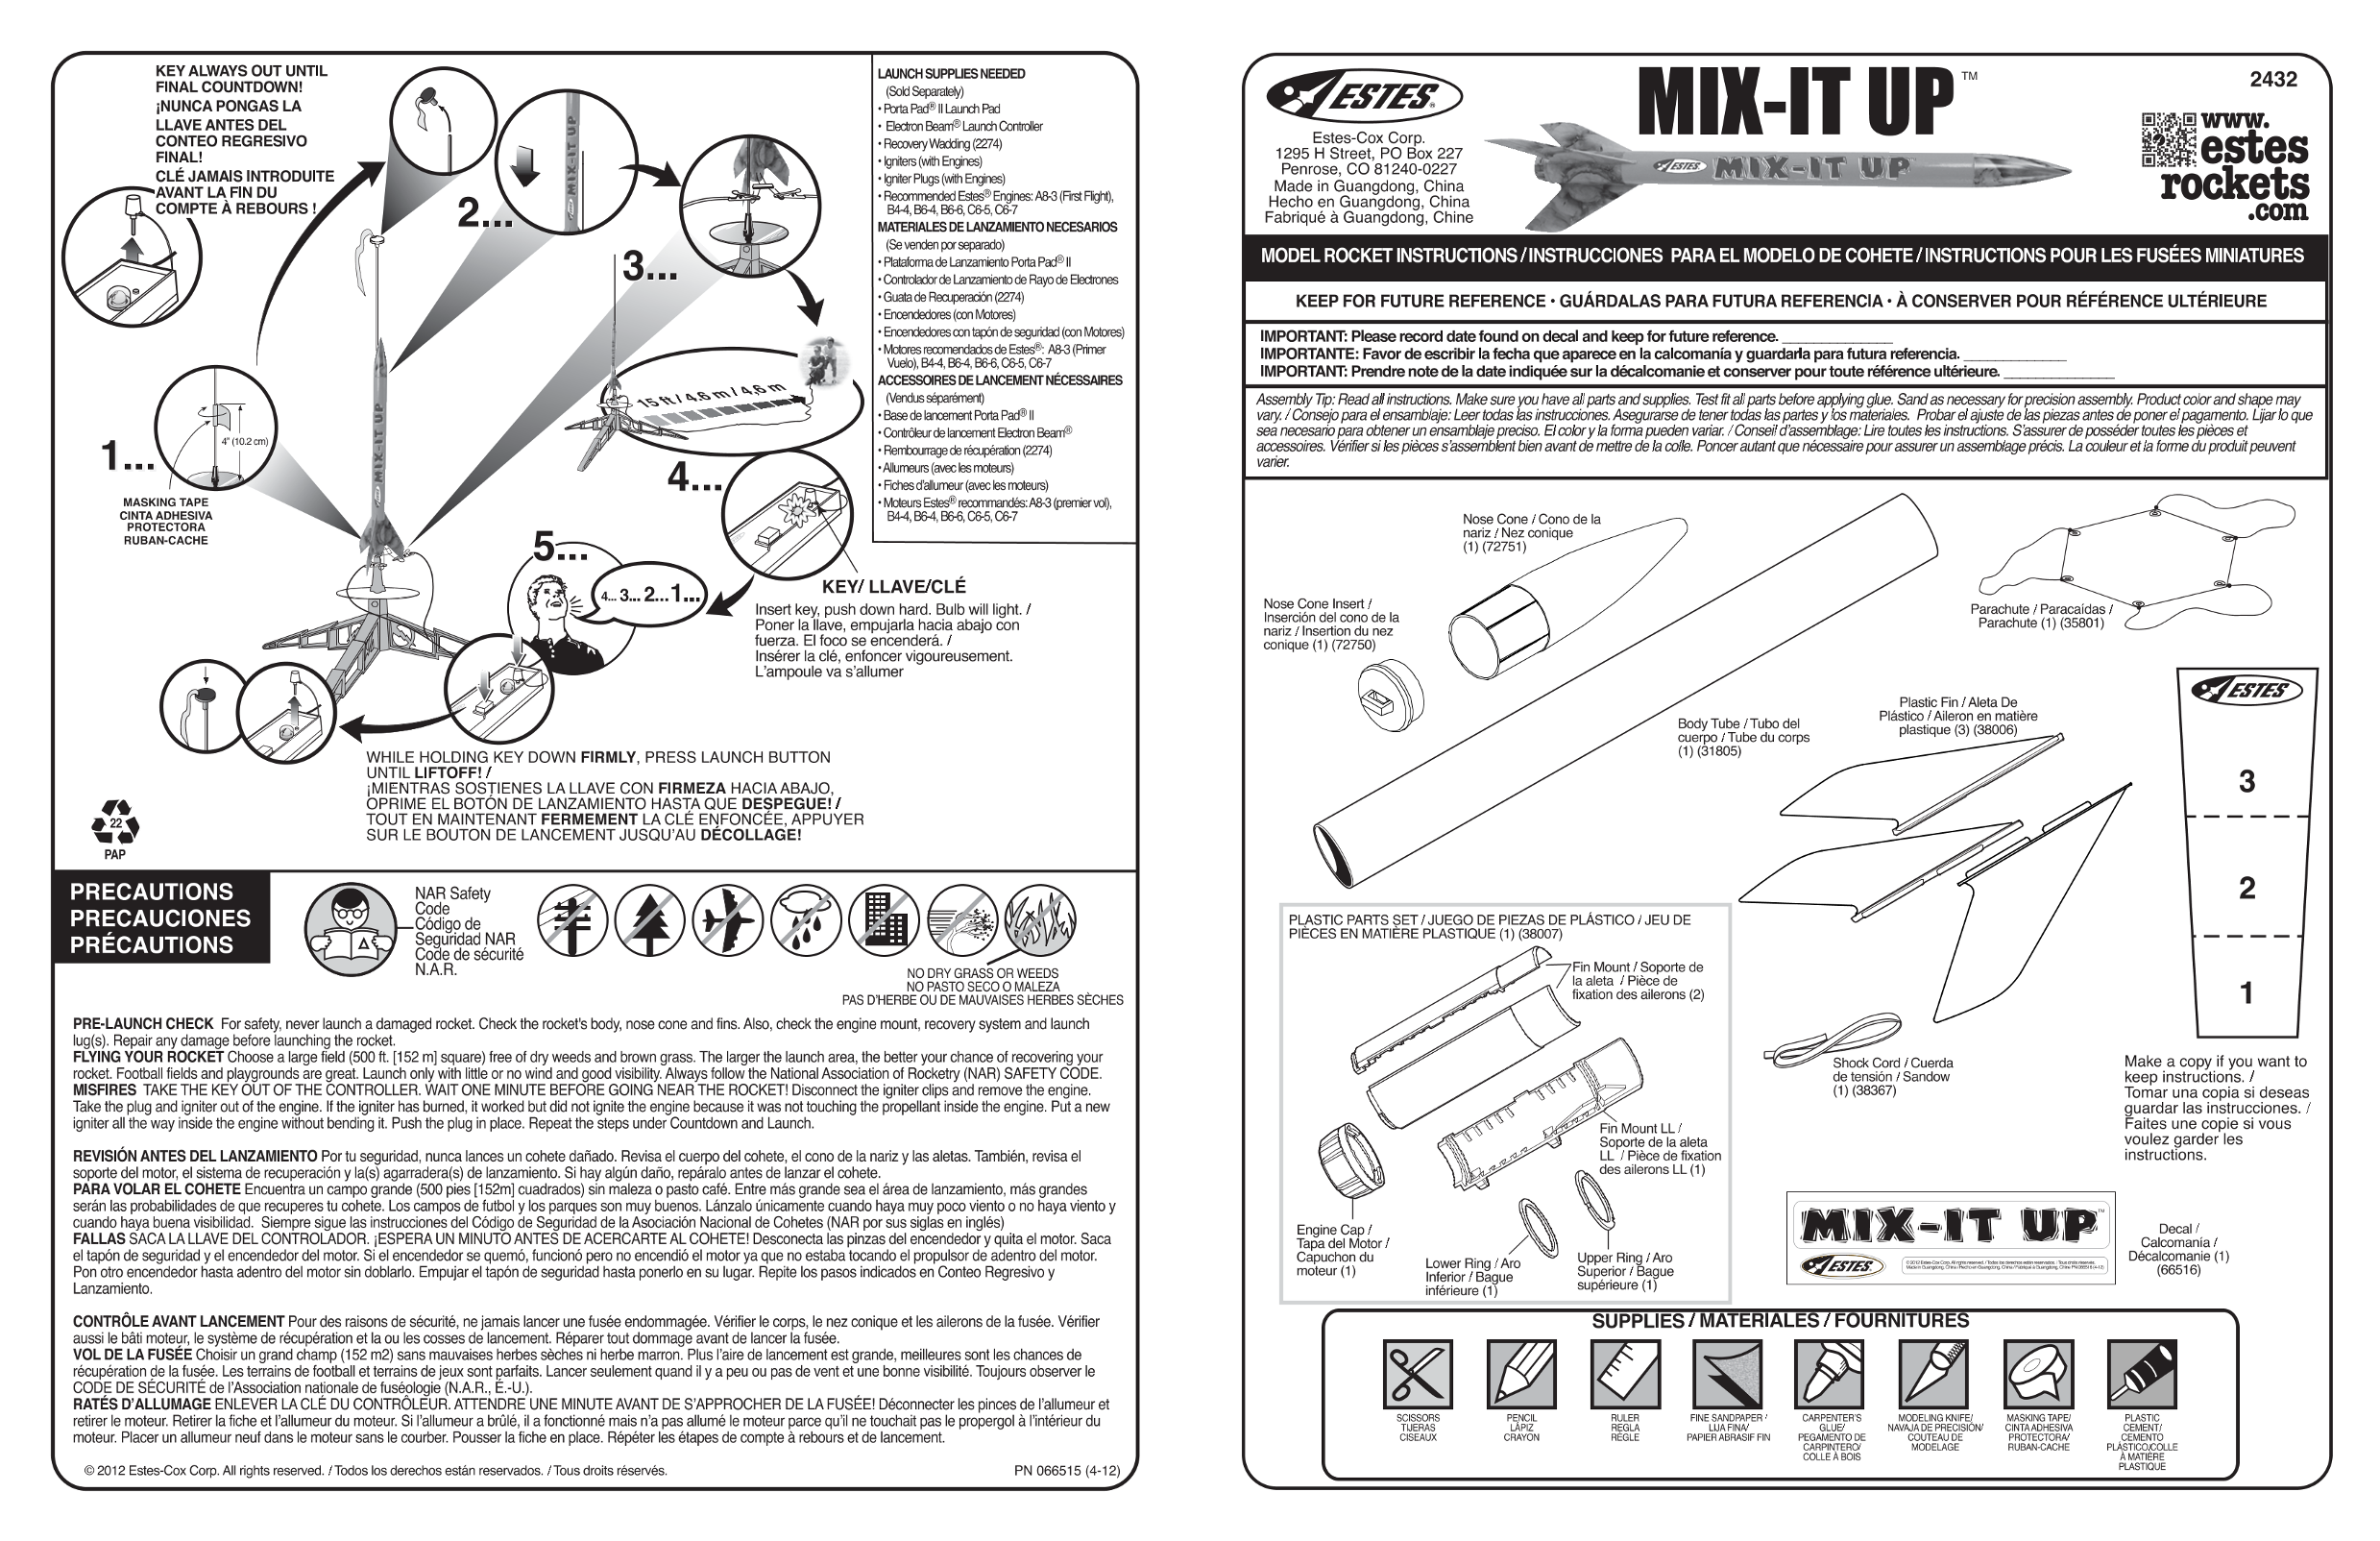
Page 1 Text Content
A KEYALWAYS OUT UNTIL LAUNCH Su PPUESNEEDED 忆 FINAL COUNTDOWN! (Sodseparaley)
i NUNCA PONGAS LA .Fora Padall Launch Fad LLAVE ANTES DEL . Eecton Beame Launc Contyoler
册 1- L 由 Estes-Cox Corp.
CONTEO REGRESIVO .Recoey Wading 2274
1295 H Street, PO Box 227
FINALI , .niers(wih Enghnes)
Penrose, CO 81240-0227
CLEJAMAIS INTRODUITE ,nier Pugs with Engnes)
Made in Guangdong, China AVANT LA FIN DU Romenkd Edse Eges A83 si Fig Hecho en Guangdong, China
COMP E REBOURS ! B44, B64 B66 C65
Fabrique a Guangdong, Chine
MATERIALES DE Lemo NECESARIOS (Sevenden porseparado)
MODEL ROCKETINSTRUCTIONS/INSTRUCCIONES PARA EL MODELO DE COHETE/INSTRUCTIONS POUR LES FUSEES MINIATURES
*“Plataformade Lanzamiento Porta Pad1
.Contaladorde Lanzamieniode Rayo de Eeciones
,Guatade Recuperacian 2274) KEEP FOR FUTURE REFERENCE ` GUARDALAS PARA FUTURA REFERENCIA .ACONSERVER POUR REFERENCE ULTERIEURE ,Encendedoes (con Moioreg) ,Encendedoescontapon de seguridad con Motores)
IMPORTANT': Please record date found on decal and keep forfuture reference.
.Moioresrecomendados de Esies8: A8.3 (Primer
IMPORTANTE: Favor de escribir la fecha que aparece en la calcomania y guardarla para futura referencia.
Wueoj, B44 B64,.B66.0C65.0C67
IMPORTANT Prendre note de la date indiquee surla decalcomanie et conserver pour toute rdference ulterieure.
ACCESSOIRES DE LANCEMENT NECESSAIRES
(endussspartmen Assemby Jp: Readalinsinuclons Make sueyouhave 到 pa 要 and5Supplies. Test 友 到 pa 要 befpreanpyinggbe. Sandasnecessayjorprecisionassembjy Poductcoorand shape rmay ,Basede ancement Pota Padp1
Va Y VConselopaa gjensamblaie:Leeriodas 委 sjnsfnuicciones, Asegu Urarse 0e ienerioqas jaspariesyipsmaleriales Proparelaiisie ge jas piezas aniesdeponerelpagamenio Liar 如 que
,Cortaleurde ancement Fecron Beam8 SBa ECe5ari D pafa oblenerun ensampblaie Precisp 百 co Dry 各 Dapueden Variar /Consejjdassemblage: Lie ioules jes insinuctons. Sass Ui Brale poss6aertoulesjes plces ef
acess0jes .VEjersijes places Sassembjentbien avant de methe 0e 避 coje. Poncerauiantgue 1 ie Pourass Urertn Pi6cis La COUBUr E 和 De 所 Droduitpeuvent
,Rembounageder Scuparaiion 2274)
Varier
“Alumeurs (avec es moteurs)
.Fohesdalumeur(avecles moieurs}
MASKING TAPE “Moleurs Esles Brecommandes:A8-3 (premiervol,
CINTA ADHESIVA B4-4 B64, B66, 06.5, 087
Nose Cone /Cono de 忆
PROTECTORA
nariz Nez conique
RUBAN-CACHE
KEY LLAVE/CLE
Nose Cone Insert/
Insert key, push down hard. Bulb will light 7 Parachute /Paracaidas /
Insercion del cono de 己
Parachute (1) (35801)
Poner lallave, empujarla hacia abajo con
nariz /Insertion du nez
fuerza. Elfoco se encendera. /
conique (TD) (72750)
Insererla cle, enfoncer vigoureusement, Lampoule va s'allumer
Plastic Fin 7Aleta De
Plastico /Aileron en matiere
Body Tube /Tubo del
plastique (3) (38006)
Cuerpo /Tube du corps (人 31805)
WHILE HOLDING KEY DOWN FIRMLY, PRESS LAUNCH BUTTON UNTIL LIFTOFF1 7
i MIENTRAS SOSJIENES LALLAVE CON FIRMEZA HACIAABAJO,
要 会 OPRIME EL BOTON DE LANZAMIENTO HASTA QUE DESPEGUE!7/ 居 2 时 TOUT EN MAINTENANT FERMEMENT LA CLE ENFONCEE, APPUYER
SUR LE BOUTON DE LANCEMENT JUSQU'AU DECOLLAGEI!
PRECAUTIONS NARsapey
PRECAUCIONES oa PLASTIC PARTS SET/JUEGO DE PIEZAS DE PLASTICO /JEU DE PIECES EN MATIERE PLASTIQUE (1) (38007}
PRECAUTIONS 人
Fin Mount /Socporte de
NO DRY GRASS OR WEEDS
la aleta / Piece de
NO PASTO SECOOMALEZA
fixation des ailerons (2)
PAS DHERBE OU DE MAUVAISES HERBES SECHES
PRE-LAUNCH CHECK For safety never launch a damaged rocket Check the rocket's body nose cone and fins, Also, check the engine mount, recovery system and launch lugfsj, Repair any damage before launching the rocket, FLYING YOUR ROCKET Choose alarge field (500 人 [152 m] square) free of dry weeds and brown grass. The larger the launch area, the better y Our chance of recovering your
“Shock cordycuerda Make a copy if you want to
focket Football fields and playgrounds are great Launch only with little or no wind and good visibility Always follow the National Association of Rocketry (NAR) SAFETY CODE.
de tension /Sandow keep instructions. 7
MISFIRES TAKE THE KEYOUT OF THE CONTROLLER. WAIT ONE MINUTE BEFORE GOING NEAR THE ROCKETI Disconnectthe igniter clips and remove the engine. 人 0) (38367) Tomar una copia si deseas Take the plug and igniter out ofthe engine. fthe igniter has burned,it worked but did not ignite the engine because it was nottouching the propellant inside the engine. Put a new guardar las instrucciones. / igniter allthe way inside the engine without bending it Push the plug in place. Repeatithe steps under Countdown and Launch. Fin Mount LL/ Faites une copie si vous
Soporte dela aleta voulez garder les REVISION ANTES DEL LANZAMIENTO Por tu seguridad, nuncalances un cohete dafiado, Revisa el cuerpo del cohete, el cono de la nariz y las aletas, Tambien, revisa el LL /Piece de fixation instructions, des ailerons LLI(1)
Soporte del motor el Sistema de recuperacion ylals) agarraderafs) de lanzamiento. Si hay algun dafio, reparalo antes de lanzar el cohete. PARAVOLAR EL COHETE Encuentra un Campo grande (500 pies [152m] cuadrados) sin maleza o pasto caf6. Entre mas grande sea el area de lanzamiento, mas grandes Seran las probabilidades de que recuperes tu cohete. Los campos de futbol y los parques son muy buenos, Lanzalo unicamente cuando haya muy poco viento o no hayaviento y cuando haya buena visibilidad,Siempre Sigue las instrucciones del Codigo de Seguridad de 昌 Asociacion Nacional de Cohetes {NAR por sus siglas en ingles)
1 , ecal Tapa d
FALLAS SACALALLAVE DELCONTROLADOR.i ESPERAUN MINUTOANTES DE ACERCARTE AL COHETE! Desconecta las pinzas del encendedor y quita el motor Saca 7 且 和 3 一 T 1 Bangine Cap Motor/ 必 Calcomania eltapbon de seguridad y el encendedor del motor Si el encendedor se queme, funciong pero no encendio el motor ya que no estabatocando el propulsor de adentro del motor, Capuchon du Upper Ring /Aro Decalcomanie {1)maoteur () 1 Superior/ He 二 “ (66516) Pon ctro encendedor hasta adentro del motor sin doblarlo. Empujar el tapon de seguridad hasta ponerlo en su lugar Repite los pasos indicados en Conteo Regresivoy Lanzamiento, inferieure (1 Superieure (1)
CONTROLE AVANT LANCEMENT Pour des raisons de securit8, ne jamais lancer une fusee endommagee. Veriierle corps,le nez conique etles ailerons de la fus6e. Varifier SUPPLIES 7/ MATERIALES/7 FOURNITURES
aussile bi moteur le Systeme de recuperation etla ou les cosses de lancement, Reparer tout dommage avant de lancerlafusee. VOLDE LA FUSEE Choisirun grand champ (152 m2) sans mauvaises herbes Seches ni herbe marron. Plus faire de lancement est grande, meilleures sontles chances de fecuperation de 上 afusee. Les terrains de football etterrains de jeux sont parfaits, Lancer seulement quand ily a peu ou pas de vent et une bonne visibilite. Toujours observer le CODEDE SECURITE de |Association nationale de fus6ologie (N.A.R.,E.-UJ). RATES D'ALLUMAGE ENLEVER LACLE DU CONTROLEUR. ATTEND EUNE MINUTE AVANT DE SAPPRCOCHER DE LA FUSEE! Deconnecter les pinces de fallumeur et
SCISSORS PENCIL RULER FINE SANDPAPER CARPENTER'S MODELING KNIFE/ MASKING PE PLASTIC
retirerle maoteur Retirer lafiche et iallumeur du moteur Si fallumeur abrle,ilafonctionne mais na pas allume le moteur parce quilne touchait pas le propergcla linterieur du
TNERAS LAPIZ REGLA LUAFINAA GLUE NAVau JA DE PRECISION QINTAADHESIVA CEMENT/ moteur Placer un allumeur neuf dans le moteur sans le courber Pousserlafiche en place. Repeter les btapes de compte arebours et de lancement CISEAUX CRAYON REGLE PFAPIERABRASIF FIN PEGAMENTO DE COUTEAU DE PROTECTORA' CEMENTO
所 MODELAGE RUEBAN-CACHE PLASTICOCOLLE COLLEA BOIS 六 MATIERE
PN 066515 2N。 2012 Estes-Cox Corp, All rights reserved. /Todos los derechos estan reservados, /Tous droits r6serves, NU PLASTIQUE LA
Page Summary Contents For ESTES 2432 - Mix-It Up Manual
Manual Details
| Brand | Estes |
|---|---|
| Pages | 2 |
| File Size | 2.62 MB |
| Published | June 05, 2026 |
Enter the captcha to get the download link:

Frequently Asked Questions
What must be done before launching the rocket?
Always inspect the rocket's body, nose cone, fins, engine mount, recovery system, and launch lugs for any damage and repair it first.
Where is the best location to launch a model rocket?
Choose a large field (500 ft x 152 m) free of dry weeds and brown grass. The larger the area, the better.
What should be done in case of misfires?
Take the key out of the controller, wait one minute before going near the rocket, then disconnect the igniter clips and remove the engine.
When storing prepared engines, what precaution is necessary?
Never store a prepared motor without ensuring the igniter tip touches the propellant. Hold until set.