ESTES 2425 - Super Neon XL
Summary
Master this advanced model rocket build with comprehensive instructions designed for dedicated hobbyists. This detailed manual guides you through every step, covering sophisticated assembly, structural reinforcement, and precision painting techniques. Learn how to install engines, recover systems, delicate decals, and apply professional-grade finishes, ensuring your kit is ready for flight while adhering to necessary safety standards.
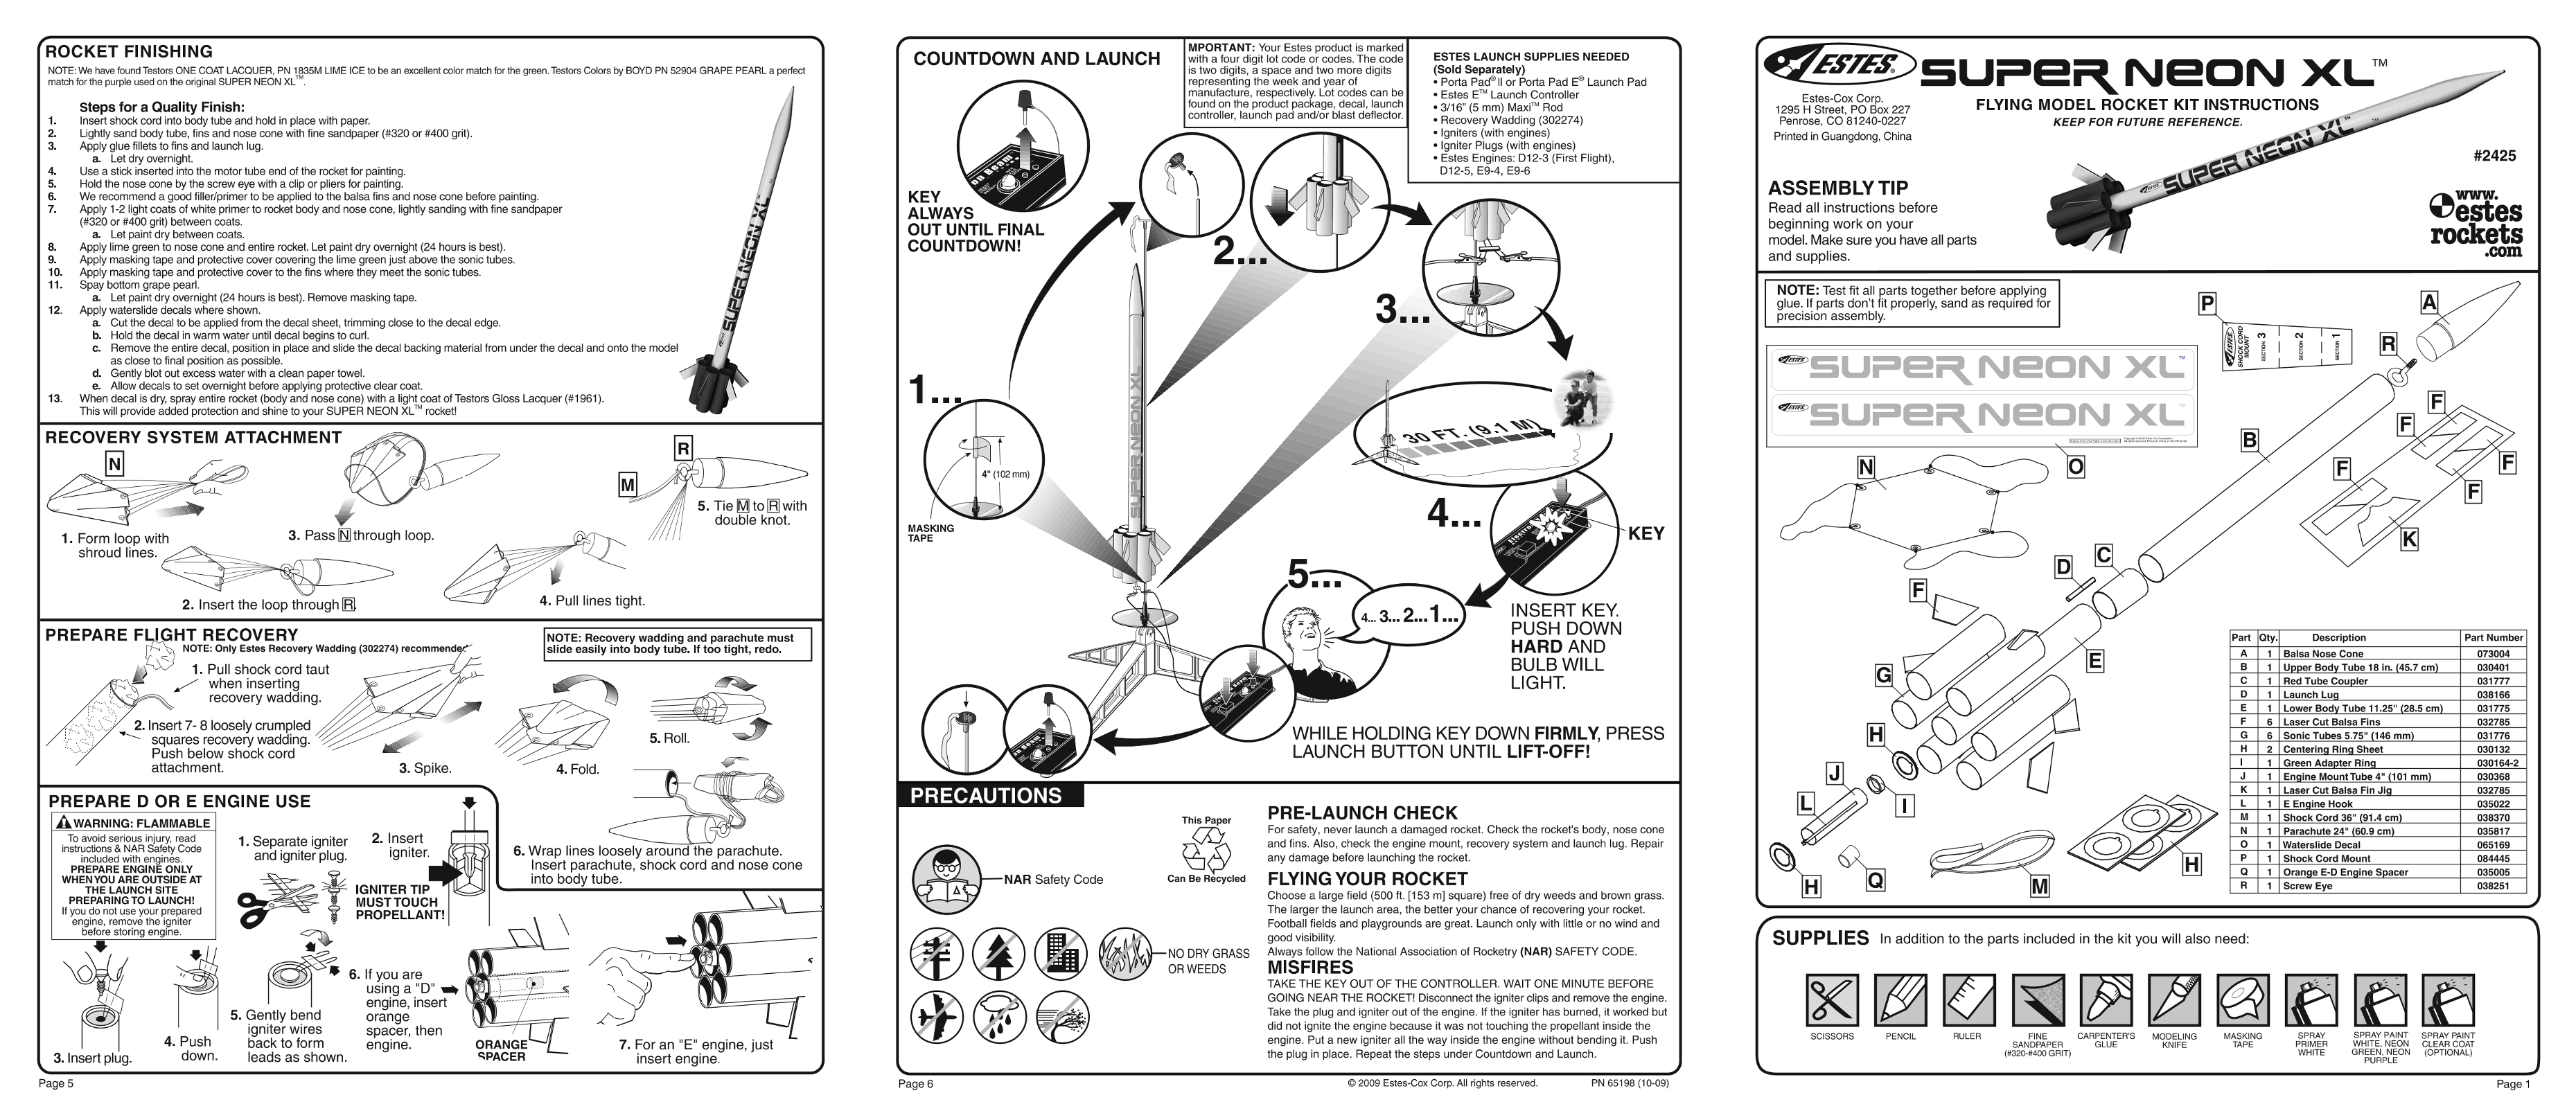
Page 1 Text Content
f Roc KET FINISHING MPORTANT: Your Estes productis marked
ESTES LAUNCH SUPPLIES NEEDED
with afour digit lot code or codes. The code
is two digits, a space and two more digits (Sold Separately)
NOTE: We have found Testors ONE COAT LACQUER, PN 1835M LIME ICE to be an excellent color match for the green. Testors Colors by BOYD PN 52904 GRAPE PEARL a perfect
representing the week and year of 。Porta Padell or Porta Pad ELaunch Pad
match for the purple used on the original SUPER NEON XL ,
manufacture, respectively Lot codes can be *Estes ET Launch Controller
Estes-Cox Corp.
found on the product package, decal, launch
Steps for a Quality Finish: 。3/16" (5 mm) Maxi Rod
1295 H Street, PO Box 227
controllen launch paq and'or blast deflector
1 Insert shock cord into body tube and hold in place with paper. 。Recovery Wadding (302274) Penrose, CO 81240-0227 KEEP FOR FUTURE REFERENCE. 2. Lightly sand body tube, fins ang nose cone with fine sandpaper (#320 or #400 gri. "lgniters (with engines)
Printed in Guangdong, China
3 Apply glue fillets to fins and launch lug. "lgniter Plugs (with engines) a_ Let dry overnight. 。Estes Engines: D12-3 (First Flight), 4 Use a stick inserted into the motortube end of the rocket for painting. D12-5, E9-4, E9-6
5. Hold the nose cone by the screw eye with a clip or pliers for painting .
ASSEMBLY TIP
6 We recommend a goodfilerprimerto be applied to the balsa fins and nose cone before painting KEY
Read all instructions before
7 Apply 1-2 light coats of white primerto rocket body and nose cone, ightly sanding with fine sandpaper
ALWAYS
(人 #320 or #400 grib between coats.
beginning work on your
OUT UNTIL FINAL
a_ Let paint dry between coats.
model.Make sure you have all parts
8 Applylime greento nose cone and entire rocket. Let paint dry overnight (24 hours is best). COUNTDOWNI!
and supplies.
9 Apply masking tape and protective cover covering the lime green just above the sonic tubes. 10. Apply masking ape and protective cover to the fins where they meet the sonic tubes. 11. Spay bottom grape pearl.
NOTE: Test 从 all parts together before applying
a_ Let paint dry overnight (24 hours is bestj. Remove masking tape-
glue.If parts domt ft properly sand as required for
12. Apply waterslide decals where shown-
Precision assembly.
a_ Cutthe decal to be applied from the decal sheet, trimming close to the decal edge-. b。 Hold the decal in warm water until decal begins to curl. CRemove the entire decal, position in place and slide the decal backing material ffom under the decal and onto the model as close to final position as possible. 二 Gently blct out excess water with a clean papertowel. e。Allow decals to set overnight before applying protective clear coat.
13. When decal is dry spray entire rocket (body and ncse cone) with a light coat of Testors Gloss Lacquer {#1961)-.
This will provide added protection and shine to your SUPER NEON XLY rockett
5.Tie Mio 回 with double knet.
MASKING
1. Form loop with shroud lines.
2. Insert the loop through 回
INSERT KEY. PUSH DOWN
Part JQty. Description Part Number
HARD AND
NOTE: Only Estes Recovery Wadding (302274) recommende Slide easily into body tube. If too tight, redo,
PREPARE 9 RECOVERY NOTE: Recovery wadding and parachute must NS 内 1 | Balsa Nose Cone 073004
BULB WILL
1. Pull shock cord taut B 1 |Upper Bedy Tube 18 in. (45.7 cm) 030401
LIGHT. 它 1 | Red Tube Coupler 031777
when inserting
D 1 |Launch Lug 038166
recovery wadding.
E 1 | Lower Body Tube 11.25" (28.5 cm) 031775 F 6 |Laser Cut Balsa Fins 032785
2.Insert7- 8loosely crumpled
WHILE HOLDING KEY DOWN FIRMLY PRESS G | 6 | Sonic Tubes 5.75" (146 mm) 031776
squares recovery wadding.
LAUNCH BUTTON UNTIL LIFTOFFI H 2 | Centering Ring Sheet 030132
Push below shock cord
1 1 | Green Adapter Ring 030164-2
attachment.
二 1 | Engine Mount Tube 4" (101 mm) 030368
K 1 | Laser Cut Balsa Fin Jig 032785
PREPARE D OR E ENGINE USE
L 1 |EEngine Hook 035022
PRE-LAUNCH CHECK
M_ | 1 |Shock cord 36" (91.4 cm, 038370
全 Ww WARNING: FLAMMABLE This Paper
For safety, neverlaunch a damaged rocket, Check the rockets body, nose cone N 1 | Parachute 24" (60.9 cm) 035817
To avcid serious injury read 2. Insert1. Separate igniter
andg fins. Also, check the engine mount, recovery system and launch lug. Repair 日 | 1 Waterslide Decal 065169
instructions & NAR Safety Code
iqniter olua . 机 6. Wrap lines loosely around the parachute. igniter,
any damage before launching the rocket. P 1 | Shock Cord Mount 084445
included with engines.
and iigniter Plug Insert parachute, shock cord and nose cone
PREPARE ENGINE ONLY
Q@ | 1 |orange E-D Engine Spacer 035005
WHEN YOU ARE OUTSIDE AT into body tube. Can Be Recycled FLYING YOUR ROCKET
R 1 | Screw Eye 038251
IGNITER TIPTHE LAUNCH SITE
Choose a large field (500 ft [153 m] square) free of dry weeds and brown grass.
PREPARING TO LAUNCH!
MUSTTOUCH
Ifyou do net use your prepared The larger the launch area, the better your chance of recovering your rocket.
PROPELLANT'
engine, remove the igniter
Football fields and playgrounds are great. Launch only with little or no wind and
before storing engine.
good visibility. sup PLIES In addition to the parts included in the kit you will also need: ( 中 一 NO DRY GRASS Always follow the National Association of Rocketry (NAR) SAFETY CODE. OR WEEDS MISFIRES
大 6. If you are
TAKE THE KEY OUT OF THE CONTROLLER. WAIT DONE MINUTE BEFORE
using a "D"” 加
GOING NEAR THE ROCKET' Disconnect the igniter clips ang remove the engine.
engine, insert
Take the plug and igniter out of the engine. lf the igniter has burned, it worked but
5. Gently bend orange
did not ignite the engine because it was not touching the propellant inside the
igniter wires spacehr then
SCISSORS PENCIL RULER FINE CARPENTER'S MODELING SPRAY SPRAY PAINT SPRAY PAINT
engine. Put a new igniter all the way inside the engine without bending it, Push
back to form engine. 7.Foran"E" engine, just SANDPAPER GLUE KNIFE WHITE NEON ”CLEAR COAT {#320-#400 GRIT) GREEN, NEON (OPTIONALU)
the plug in place. Repeat the steps under Countdown and Launch.
司 3.Insert plug. leads as shown. SPACER insert engine, PURPLE
人 2009 Estes-Cox Corp. All rights reserved. PN 65198 (10-09)
Page Summary Contents For ESTES 2425 - Super Neon XL
Manual Details
| Brand | Estes |
|---|---|
| Pages | 2 |
| File Size | 3.07 MB |
| Published | June 05, 2026 |
Enter the captcha to get the download link:

Frequently Asked Questions
What is the minimum safe launch area size?
You should choose a large field (500 ft [153 m] square) free of dry weeds and brown grass.
How should I prepare balsa sheets for assembly?
Sand both sides with fine sandpaper (#320 or #400 grit) and round the leading edges. Do not sand the root from the sheet.
What supplies are needed for paint preparation?
You'll need a good primer to be applied to the balsa fins and nose cone before painting is recommended.
How do I apply waterslide decals properly?
Hold the decal in warm water until it begins to curl. Remove the entire decal, position it, slide the backing off, and gently blot excess water with a clean paper towel.
When is the best time frame for drying paint coats?
Allowing 24 hours between major painting steps or overnight (24 hours) when applying base colors like lime green on the nose cone and rocket body is recommended.