EPSON Stylus CX4600 User's Guide
Summary
Get your creative projects powered up with professional photo printing, scanning, and copying. This guide offers comprehensive setup instructions for the Epson Stylus CX4600 printer/scanner system. It walks new users through every step, from safely unpacking and installing ink cartridges, to loading various paper types, setting up the scanner, and completing software installation for seamless use with Windows and Macintosh operating systems. Start printing flawless photos and graphics immediately!
Page 1 Text Content
Start Here Insert the cartridges in the holder for each color.
Turn On the CX46003 Load Paper
Epson Stylus® CX4600 Connect the power cable. Open the paper support and pull up its extensions.
Open the output tray and pull out its extension.
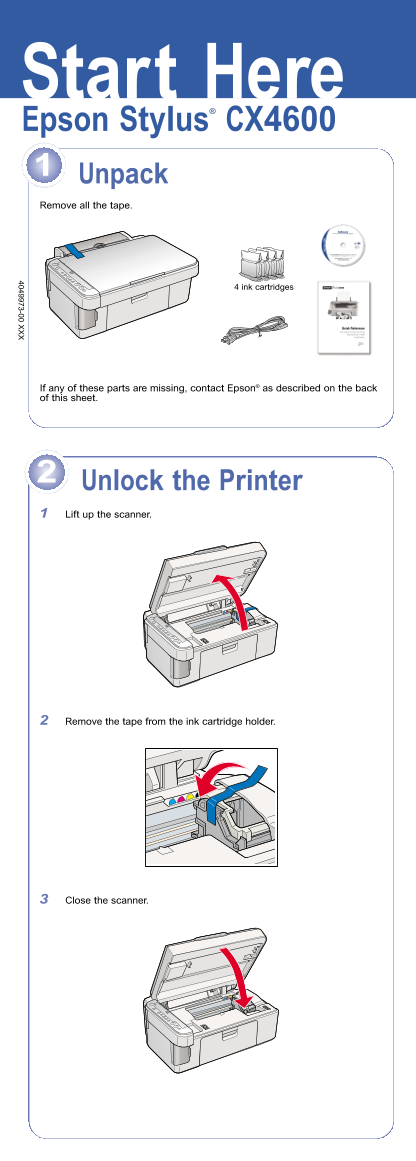
Unpack Remove all the tape.
Paper support
Press the cartridges down until they click.
4 ink cartridges Output tray
Press the On button.
Flip the feeder guard forward.
If any of these parts are missing, contact Epson® as described on the back
of this sheet.
Close the ink cartridge cover and press it down.
Unlock the Printer2 Lift up the scanner.
Install Ink Cartridges4 Slide the edge guide left.
Caution: Don’t load paper before installing the ink cartridges.
Lift up the scanner.
Close the scanner.
Remove the tape from the ink cartridge holder. Load paper against the right edge guide and slide the left edge guide over.
Open the ink cartridge cover.
Press the ink button to charge ink. Charging takes about 2 minutes.
Close the scanner.
Flip the feeder guard back.
Shake the ink cartridges, then unpack them.
Caution: Don’t turn off the CX4600 while the On light is flashing or you’ll waste ink.
continue
Turn over
Page Summary Contents For EPSON Stylus CX4600 User's Guide
Manual Details
| Brand | Epson |
|---|---|
| Pages | 8 |
| File Size | 1.32 MB |
| Published | May 19, 2026 |
Enter the captcha to get the download link:

Frequently Asked Questions
What is the first warning regarding paper loading?
Do not load paper before installing the ink cartridges.
How long is the initial ink charging process?
Charging takes about 2 minutes after opening the cover and pressing the ink button.
What should I do if there are print quality problems?
If you have a print quality problem, you may need to clean your print head.
What operating systems does the software support?
The software is compatible with Windows 98SE, Me, 2000, and XP.