Dell EqualLogic PS6210 Setup Poster
Summary
Installation and setup guide for Dell EqualLogic PS6210 PS Series storage arrays, covering rack mounting with four-post 19-inch rails, Host Integration Tools installation, Remote Setup Wizard configuration, and SAN volume creation via iSCSI initiator. Includes multi-member group setup with array IP addressing, RAID policy selection, CHAP authentication, and Group Manager GUI navigation for storage allocation and access control configuration.
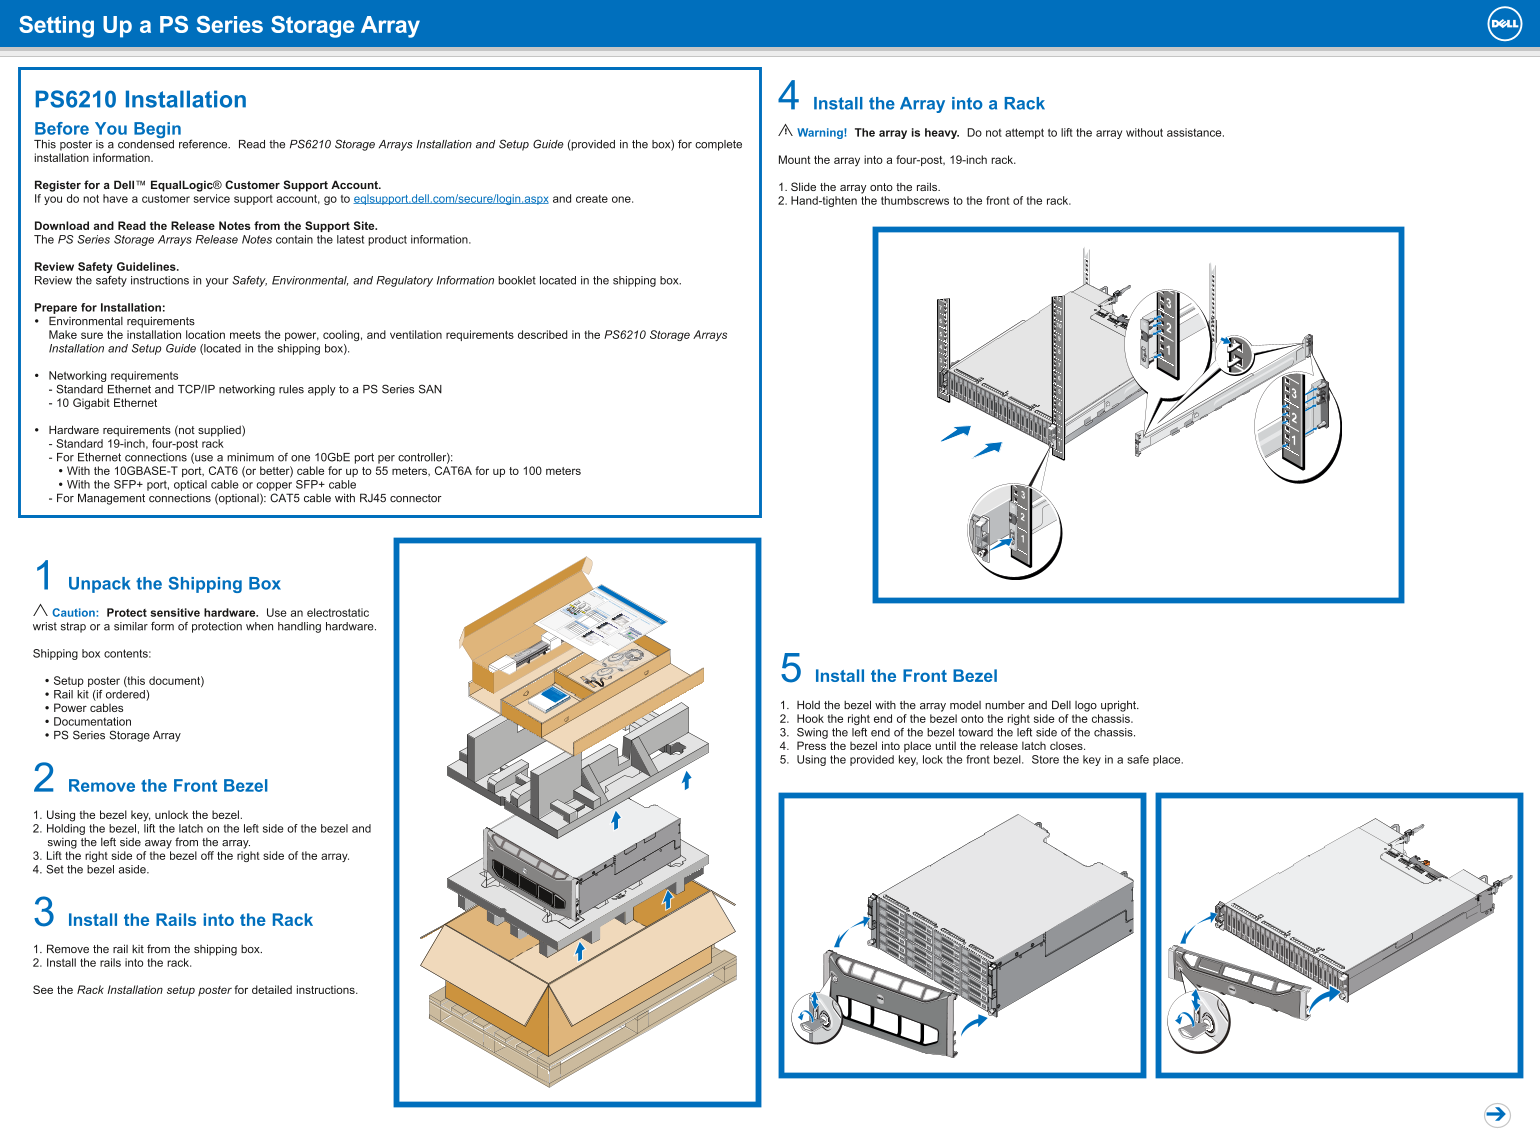
Page 1 Text Content
Setting Up a PS Series Storage Array
PS6210 Installation 4 Install the Array into a Rack Before You Begin Warning! The array is heavy. Do not attempt to lift the array without assistance. This poster is a condensed reference. Read the PS6210 Storage Arrays Installation and Setup Guide (provided in the box) for complete installation information. Mount the array into a four-post, 19-inch rack. Register for a Dell™ Equal Logic® Customer Support Account. 1. Slide the array onto the rails. If you do not have a customer service support account, go to eqlsupport.dell.com/secure/login.aspx and create one. 2. Hand-tighten the thumbscrews to the front of the rack. Download and Read the Release Notes from the Support Site. The PS Series Storage Arrays Release Notes contain the latest product information. Review Safety Guidelines. Review the safety instructions in your Safety, Environmental, and Regulatory Information booklet located in the shipping box. Prepare for Installation: Environmental requirements Make sure the installation location meets the power, cooling, and ventilation requirements described in the PS6210 Storage Arrays Installation and Setup Guide (located in the shipping box). Networking requirements - Standard Ethernet and TCP/IP networking rules apply to a PS Series SAN - 10 Gigabit Ethernet Hardware requirements (not supplied) - Standard 19-inch, four-post rack - For Ethernet connections (use a minimum of one 10Gb E port per controller): With the 10GBASE-T port, CAT6 (or better) cable for up to 55 meters, CAT6A for up to 100 meters With the SFP+ port, optical cable or copper SFP+ cable - For Management connections (optional): CAT5 cable with RJ45 connector
1 Unpack the Shipping Box
Software Configuration PS Series Storage Arrays
PS Series Groups
Multi-Member PS Series Group Step 1: Install the Host Integration Tools Step 2: Collect Configuration Information
Software Configuration Methods Group1 in the following tables. To configure the PS Series software, you need the information Step 3: Run the Remote Setup Wizard
Subnet mask Array IP address Member name Array Configuration
Caution: Protect sensitive hardware. Use an electrostatic RAID policy Default gateway
Step 4: Start Using the SAN
Administration Group name Group IP address Membership Group Configuration
CHAP password CHAP user name password
wrist strap or a similar form of protection when handling hardware.
Where to Go Next
Shipping box contents:
Setup poster (this document) 5 Install the Front Bezel
Installation & Setup Manual PS SERIES STORAGE ARRAYS
Rail kit (if ordered)
Power cables 1. Hold the bezel with the array model number and Dell logo upright. Documentation 2. Hook the right end of the bezel onto the right side of the chassis. PS Series Storage Array 3. Swing the left end of the bezel toward the left side of the chassis. 4. Press the bezel into place until the release latch closes. 5. Using the provided key, lock the front bezel. Store the key in a safe place.
2 Remove the Front Bezel 1. Using the bezel key, unlock the bezel. 2. Holding the bezel, lift the latch on the left side of the bezel and swing the left side away from the array. 3. Lift the right side of the bezel off the right side of the array. 4. Set the bezel aside.
3 Install the Rails into the Rack 1. Remove the rail kit from the shipping box. 2. Install the rails into the rack. See the Rack Installation setup poster for detailed instructions.
Page Summary Contents For Dell EqualLogic PS6210 Setup Poster
Manual Details
| Brand | Dell |
|---|---|
| Pages | 2 |
| File Size | 2.42 MB |
| Published | June 15, 2026 |
Enter the captcha to get the download link:

Frequently Asked Questions
What safety precautions must be taken when handling the hardware?
Use an electrostatic wrist strap or similar form of protection, and remember that the array is heavy and requires assistance to lift.
What specific cables are required for 10 Gigabit Ethernet connections?
For the 10GBASE-T port, use CAT6 (or better) cable for up to 55 meters, or CAT6A for up to 100 meters.
What preparation steps are needed before connecting power?
Allow enough time—such as overnight—for the array to adjust to ambient temperature and humidity, and ensure the power switch is set to 'Off'.
Is a long initial boot delay normal when powering on the system?
Yes, when first powered on, expect a boot delay of up to 30 minutes while the battery backup unit charges to full capacity.