Dell EqualLogic PS4000 Setup Poster -Front Owner's Manual
Summary
Installation and setup manual for Dell EqualLogic PS Series storage arrays with chassis types 4 and 5, guiding users through SAN volume creation and iSCSI connection using the Group Manager GUI. Details volume naming, size allocation, access control configuration via initiator name or IP address, SCSI target discovery, and login procedures. Covers multi-member group setup and points to PS Series Online Help for advanced customization and tool access.
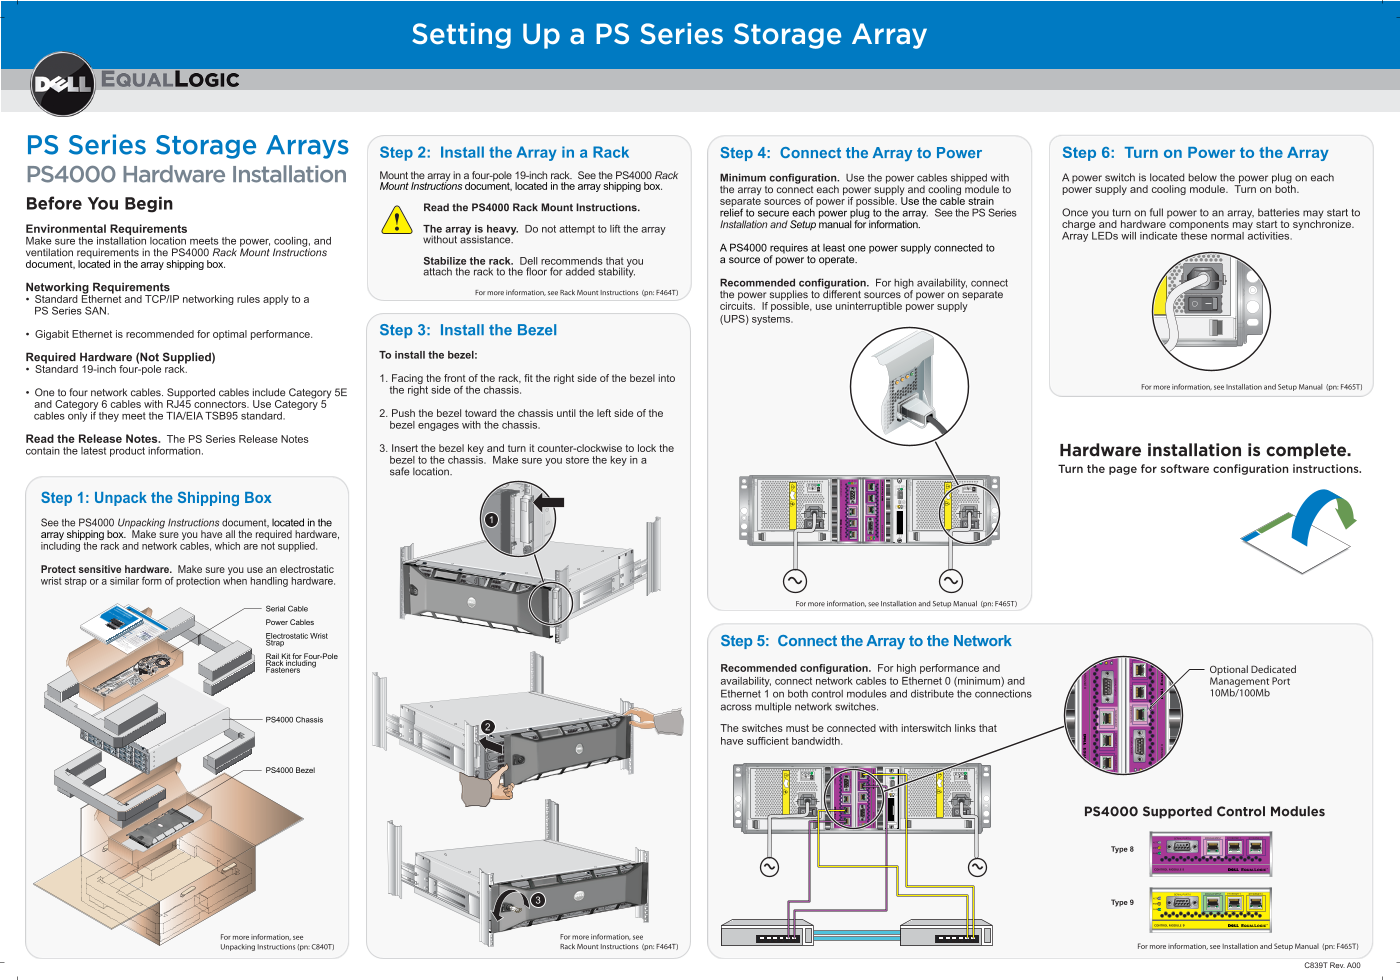
Page 1 Text Content
Setting Up a PS Series Storage Array
PS Series Storage Arrays Step 2: Install the Array in a Rack Step 6: Turn on Power to the Array
Step 4: Connect the Array to Power
PS4000 Hardware Installation Mount the array in a four-pole 19-inch rack. See the PS4000 Rack Minimum configuration. Use the power cables shipped with A power switch is located below the power plug on each Mount Instructions document, located in the array shipping box.
the array to connect each power supply and cooling module to power supply and cooling module. Turn on both.
separate sources of power if possible. Use the cable strain
Before You Begin Read the PS4000 Rack Mount Instructions.
relief to secure each power plug to the array. See the PS Series Once you turn on full power to an array, batteries may start to Installation and Setup manual for information. charge and hardware components may start to synchronize.
Environmental Requirements The array is heavy. Do not attempt to lift the array
Array LEDs will indicate these normal activities.
Make sure the installation location meets the power, cooling, and without assistance.
A PS4000 requires at least one power supply connected to
ventilation requirements in the PS4000 Rack Mount Instructions
Stabilize the rack. Dell recommends that you a source of power to operate.
document, located in the array shipping box.
attach the rack to the floor for added stability.
Recommended configuration. For high availability, connect
Networking Requirements
For more information, see Rack Mount Instructions (pn: F464T)
the power supplies to different sources of power on separate
• Standard Ethernet and TCP/IP networking rules apply to a
circuits. If possible, use uninterruptible power supply
PS Series SAN.
(UPS) systems.
• Gigabit Ethernet is recommended for optimal performance. Step 3: Install the Bezel Required Hardware (Not Supplied) To install the bezel:
• Standard 19-inch four-pole rack.
1. Facing the front of the rack, fit the right side of the bezel into
For more information, see Installation and Setup Manual (pn: F465T)
• One to four network cables. Supported cables include Category 5E the right side of the chassis.
and Category 6 cables with RJ45 connectors. Use Category 5
cables only if they meet the TIA/EIA TSB95 standard. 2. Push the bezel toward the chassis until the left side of the bezel engages with the chassis.
Read the Release Notes. The PS Series Release Notes
contain the latest product information. 3. Insert the bezel key and turn it counter-clockwise to lock the
Hardware installation is complete.
bezel to the chassis. Make sure you store the key in a
safe location. Turn the page for software configuration instructions.
Address Invalid
Step 1: Unpack the Shipping Box See the PS4000 Unpacking Instructions document, located in the array shipping box. Make sure you have all the required hardware, including the rack and network cables, which are not supplied.
Protect sensitive hardware. Make sure you use an electrostatic wrist strap or a similar form of protection when handling hardware.
For more information, see Installation and Setup Manual (pn: F465T)
Installation & Setup Manual PS SERIES STORAGE ARRAYS
Chassis Types 4, and 5 Before You Begin Software Configuration PS Series Storage Arrays Serial Cable Then, create a group with the array as the first member or add After you install the array hardware, you must initialize the array. area network (SAN). A PS Series group is an easy-to-use, highly-scalable storage PS Series Groups
capacity and performance increase, with no disruption to users. the array to an existing group. When you expand a group,
One-Member PS Series Group Volume2Volume4 The Host Integration Tools CD-ROM is shipped with the array. Step 1: Install the Host Integration Tools
Multi-Member PS Series Group Group1 Volume1Pool1 Member1 Network At a minimum, you must install the following: 2. In the dialog boxes, follow the installation instructions. 1. Insert the CD-ROM in a Windows computer.
Software Configuration Methods Group1 Volume2 Pool1 Member1 Network Volume3 Optionally, you can install: - Auto-Snapshot Manager Group Manager graphical user interface) - Java - Microsoft i SCSI Software Initiator - Remote Setup Wizard ™ Runtime Environment (required by the
• A computer running Microsoft Requirements include: the PS Series software. storage space and is the recommended method of configuring The Remote Setup Wizard facilitates server access to group Volume1 Volume4 Member2 provide detailed information about using the tools. The Host Integration Tools Release Notes and User Guide - Manual Transfer Utility - Virtual Disk Service (VDS) provider Power Cables
Do not block Layer 2 multicasting between the devices. – Connected to the same Ethernet segment as the array. • The computer must have one of these configurations: Server 2003 R2. Windows Server 2000, Windows Server 2003 SP1, or Windows Pool2 Volume3 Member3 in the following tables. To configure the PS Series software, you need the information Step 2: Collect Configuration Information and must match the volume’s access controls. connect to a volume, a computer must have an i SCSI initiator To allocate SAN storage space to users, create a volume. To Step 4: Start Using the SAN
PS Series Installation and Setup manual for information. the setup utility to configure the PS Series software. See the If you do not meet the Remote Setup Wizard requirements, use – Connected to Ethernet 0 on the array using an RJ45 cable. ® Windows Subnet mask Array IP address Member name Default gateway One to 63 letters, numbers, or hyphens. The first Array Configuration To create and connect to a volume: Group Manager GUI to set the RAID policy. storage space will not not available until you use the Note: If you added the array to an existing group, the array’s
For support, visit www.dell.com/equallogic or call 1-800-945-3355. ® XP, Windows Vista, RAID policy PS5500 arrays only support RAID 50 (striping on top Subnet for the array IP address. Must be in the same subnet as the group IP address. character must be a letter or number. latest browser requirements. in a web browser. See the PS Series Release Notes for the 1. Start the Group Manager GUI by entering the group IP address
password Membership Administration Group IP address Group name character must be a letter. One to 63 letters, numbers, or hyphens. The first Group Configuration RAID policy is set only for the first group member. of two RAID 5 sets, with two spare disk drives). The
CHAP password CHAP user name Microsoft services for group access. Three to 54 letters or numbers. Used by Used when expanding an existing group. Three to 16 letters or numbers, case-sensitive. Overrides the default grpadmin account password. Must be in the same subnet as the array IP address. 2. Click Create Volume in the Activities panel.
Microsoft services for group access. Twelve to 16 letters or numbers. Used by the software, enter the group IP address as the target If the computer is not the one from which you configured targets (volumes) in the group. 4. Use the computer’s i SCSI initiator to discover the i SCSI controls (i SCSI initiator name or IP address). 3. In the dialog boxes, enter the volume name, size, and access
matches the volume’s access controls. Note: If you cannot log in to a volume, make sure the computer 5. Select the target associated with the volume and log in. discovery address in order to discover the group volumes. Electrostatic Wrist
Group Manager GUI. Start the GUI, expand Tools in connection, you can access the online help from the and use all its features. If your computer has an Internet See the PS Series Online Help to customize the group Where to Go Next
about PS Series arrays. Visit www.dell.com/equallogic for the latest information the lower-left corner and select Online Help. Step 5: Connect the Array to the Network
Strap
N233H Rev. A00
Rail Kit for Four-Pole Rack including
Fasteners Recommended configuration. For high performance and Optional Dedicated availability, connect network cables to Ethernet 0 (minimum) and Management Port
Ethernet 1 on both control modules and distribute the connections 10Mb/100Mb
across multiple network switches.
PS4000 Chassis
The switches must be connected with interswitch links that have sufficient bandwidth.
PS4000 Bezel Invalid
- - - Address - - -
PS4000 Supported Control Modules
Type 8
Type 9
For more information, see For more information, see
Unpacking Instructions (pn: C840T) Rack Mount Instructions (pn: F464T) For more information, see Installation and Setup Manual (pn: F465T)
C839T Rev. A00
Page Summary Contents For Dell EqualLogic PS4000 Setup Poster -Front Owner's Manual
Manual Details
| Brand | Dell |
|---|---|
| Pages | 1 |
| File Size | 1.39 MB |
| Published | June 15, 2026 |
Enter the captcha to get the download link:

Frequently Asked Questions
How do I begin creating a new storage volume?
Start the Group Manager GUI, click Create Volume in the Activities panel, and enter the desired name, size, and access controls.
What network cables are supported for connecting the PS Series array?
The recommended supported cables include Category 5E and Category 6 with RJ45 connectors.
If I encounter an issue logging into a volume, what should I check first?
Confirm that the computer attempting to connect exactly matches the volume’s established access controls.
What information is required when setting up a new group configuration?
You need the array's IP address, the group name (which must start with a letter), and the respective member names.