Dell EqualLogic PS6000 Setup Poster -Front Owner's Manual
Summary
Dell PS Series Storage Array Setup Guide. This guide provides step-by-step instructions for installing and configuring PS Series storage arrays in a rack, including power and network connections, bezel installation, and environmental requirements. Target users: storage administrators and IT professionals deploying Dell EqualLogic SAN storage solutions.
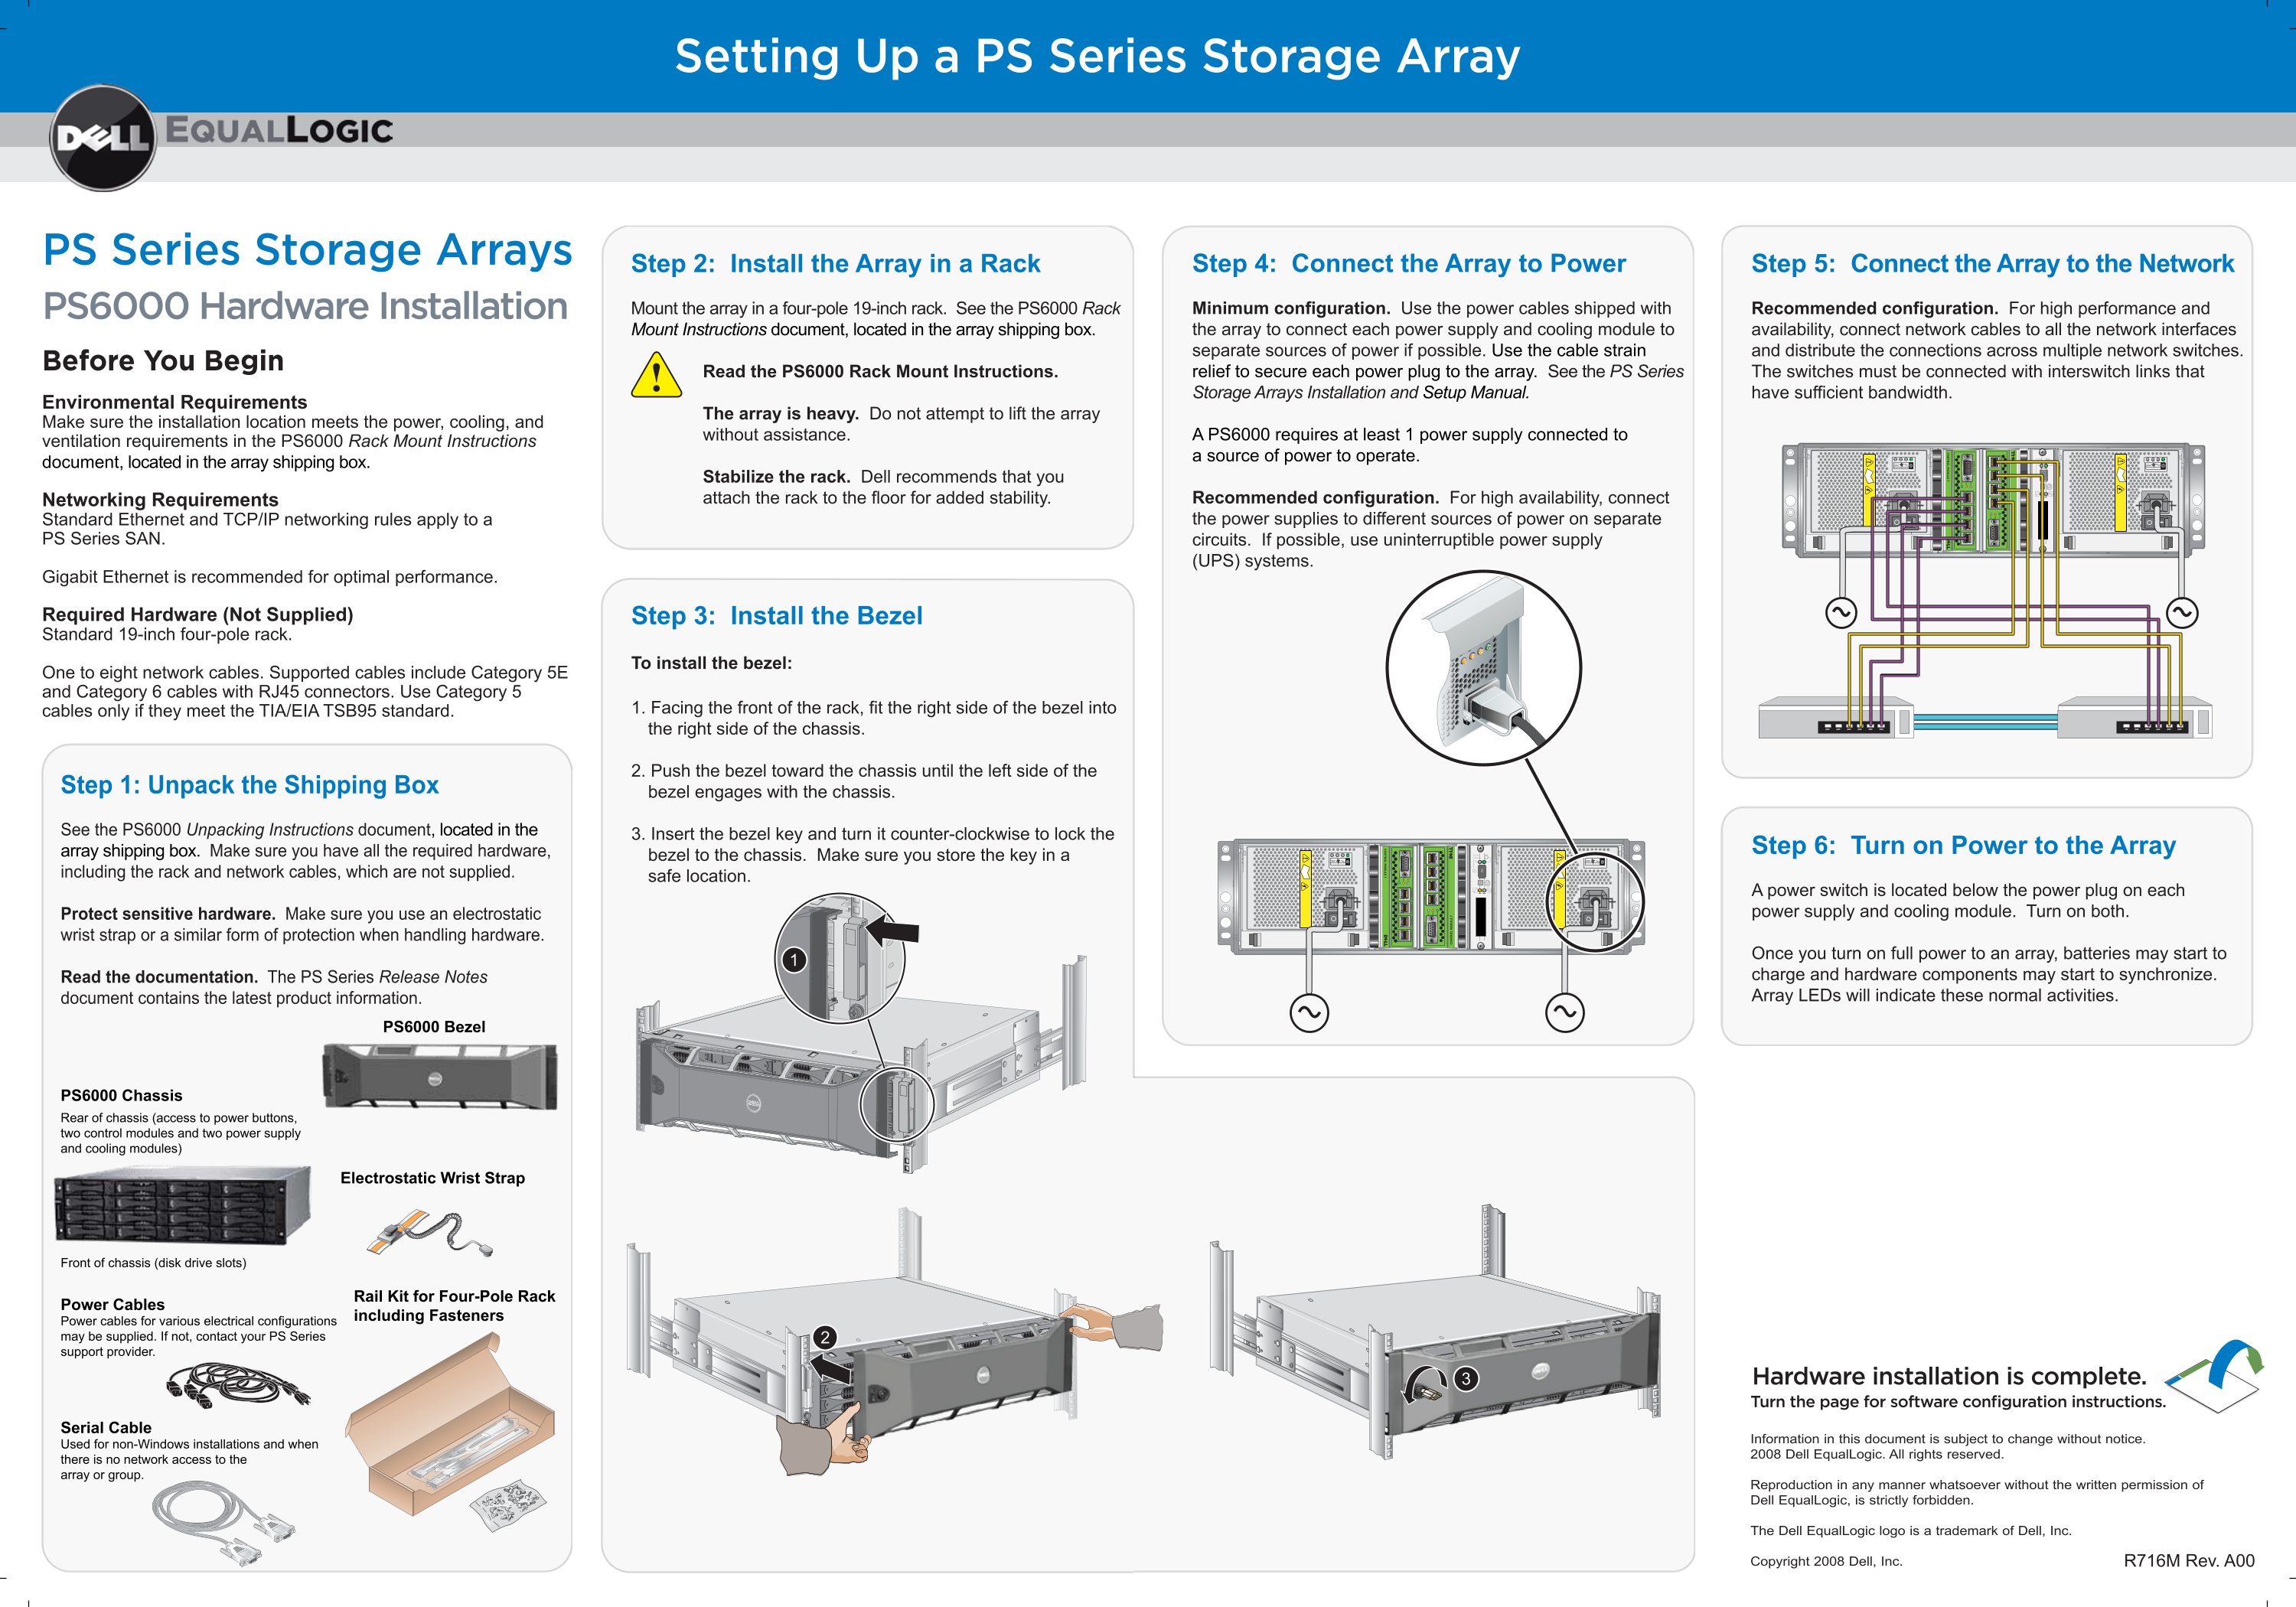
Page 1 Text Content
Setting Up a PS Series Storage Array
PS Series Storage Arrays
Step 2: Install the Array in a Rack Step 4: Connect the Array to Power Step 5: Connect the Array to the Network PS6000 Hardware Installation Mount the array in a four-pole 19-inch rack. See the PS6000 Rack Minimum configuration. Use the power cables shipped with Recommended configuration. For high performance and Mount Instructions document, located in the array shipping box. the array to connect each power supply and cooling module to availability, connect network cables to all the network interfaces
TR L M LE 7 D LL
separate sources of power if possible. Use the cable strain and distribute the connections across multiple network switches.
Before You Begin
Read the PS6000 Rack Mount Instructions. relief to secure each power plug to the array. See the PS Series The switches must be connected with interswitch links that Storage Arrays Installation and Setup Manual. have sufficient bandwidth.
Environmental Requirements
The array is heavy. Do not attempt to lift the array
Make sure the installation location meets the power, cooling, and
without assistance. A PS6000 requires at least 1 power supply connected to
ventilation requirements in the PS6000 Rack Mount Instructions
a source of power to operate. Address Invalid
document, located in the array shipping box. - - - - - -
Stabilize the rack. Dell recommends that you
Networking Requirements attach the rack to the floor for added stability. Recommended configuration. For high availability, connect Standard Ethernet and TCP/IP networking rules apply to a the power supplies to different sources of power on separate
PS Series SAN. circuits. If possible, use uninterruptible power supply
(UPS) systems.
Gigabit Ethernet is recommended for optimal performance.
Required Hardware (Not Supplied) Step 3: Install the Bezel Standard 19-inch four-pole rack.
To install the bezel:
One to eight network cables. Supported cables include Category 5E and Category 6 cables with RJ45 connectors. Use Category 5
cables only if they meet the TIA/EIA TSB95 standard. 1. Facing the front of the rack, fit the right side of the bezel into the right side of the chassis.
2. Push the bezel toward the chassis until the left side of the
Step 1: Unpack the Shipping Box bezel engages with the chassis.
See the PS6000 Unpacking Instructions document, located in the 3. Insert the bezel key and turn it counter-clockwise to lock the
array shipping box. Make sure you have all the required hardware, Invalid Step 6: Turn on Power to the Array
bezel to the chassis. Make sure you store the key in a Address
including the rack and network cables, which are not supplied. safe location.
A power switch is located below the power plug on each
TR L M LE 7 D LL
Protect sensitive hardware. Make sure you use an electrostatic power supply and cooling module. Turn on both.
wrist strap or a similar form of protection when handling hardware.
Once you turn on full power to an array, batteries may start to Read the documentation. The PS Series Release Notes charge and hardware components may start to synchronize. document contains the latest product information. Array LEDs will indicate these normal activities.
PS6000 Bezel
PS6000 Chassis Rear of chassis (access to power buttons, two control modules and two power supply and cooling modules)
Electrostatic Wrist Strap
Front of chassis (disk drive slots)
Rail Kit for Four-Pole Rack
Power Cables
including Fasteners
Power cables for various electrical configurations may be supplied. If not, contact your PS Series support provider.
Hardware installation is complete. Turn the page for software configuration instructions.
Serial Cable
Information in this document is subject to change without notice.
Used for non-Windows installations and when
TR LE
2008 Dell Equal Logic. All rights reserved.
there is no network access to the array or group.
Reproduction in any manner whatsoever without the written permission of Dell Equal Logic, is strictly forbidden.
The Dell Equal Logic logo is a trademark of Dell, Inc.
Copyright 2008 Dell, Inc. R716M Rev. A00
TR LE
Page Summary Contents For Dell EqualLogic PS6000 Setup Poster -Front Owner's Manual
Manual Details
| Brand | Dell |
|---|---|
| Pages | 1 |
| File Size | 1.25 MB |
| Published | June 24, 2026 |
Enter the captcha to get the download link:

Frequently Asked Questions
Is lifting the storage array safe for a single person?
No, the array is heavy and you must not attempt to lift it without assistance.
What is recommended for maximizing power availability?
For high availability, connect the power supplies to different sources of power on separate circuits. UPS systems are highly recommended.
What kind of cables should I use for networking connections?
Supported cables include Category 5E and Category 6 cables with RJ45 connectors.
What safety precaution must be taken when handling the device hardware?
You must use an electrostatic wrist strap or similar protective equipment when handling the hardware.