ASUS Server Workstation Universal Server RS720A-E12-RS24U Tool-less Friction Rail Kit Installation Guide
Summary
Effortlessly secure your server equipment using this tool-less friction rail kit, designed for quick and stable rack mounting. The comprehensive manual provides step-by-step guidance on installing chassis brackets onto your server unit and precisely attaching the rails to standard rack posts. This robust solution is ideal for IT technicians and system integrators who need reliable server support without the hassle of traditional tools. Ensures optimal alignment and maximum stability within any data center or server rack environment.
Page 1 Text Content
ae E21630
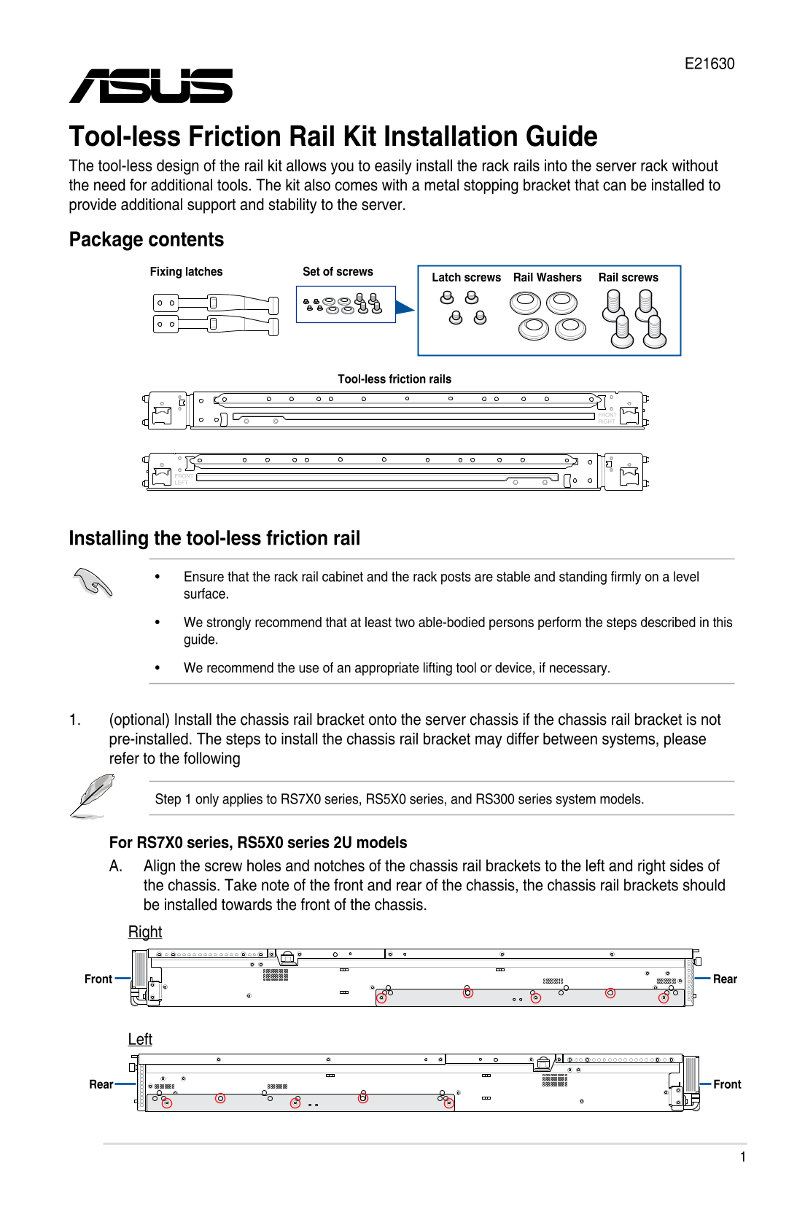
Tool-less Friction Rail Kit Installation Guide The tcol-less design ofthe rail kit allows you to easily install the rack rails into the server rack without the need for additional tools. The kit also comes with a metal stopping bracket that can be installed to provide additional support and stability to the server-.
Package contents
Fixing latches Setof screws Latch screws Rail Washers 。 Rail screws
EEC [was | 95 2Q 84 Toolless ffiction rails 间距 9 6 5 IE 豆 上
招亲 IC 5 ER 二 品
Installing the tool-less friction rail
ASN * Ensure that the rack rail cabinet and the rack posts are stable and standing frmly on alevel
surface.
*, We strongly recommend that at least two able-bodied persons perform the steps described in this
guide.
*, We recommend the use of an appropriate lifting tool or device, if necessary-
1 (optional) Install the chassis rail bracket onto the Server chassis ifthe chassis rail bracket is not pre-installed. The steps to install the chassis rail bracket may differ between systems, please refer to the following
5 Step 1 only applies to RS7X0 series, RS5X0 series, and RS300 series System models. For RS7X0 series, RS5X0 series 2U models AAAlign the screw holes and notches of the chassis rail brackets to the left and right sides of
the chassis. Take note of the front and rear of the chassis, the chassis rail brackets should
be installed towards the front of the chassis.
Page Summary Contents For ASUS Server Workstation Universal Server RS720A-E12-RS24U Tool-less Friction Rail Kit Installation Guide
Manual Details
| Brand | Server |
|---|---|
| Pages | 6 |
| File Size | 598.61 KB |
| Published | June 05, 2026 |
Enter the captcha to get the download link:

Frequently Asked Questions
What preparation is required before installing the rail kit?
Ensure the rack rail cabinet and rack posts are stable and standing firmly on an level surface.
How many people should install this equipment?
It is strongly recommended that at least two able-bodied persons perform the installation steps.
Where should the chassis rail brackets be positioned on the chassis?
They should be installed towards the front of the chassis, aligning with the screw holes and notches on both the left and right sides.
Are tools required for assembly?
No additional tools are needed since the design is tool-less.