Philips FCS145 MCS145 Installation Instructions User Manual
Summary
Complete installation guide for a diverse range of professional downlight fixtures and commercial lighting solutions. This manual details every step required for seamless setup, from preparing your ceiling surface and mounting the base unit to correctly wiring the power cord and securing the fixture. It provides clear instructions on lamp replacement and safe operation, making it essential reading for technicians, electricians, or DIY users installing recessed lighting systems.
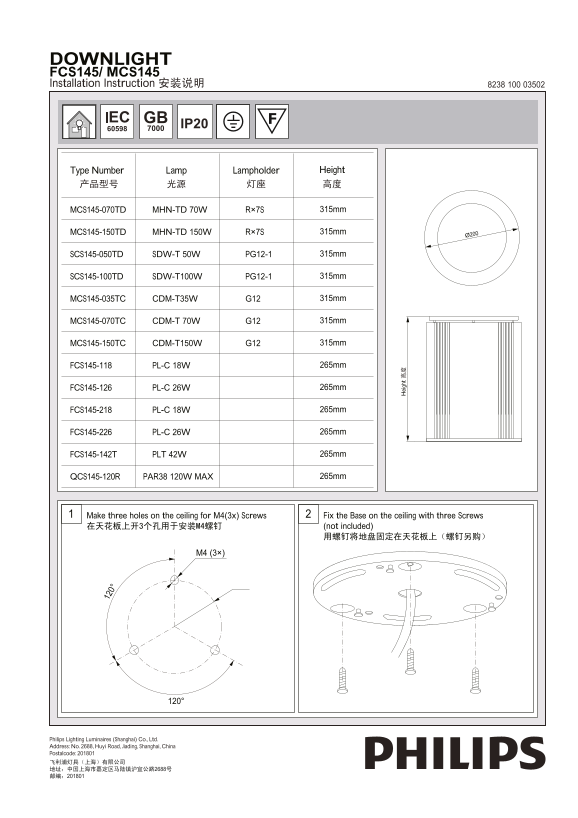
Page 1 Text Content
DOWNLIGHT FCS145/ MCS145 Installation Instruction 安装说明 8238 100 03502
Lamp Type Number Lampholder Height
MHN-TD 70WMCS145-070TD R×7S 315mm
MHN-TD 150WMCS145-150TD R×7S 315mm
SDW-T 50WSCS145-050TD PG12-1 315mm
SDW-T100WSCS145-100TD PG12-1 315mm
CDM-T35WMCS145-035TC G12 315mm
CDM-T 70WMCS145-070TC G12 315mm
CDM-T150WMCS145-150TC G12 315mm
PL-C 18WFCS145-118 265mm
PL-C 26WFCS145-126 265mm
ei gh
PL-C 18WFCS145-218 265mm
PL-C 26WFCS145-226 265mm
PLT 42WFCS145-142T 265mm
PAR38 120W MAXQCS145-120R 265mm
2Make three holes on the ceiling for M4(3x) Screws Fix the Base on the ceiling with three Screws
在天花板上开3个孔用于安装M4螺钉 (not included)
Philips Lighting Luminaires (Shanghai) Co., Ltd. Address: No. 2688, Huyi Road, Jiading, Shanghai, China Postalcode: 201801 飞利浦灯具(上海)有限公司 地址:中国上海市嘉定区马陆镇沪宜公路2688号 邮编:201801
Page Summary Contents For Philips FCS145 MCS145 Installation Instructions User Manual
Manual Details
| Brand | Philips |
|---|---|
| Pages | 3 |
| File Size | 542.45 KB |
| Published | June 06, 2026 |
Enter the captcha to get the download link:

Frequently Asked Questions
How do I initially mount the luminaire to the ceiling?
Make three holes on the ceiling for M4 screws and fix the base using three screws (M4 screws are not included).
What is required before replacing a lamp or light source?
You must disconnect the unit from the power source first.
How do I secure the luminaire to its mounting base?
Bring the luminaire towards the base using three screws, then rotate clockwise and counter-clockwise to fix it.