# A B C D E F G H I J K L M N O P Q R S T U V W X Y Z

Panasonic SC-HC30 Compact Stereo System Operating Instructions

Summary

Experience reliable audio quality with the ENERGY STAR certified Compact Stereo System, ideal for enhancing home sound. This comprehensive manual provides step-by-step operating instructions, setup guides for various devices (including smartphones and media), and detailed safety warnings. If you are setting up or using this unit, consult this guide to ensure safe operation, troubleshoot common issues, and maximize performance from day one.
📄 Preview 📖 Table of Contents Contents PAGE OF 28

Page 1 Text Content

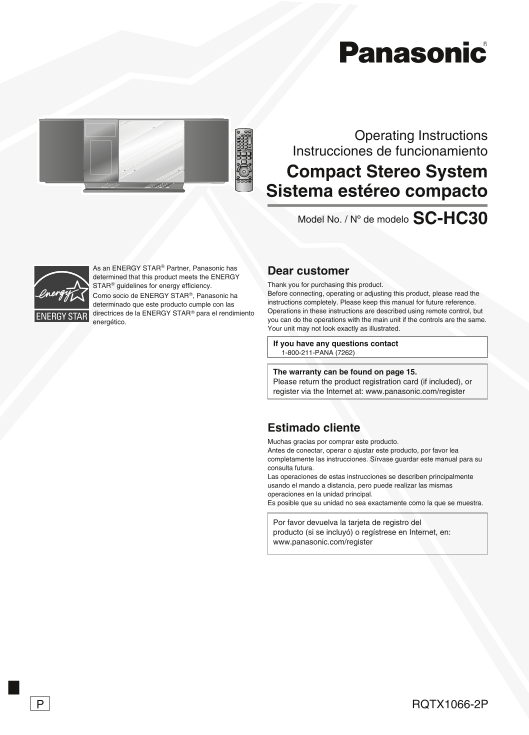
Operating Instructions

Instrucciones de funcionamiento Compact Stereo System Sistema estéreo compacto

SC-HC30Model No. / Nº de modelo

As an ENERGY STAR Partner, Panasonic has

Dear customer

determined that this product meets the ENERGY

STAR guidelines for energy efficiency. Thank you for purchasing this product. Before connecting, operating or adjusting this product, please read the

Como socio de ENERGY STAR , Panasonic ha

instructions completely. Please keep this manual for future reference.

determinado que este producto cumple con las

Operations in these instructions are described using remote control, but

directrices de la ENERGY STAR para el rendimiento

you can do the operations with the main unit if the controls are the same.

energético.

Your unit may not look exactly as illustrated.

If you have any questions contact 1-800-211-PANA (7262)

The warranty can be found on page 15. Please return the product registration card (if included), or register via the Internet at: www.panasonic.com/register

Estimado cliente Muchas gracias por comprar este producto. Antes de conectar, operar o ajustar este producto, por favor lea completamente las instrucciones. Sírvase guardar este manual para su consulta futura. Las operaciones de estas instrucciones se describen principalmente usando el mando a distancia, pero puede realizar las mismas operaciones en la unidad principal. Es posible que su unidad no sea exactamente como la que se muestra.

Por favor devuelva la tarjeta de registro del producto (si se incluyó) o regístrese en Internet, en: www.panasonic.com/register

RQTX1066-2PP

Page Summary Contents For Panasonic SC-HC30 Compact Stereo System Operating Instructions

Page 1 Operating Instructions Instrucciones de funcionamiento Compact Stereo System Sistema estéreo compacto SC-HC30Model No. / Nº de modelo As an ENERGY STAR Partner, Panasonic has Dear customer determined ...
Page 2 ANTENNA LEAD IN WIRE GROUND CLAMP ANTENNA ELECTRIC DISCHARGE UNIT SERVICE IS (NEC SECTION 810-20) EQUIPMENT GROUNDING CONDUCTORS (NEC SECTION 810-21) GROUND CLAMPS POWER SERVICE GROUNDING ELECTRODE SY...
Page 3 Listening caution Table of contents IMPORTANT SAFETY INSTRUCTIONS 2 Listening caution 3 EST. 1924 Product service 3 Supplied accessories 4 Selecting fine audio equipment such as the unit you’ve just p...
Page 4 Supplied accessories Please check and identify the supplied accessories. Use numbers indicated in parentheses when asking for replacement parts. (Product numbers are correct as of January 2010. These ...
Page 5 Attaching the unit to a wall (Optional) Notes on installation g Before installation, read the “Safety precautions” and “Wall mount instructions” for correct installation. g For optimal performance and...
Page 6 Attaching the unit to a wall (Optional) (continued) Wall mount instructions • Before installation, turn the unit off and disconnect the AC power supply cord plug from the AC receptacle. • Tighten scre...
Page 7 Attaching the unit to a wall (Optional) (continued) Wall mount instructions (continued) 4. Hang the unit on the wall.  Hook the unit securely onto the mounting screws . Connect the FM/AM antenna befo...
Page 8 Control guide Standby/on switch [^], [AUTO OFF] Remote control [8, POWER] (9, 11, 14) This function allows you to turn Press to switch the unit from on the unit off (except in radio mode) Refer to the...
Page 9 Disc operations g Inserting a disc Basic play  Press [^] to turn the unit on.  Press [;, CD] to open the sliding door.  Press [^] to turn the unit on.  Insert the disc to be played (➡ left).  Pre...
Page 10 Disc operations (continued) Radio operations Play Mode function Manual tuning  Press [CD q/h].  Press [RADIO] to select “FM” or “AM”.  Press [PLAY MODE] repeatedly to select the following modes.  ...
Page 11 Timer External unit Setting the clock Enjoying audio from i Pod ® or i Phone This is a 12-hour clock. g Inserting an i Pod®/i Phone  Press [CLOCK/TIMER] to select “CLOCK”.  Press [;, i Pod] to open ...
Page 12 External unit (continued) Notes on i Phone: ■ Compatible i Pod® All phone features can only be controled by the i Phone’s touch Name Memory size screen. i Pod nano 5th generation (video camera) 8 GB, ...
Page 13 Troubleshooting guide Before requesting service, make the following checks. If you are in doubt about some of the check points, or if the remedies indicated in the chart do not solve the problem, refe...
Page 14 Memory reset (Initialization) When the following situations occur, reset the memory:  While pressing and holding down [8, POWER] on the main unit, There is no response when buttons are pressed. recon...
Page 15 Limited Warranty Panasonic Consumer Electronics Company, Division of Panasonic Corporation of North America One Panasonic Way, Secaucus, New Jersey 07094 Panasonic Home Audio Products Limited Warranty...
Page 16 ANTENNA LEAD IN WIRE GROUND CLAMP ANTENNA ELECTRIC DISCHARGE UNIT SERVICE (NEC SECTION 810-20) EQUIPMENT GROUNDING CONDUCTORS (NEC SECTION 810-21) GROUND CLAMPS POWER SERVICE GROUNDING INSTRUCCIONES D...
Page 17 Precauciones al escuchar Índice INSTRUCCIONES DE SEGURIDAD EST. 1924 IMPORTANTES 2 Precauciones al escuchar 3 La selección de un fino equipo de audio como la unidad que acaba Servicio a productos 3 de...
Page 18 Accesorios incluidos Por favor verifique e identifique los accesorios incluidos. Use los números indicados entre paréntesis cuando or solicite refacciones. (Los números de producto son correctos a ene...
Page 19 Fijación de la unidad en un muro (Opcional) Notas sobre la instalación g Antes de proceder a la instalación, lea las secciones “Precauciones de seguridad” e “Instrucciones de montaje en el muro” para ...
Page 20 Fijación de la unidad en un muro (Opcional) (continuación) Instrucciones de montaje en el muro • Antes de la instalación, apague la unidad y desconecte el enchufe del cable de alimentación eléctrica d...
Page 21 Fijación de la unidad en un muro (Opcional) (continuación) Instrucciones de montaje en el muro (continuación) 4. Cuelgue la unidad del muro.  Enganche de manera segura la unidad en los tornillos de m...
Page 22 Guía de control Interruptor de modo en [AUTO OFF] Mando a distancia espera/encendido [^], Esta función le permite apagar [8, POWER] (9, 11, 13) la unidad (excepto en el modo Los números entre paréntes...
Page 23 Operaciones de discos g Insertar un disco Reproducción básica  Presione [^] para encender la unidad.  Presione [;, CD] para abrir la puerta deslizante.  Presione [^] para encender la unidad.  Inse...
Page 24 Operaciones de discos (continuación) Operaciones de la radio Función del modo de reproducción Sintonización manual  Presione [CD q/h].  Presione [RADIO] para seleccionar “FM” o “AM”.  Presione repe...
Page 25 Temporizador Unidad externa Ajustes del reloj Disfrute el audio del i Pod ® o i Phone El reloj tiene formato de 12 horas. g Inserción del i Pod®/i Phone  Pulse [CLOCK/TIMER] para seleccionar “CLOCK”....
Page 26 Unidad externa (continuación) ■ i Pod® compatibles Notas sobre i Phone: Todas las funciones de teléfono sólo se pueden controlar con la Nombre Tamaño de la memoria pantalla táctil del i Phone. La unid...
Page 27 Guía de solución de problemas Antes de pedir servicio, realice las comprobaciones siguientes. Si tiene dudas sobre algunos puntos de comprobación o si las soluciones indicadas en la tabla no resuelven...
Page 28 Especificaciones Información Útil g SECCIÓN DEL AMPLIFICADOR Potencia de salida RMS Atención al Cliente Canal frontal (ambos canales operados) 20 W por canal (6 Ω), 1 k Hz, Directorio de Atención al C...

Manual Details

Brand Panasonic
Pages 28
File Size 3.74 MB
Published June 19, 2026
8 views

Enter the captcha to get the download link:

captcha

Frequently Asked Questions

What safety precautions must I follow before using the unit?

Read these instructions, keep them handy, heed all warnings, and never use it near water or heat sources. Always unplug during lightning storms.

How do I properly service the apparatus if something goes wrong?

Refer all servicing to qualified service personnel. Do not attempt repairs on user-serviceable parts yourself.

What should I do if my stereo unit isn't showing any signal or tracks?

First, ensure the iPod/iPhone is inserted correctly and that the main unit is set to the 'REMOTE 1' mode by changing the remote control.

Is this product compatible with all devices?

The provided manual only discusses switching between operating modes ('REMOTE 1' and 'REMOTE 2') for specific Apple models, suggesting compatibility depends on the software version.