Panasonic Network Camera BL-.C210 BL-.C230 Setup Guide
Summary
Easily set up and manage your Panasonic Indoor Network Cameras (BL-C210/BL-C230) with this comprehensive setup guide. This manual details the step-by-step processes for initial camera configuration, from connecting to your network and updating firmware to saving user credentials. It is essential reading for users who need to install both single and multi-camera versions of the associated viewer software (Network Camera Recorder), ensuring a smooth, secure deployment process.
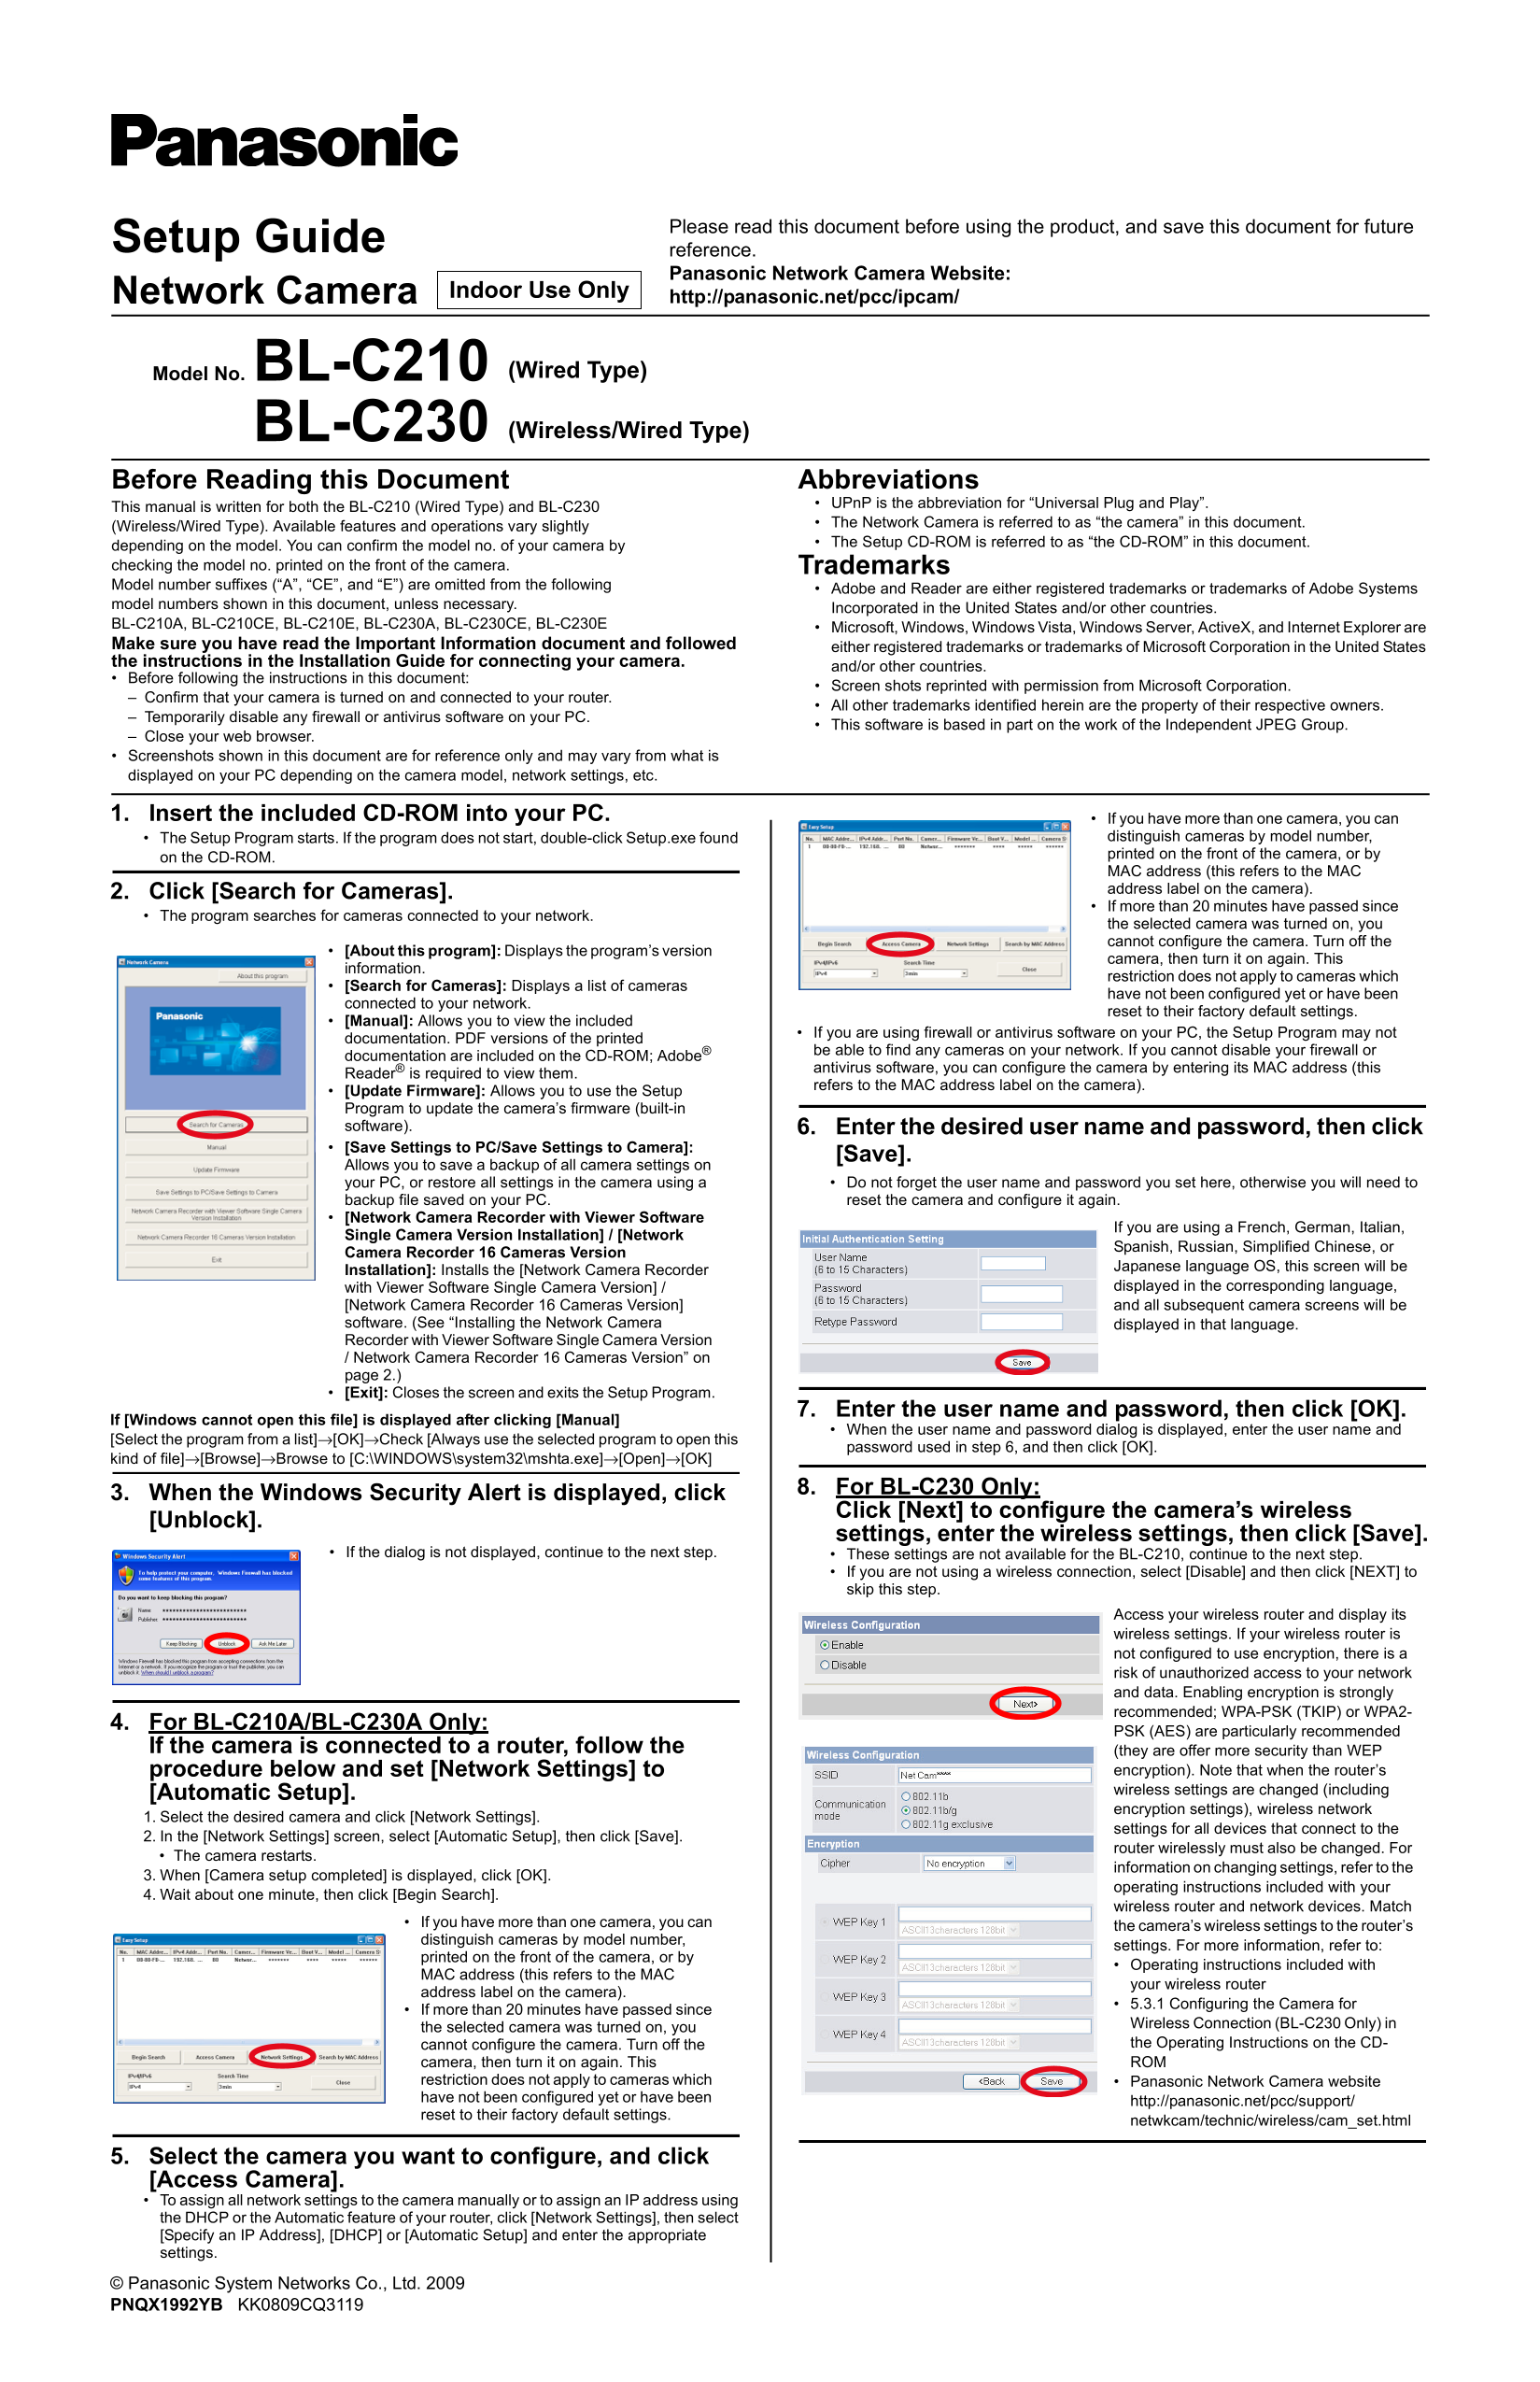
Page 1 Text Content
Please read this document before using the product, and save this document for future
Setup Guide reference.
Panasonic Network Camera Website: Network Camera http://panasonic.net/pcc/ipcam/Indoor Use Only
Model No. BL-C210 (Wired Type) BL-C230 (Wireless/Wired Type)
Before Reading this Document Abbreviations
UPn P is the abbreviation for “Universal Plug and Play”.
This manual is written for both the BL-C210 (Wired Type) and BL-C230
The Network Camera is referred to as “the camera” in this document.
(Wireless/Wired Type). Available features and operations vary slightly
depending on the model. You can confirm the model no. of your camera by The Setup CD-ROM is referred to as “the CD-ROM” in this document.
checking the model no. printed on the front of the camera. Trademarks Model number suffixes (“A”, “CE”, and “E”) are omitted from the following
Adobe and Reader are either registered trademarks or trademarks of Adobe Systems
model numbers shown in this document, unless necessary.
Incorporated in the United States and/or other countries.
BL-C210A, BL-C210CE, BL-C210E, BL-C230A, BL-C230CE, BL-C230E Microsoft, Windows, Windows Vista, Windows Server, Active X, and Internet Explorer are Make sure you have read the Important Information document and followed either registered trademarks or trademarks of Microsoft Corporation in the United States the instructions in the Installation Guide for connecting your camera.
and/or other countries.
Before following the instructions in this document:
Screen shots reprinted with permission from Microsoft Corporation.
Confirm that your camera is turned on and connected to your router.
All other trademarks identified herein are the property of their respective owners.
Temporarily disable any firewall or antivirus software on your PC.
This software is based in part on the work of the Independent JPEG Group.
Close your web browser. Screenshots shown in this document are for reference only and may vary from what is displayed on your PC depending on the camera model, network settings, etc.
1. Insert the included CD-ROM into your PC. If you have more than one camera, you can
The Setup Program starts. If the program does not start, double-click Setup.exe found distinguish cameras by model number, on the CD-ROM. printed on the front of the camera, or by MAC address (this refers to the MAC 2. Click [Search for Cameras]. address label on the camera). If more than 20 minutes have passed since
The program searches for cameras connected to your network.
the selected camera was turned on, you cannot configure the camera. Turn off the
[About this program]: Displays the program’s version
camera, then turn it on again. This
information.
restriction does not apply to cameras which
[Search for Cameras]: Displays a list of cameras
have not been configured yet or have been
connected to your network.
reset to their factory default settings.
[Manual]: Allows you to view the included
If you are using firewall or antivirus software on your PC, the Setup Program may not
documentation. PDF versions of the printed
be able to find any cameras on your network. If you cannot disable your firewall or
documentation are included on the CD-ROM; Adobe®
antivirus software, you can configure the camera by entering its MAC address (this
Reader® is required to view them.
refers to the MAC address label on the camera).
[Update Firmware]: Allows you to use the Setup Program to update the camera’s firmware (built-in software). 6. Enter the desired user name and password, then click [Save Settings to PC/Save Settings to Camera]:
[Save].
Allows you to save a backup of all camera settings on
your PC, or restore all settings in the camera using a Do not forget the user name and password you set here, otherwise you will need to backup file saved on your PC. reset the camera and configure it again.
[Network Camera Recorder with Viewer Software
If you are using a French, German, Italian,
Single Camera Version Installation] / [Network
Spanish, Russian, Simplified Chinese, or
Camera Recorder 16 Cameras Version
Japanese language OS, this screen will be
Installation]: Installs the [Network Camera Recorder
with Viewer Software Single Camera Version] / displayed in the corresponding language,
[Network Camera Recorder 16 Cameras Version] and all subsequent camera screens will be software. (See “Installing the Network Camera displayed in that language. Recorder with Viewer Software Single Camera Version / Network Camera Recorder 16 Cameras Version” on page 2.) [Exit]: Closes the screen and exits the Setup Program.
7. Enter the user name and password, then click [OK].
If [Windows cannot open this file] is displayed after clicking [Manual]
When the user name and password dialog is displayed, enter the user name and
[Select the program from a list]→[OK]→Check [Always use the selected program to open this
password used in step 6, and then click [OK].
kind of file]→[Browse]→Browse to [C:\WINDOWS\system32\mshta.exe]→[Open]→[OK]
8. For BL-C230 Only:
3. When the Windows Security Alert is displayed, click
Click [Next] to configure the camera’s wireless
[Unblock].
settings, enter the wireless settings, then click [Save].
If the dialog is not displayed, continue to the next step. These settings are not available for the BL-C210, continue to the next step.
If you are not using a wireless connection, select [Disable] and then click [NEXT] to skip this step.
Access your wireless router and display its wireless settings. If your wireless router is not configured to use encryption, there is a risk of unauthorized access to your network and data. Enabling encryption is strongly recommended; WPA-PSK (TKIP) or WPA2-
4. For BL-C210A/BL-C230A Only:
PSK (AES) are particularly recommended
If the camera is connected to a router, follow the (they are offer more security than WEP
procedure below and set [Network Settings] to encryption). Note that when the router’s [Automatic Setup]. wireless settings are changed (including encryption settings), wireless network
1. Select the desired camera and click [Network Settings].
settings for all devices that connect to the
2. In the [Network Settings] screen, select [Automatic Setup], then click [Save].
router wirelessly must also be changed. For
The camera restarts.
information on changing settings, refer to the
3. When [Camera setup completed] is displayed, click [OK].
operating instructions included with your
4. Wait about one minute, then click [Begin Search].
wireless router and network devices. Match
If you have more than one camera, you can the camera’s wireless settings to the router’s distinguish cameras by model number,
settings. For more information, refer to:
printed on the front of the camera, or by
Operating instructions included with
MAC address (this refers to the MAC
your wireless router
address label on the camera).
5.3.1 Configuring the Camera for
If more than 20 minutes have passed since
Wireless Connection (BL-C230 Only) in
the selected camera was turned on, you
cannot configure the camera. Turn off the the Operating Instructions on the CD- camera, then turn it on again. This ROM
restriction does not apply to cameras which Panasonic Network Camera website have not been configured yet or have been http://panasonic.net/pcc/support/ reset to their factory default settings.
netwkcam/technic/wireless/cam_set.html
5. Select the camera you want to configure, and click [Access Camera]. To assign all network settings to the camera manually or to assign an IP address using the DHCP or the Automatic feature of your router, click [Network Settings], then select [Specify an IP Address], [DHCP] or [Automatic Setup] and enter the appropriate settings. © Panasonic System Networks Co., Ltd. 2009 PNQX1992YB KK0809CQ3119
Page Summary Contents For Panasonic Network Camera BL-.C210 BL-.C230 Setup Guide
Manual Details
| Brand | Panasonic |
|---|---|
| Pages | 2 |
| File Size | 562.78 KB |
| Published | July 16, 2026 |
Enter the captcha to get the download link:

Frequently Asked Questions
What should I do if my setup program doesn't find any connected cameras?
Make sure the camera is powered on, or you may need to enter its MAC address manually.
Can the setup software be used to update the device firmware?
Yes, the [Update Firmware] option allows you to use the Setup Program for this purpose.
What are the compatibility limitations of the recorder software versions?
The single camera version is compatible with Windows Vista, XP, and Server 2003. The 16 cameras version supports Win XP Pro and Win 2000 (SP2+).
Do I need to disable my firewall or antivirus before setup?
Yes; if you use such software on your PC, the Setup Program may not find any cameras on your network.