Kodak CAMEO Camera User's Manual
Summary
Discover everything you need to know about your compact, auto-focus 35mm camera. This essential manual provides comprehensive instructions for every feature, including effortless film loading, utilizing flash settings, and capturing vivid panoramic images. Whether you are a beginner or require a detailed guide on advanced operation, this resource ensures optimal use of all controls and specifications. Designed for photographers looking to capture high-quality memories with reliable, simple auto-focus technology.
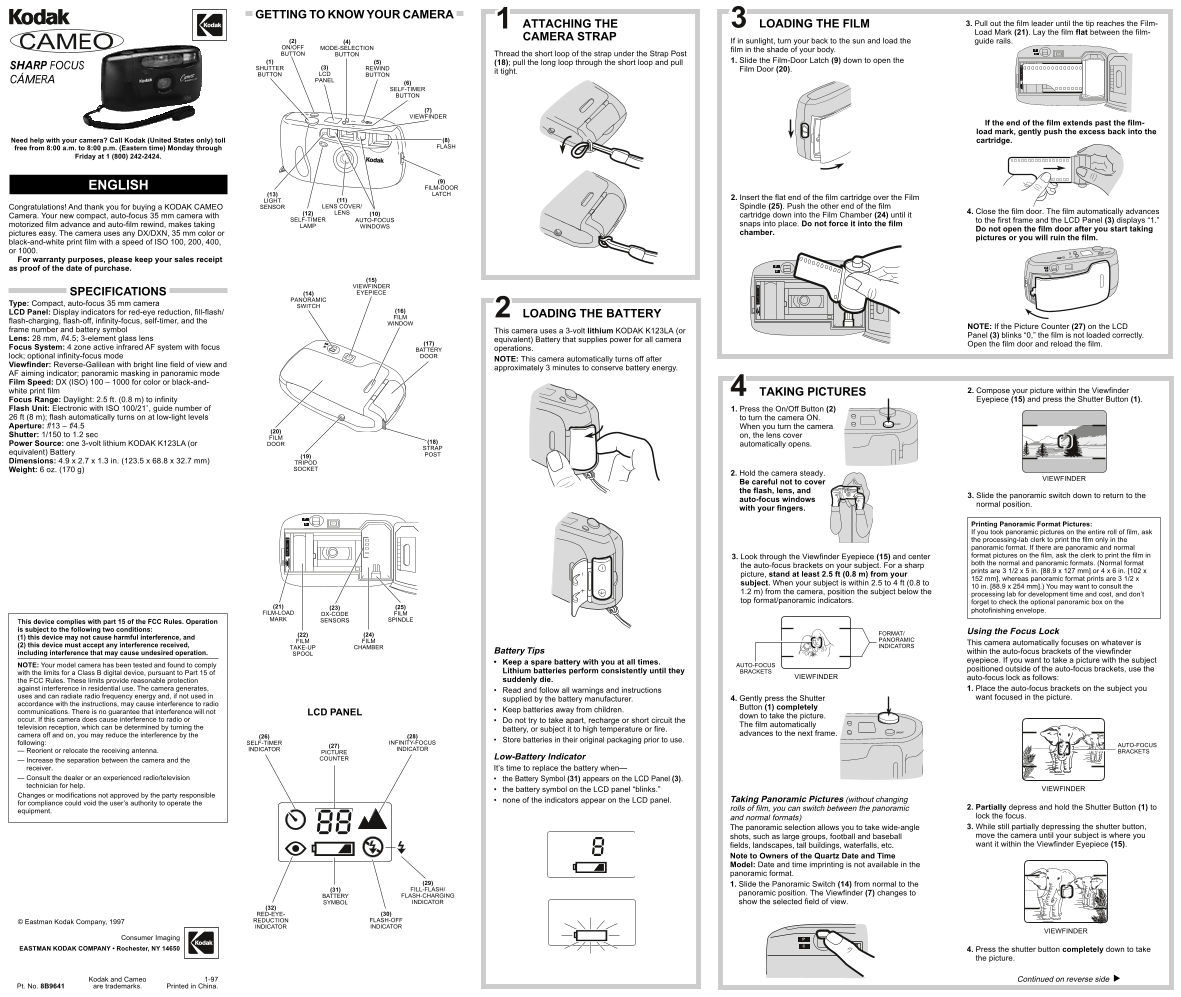
Page 1 Text Content
GETTING TO KNOW YOUR CAMERA
ATTACHING THE LOADING THE FILM 3. Pull out the film leader until the tip reaches the Film- Load Mark (21). Lay the film flat between the film-
CAMERA STRAP
(2) (4) If in sunlight, turn your back to the sun and load the guide rails.
CAMEO ON/OFF MODE-SELECTION
film in the shade of your body.
BUTTON ( )
BUTTON Thread the short loop of the strap under the Strap Post
(1) (5) 1. Slide the Film-Door Latch (9) down to open the
(18); pull the long loop through the short loop and pull
SHARP FOCUS SHUTTER (3) REWIND
Film Door (20).
it tight.
BUTTON LCD BUTTON CÁMERA PANEL
(6) SELF-TIMER BUTTON
(7) VIEWFINDER
If the end of the film extends past the film- load mark, gently push the excess back into the
Need help with your camera? Call Kodak (United States only) toll (8) cartridge. free from 8:00 a.m. to 8:00 p.m. (Eastern time) Monday through FLASH
Friday at 1 (800) 242-2424.
ENGLISH FILM-DOOR
(13) LATCH
2. Insert the flat end of the film cartridge over the Film
LIGHT (11) Congratulations! And thank you for buying a KODAK CAMEO SENSOR LENS COVER/ Spindle (25). Push the other end of the film
(12) LENS (10) 4. Close the film door. The film automatically advances
Camera. Your new compact, auto-focus 35 mm camera with cartridge down into the Film Chamber (24) until it
SELF-TIMER AUTO-FOCUS to the first frame and the LCD Panel (3) displays “1.”
motorized film advance and auto-film rewind, makes taking LAMP snaps into place. Do not force it into the film
WINDOWS
Do not open the film door after you start taking
pictures easy. The camera uses any DX/DXN, 35 mm color or chamber.
pictures or you will ruin the film.
black-and-white print film with a speed of ISO 100, 200, 400, or 1000. ON/OFF
For warranty purposes, please keep your sales receipt as proof of the date of purchase. ( )
(15) VIEWFINDER SPECIFICATIONS EYEPIECE(14)
PANORAMIC
Type: Compact, auto-focus 35 mm camera
SWITCH
LCD Panel: Display indicators for red-eye reduction, fill-flash/ (16)
FILM LOADING THE BATTERY
flash-charging, flash-off, infinity-focus, self-timer, and the
WINDOW
NOTE: If the Picture Counter (27) on the LCD
frame number and battery symbol This camera uses a 3-volt lithium KODAK K123LA (or
Panel (3) blinks “0,” the film is not loaded correctly.
Lens: 28 mm, f/4.5; 3-element glass lens equivalent) Battery that supplies power for all camera
(17) Open the film door and reload the film.
Focus System: 4 zone active infrared AF system with focus operations.
BATTERY
lock; optional infinity-focus mode ( ) DOOR
NOTE: This camera automatically turns off after
Viewfinder: Reverse-Galilean with bright line field of view and
approximately 3 minutes to conserve battery energy.
AF aiming indicator; panoramic masking in panoramic mode Film Speed: DX (ISO) 100 – 1000 for color or black-and-
white print film TAKING PICTURES 2. Compose your picture within the Viewfinder Focus Range: Daylight: 2.5 ft. (0.8 m) to infinity Eyepiece (15) and press the Shutter Button (1).
Flash Unit: Electronic with ISO 100/21˚, guide number of 1. Press the On/Off Button (2) 26 ft (8 m); flash automatically turns on at low-light levels to turn the camera ON.
ON/OFF
Aperture: f/13 – f/4.5 When you turn the camera
Shutter: 1/150 to 1.2 sec on, the lens cover
Power Source: one 3-volt lithium KODAK K123LA (or DOOR automatically opens.
STRAP
equivalent) Battery POST
Dimensions: 4.9 x 2.7 x 1.3 in. (123.5 x 68.8 x 32.7 mm) TRIPOD
Weight: 6 oz. (170 g) SOCKET
2. Hold the camera steady.
VIEWFINDER
Be careful not to cover the flash, lens, and
3. Slide the panoramic switch down to return to the
auto-focus windows
normal position.
MODE with your fingers.
Printing Panoramic Format Pictures: If you took panoramic pictures on the entire roll of film, ask the processing-lab clerk to print the film only in the panoramic format. If there are panoramic and normal 3. Look through the Viewfinder Eyepiece (15) and center format pictures on the film, ask the clerk to print the film in both the normal and panoramic formats. (Normal format
the auto-focus brackets on your subject. For a sharp
prints are 3 1/2 x 5 in. [88.9 x 127 mm] or 4 x 6 in. [102 x
picture, stand at least 2.5 ft (0.8 m) from your
152 mm], whereas panoramic format prints are 3 1/2 x
subject. When your subject is within 2.5 to 4 ft (0.8 to
10 in. [88.9 x 254 mm].) You may want to consult the
1.2 m) from the camera, position the subject below the
processing lab for development time and cost, and don’t
top format/panoramic indicators. forget to check the optional panoramic box on the
photofinishing envelope.
FILM-LOAD DX-CODE FILM MARK SENSORS SPINDLE
This device complies with part 15 of the FCC Rules. Operation is subject to the following two conditions:
FORMAT/ Using the Focus Lock
(1) this device may not cause harmful interference, and
FILM FILM PANORAMIC
This camera automatically focuses on whatever is
(2) this device must accept any interference received, INDICATORS
TAKE-UP CHAMBER
including interference that may cause undesired operation. Battery Tips within the auto-focus brackets of the viewfinder
SPOOL
Keep a spare battery with you at all times. eyepiece. If you want to take a picture with the subject
NOTE: Your model camera has been tested and found to comply AUTO-FOCUS
Lithium batteries perform consistently until they positioned outside of the auto-focus brackets, use the
with the limits for a Class B digital device, pursuant to Part 15 of BRACKETS
VIEWFINDER auto-focus lock as follows:
the FCC Rules. These limits provide reasonable protection suddenly die.
against interference in residential use. The camera generates, 1. Place the auto-focus brackets on the subject you
Read and follow all warnings and instructions
uses and can radiate radio frequency energy and, if not used in want focused in the picture.
supplied by the battery manufacturer. 4. Gently press the Shutter
accordance with the instructions, may cause interference to radio
Button (1) completely
communications. There is no guarantee that interference will not Keep batteries away from children.
LCD PANEL
down to take the picture.
occur. If this camera does cause interference to radio or Do not try to take apart, recharge or short circuit the
The film automatically
television reception, which can be determined by turning the
battery, or subject it to high temperature or fire. ON/OFF
camera off and on, you may reduce the interference by the advances to the next frame.
Store batteries in their original packaging prior to use.
following: SELF-TIMER INFINITY-FOCUS
(27) AUTO-FOCUS
— Reorient or relocate the receiving antenna. INDICATOR INDICATOR
PICTURE BRACKETS
COUNTER Low-Battery Indicator
— Increase the separation between the camera and the receiver. It’s time to replace the battery when— — Consult the dealer or an experienced radio/television the Battery Symbol (31) appears on the LCD Panel (3). technician for help.
the battery symbol on the LCD panel “blinks.” VIEWFINDER
Changes or modifications not approved by the party responsible
none of the indicators appear on the LCD panel. Taking Panoramic Pictures (without changing
for compliance could void the user’s authority to operate the
rolls of film, you can switch between the panoramic 2. Partially depress and hold the Shutter Button (1) to
equipment.
and normal formats) lock the focus. The panoramic selection allows you to take wide-angle 3. While still partially depressing the shutter button, shots, such as large groups, football and baseball move the camera until your subject is where you fields, landscapes, tall buildings, waterfalls, etc. want it within the Viewfinder Eyepiece (15).
Note to Owners of the Quartz Date and Time Model: Date and time imprinting is not available in the panoramic format. MODE
(29) ON/OFF
1. Slide the Panoramic Switch (14) from normal to the
(31) FILL-FLASH/
panoramic position. The Viewfinder (7) changes to
BATTERY FLASH-CHARGING SYMBOL INDICATOR show the selected field of view.
RED-EYE- (30) REDUCTION FLASH-OFF
© Eastman Kodak Company, 1997
INDICATOR INDICATOR
VIEWFINDER
Consumer Imaging
EASTMAN KODAK COMPANY • Rochester, NY 14650 4. Press the shutter button completely down to take
the picture.
Kodak and Cameo 1-97 Continued on reverse side
Pt. No. 8B9641 are trademarks. Printed in China.
Page Summary Contents For Kodak CAMEO Camera User's Manual
Manual Details
| Brand | Kodak |
|---|---|
| Pages | 2 |
| File Size | 302.69 KB |
| Published | May 24, 2026 |
Enter the captcha to get the download link:

Frequently Asked Questions
What kind of film can this camera use?
It uses DX (ISO) 100 – 1000 for color or black-and-white print film.
What are the dimensions and weight of the camera, and what battery does it require?
Dimensions are 4.9 x 2.7 x 1.3 in., weighing 6 oz. It requires a one 3-volt lithium KODAK K123LA battery.
How do I properly load film into the camera?
Open the door, insert the cartridge over the spindle, push the other end into the chamber, and close the film door.
What safety precautions should be taken when taking pictures with flash?
Do not cover the flash, lens, or auto-focus windows, and keep fingers away from these components to avoid dark pictures.