# A B C D E F G H I J K L M N O P Q R S T U V W X Y Z

HP Photosmart 7510 Digital Multifunction Printer Series - C311 Reference Guide

Summary

Experience comprehensive photo and document printing with this user guide for your versatile multifunction printer. Learn everything from initial setup and connecting via wireless or USB to mastering core functions like high-quality scanning, copying, and photo editing. The manual details advanced features such as ePrint for secure mobile printing and eFax services. Designed for home users who require an easy-to-navigate tool for printing photos, documents, and web content from a single device.
📄 Preview PAGE OF 16

Page 1 Text Content

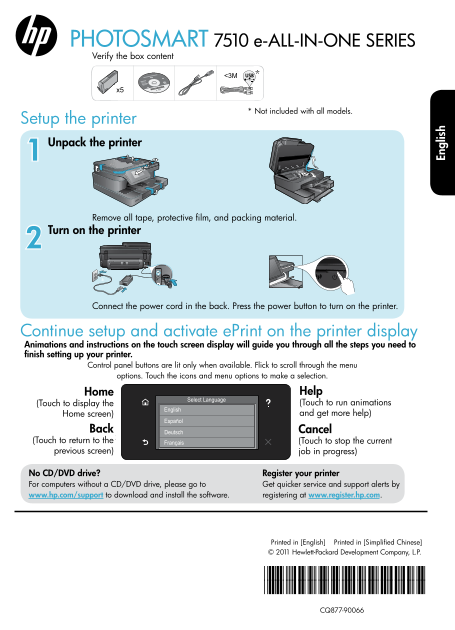
PHOTOSMART 7510 e-ALL-IN-ONE SERIES Verify the box content

* Not included with all models.

Setup the printer Unpack the printer

Remove all tape, protective film, and packing material.

Turn on the printer

Connect the power cord in the back. Press the power button to turn on the printer.

Continue setup and activate e Print on the printer display Animations and instructions on the touch screen display will guide you through all the steps you need to finish setting up your printer.

Control panel buttons are lit only when available. Flick to scroll through the menu options. Touch the icons and menu options to make a selection.

Home Home Help

Select Language

(Touch to display the (Touch to display the (Touch to run animations and (Touch to run a imations

Home screen) English get more help)

Home screen) and get more help)

Español

Deutsch Cancel Cancel

(Touch to return to the Français (Touch to stop the current En gl is

(Touch to return to the (Touch to stop the current job in

previous screen) previous scre n) progress) job in progress)

No CD/DVD drive? Register your printer For computers without a CD/DVD drive, please go to Get quicker service and support alerts by www.hp.com/support to download and install the software. registering at www.register.hp.com.

Printed in [English] Printed in [Simplified Chinese] © 2011 Hewlett-Packard Development Company, L.P.

*CQ877-90066* *CQ877-90066* CQ877-90066

Page Summary Contents For HP Photosmart 7510 Digital Multifunction Printer Series - C311 Reference Guide

Page 1 PHOTOSMART 7510 e-ALL-IN-ONE SERIES Verify the box content * Not included with all models. Setup the printer Unpack the printer Remove all tape, protective film, and packing material. Turn on the prin...
Page 2 Get to know your HP Photosmart Ink Levels: Opens the Ink level menu which displays estimated ink levels. Settings: Opens the Settings menu where you can change product settings and perform maintenance...
Page 3 Features and tips Save energy and ink •• The Energy Save mode and Auto Power off feature are turned on by default, reducing energy use. You can change these settings from the Setup > Preferences me...
Page 4 Setup troubleshooting Auto Wireless Connect (for computers connected wirelessly to a network) Auto Wireless Connect automatically configures the printer with your wireless network settings. Follow the...
Page 5 Networked printer use and troubleshooting Get help from Wireless Printing Center The HP Wireless Printing Center website (www.hp.com/go/wirelessprinting) is an online reference guide to setting up you...
Page 6 Networked printing troubleshooting Connection and security tips Check for and resolve the following possible conditions: •• Your computer might not be connected to your network. Make sure that the com...
Page 7 HP printer limited warranty statement HP product Duration of limited warranty Software Media 90 days Printer 1 year Print or Ink cartridges Until the HP ink is depleted or the “end of warranty” date p...
Page 8 Web Services What is e Print? HP’s e Print service provides a safe and easy way to print by sending email to your printer’s email address. Send email and attachments from any email-capable device to t...
Page 9 PHOTOSMART 7510 e-ALL-IN-ONE SERIES 确认包装内物品 在打印机显示屏上继续设置和激活 e Print 触摸屏上的动画和说明,可指导您完成设置打印机所需的所有步骤。 Home Help Select Language (触摸此按钮可 (Touch to display the (Touch to run animations and (触摸此按钮可运行动画 Home...
Page 10 HP Photosmart 入门 Apps:提供访问 Apps 和打印来自 Apps 的信息 (如地图、优惠券、填色卡和迷题)的快捷简便方法。 Web 服务:在主屏幕中,打开 Web 服务菜单。 e Fax:打开传真菜单,可在此菜单中发送传真消息。 注意:e Fax 可能在某些国家/地区不可用。 盖子 纸盒延长板(也称为延长板) 无线 LED 盖子衬板 主纸盒的纸张宽度导轨 存储卡插槽 LED 电...
Page 11 节省能源和墨水 •• 默认情况下开启“节能模式”和“自动关闭电源”功能,以节约能源。您可以在打印机显示屏的设置 > 首选项菜单 中更改这些设置。 •• 在打印机上启用 Web 服务或将打印机无线连接至计算机后,将会关闭自动关闭电源功能。 •• 独立墨水盒允许单独更换各个墨盒。 轻松打印照片和文档 •• 直接从存储卡以不同尺寸和纸张打印照片。只要将存储卡插入相应的存储卡插槽。在打印机显示屏中,...
Page 12 自动无线连接(用于无线连接到网络的打印机) 自动无线连接自动配置打印机的无线网络设置。按照打印机显示屏上的说明设置打印机硬件,然后插入打印机软件 CD。 该软件指导您完成软件安装。如果自动无线连接方法不适用于您的配置或操作系统,该软件将引导您完成另外一种无线安 装方法。有关无线安装的更多信息,请访问 HP 无线打印中心网站 (www.hp.com/go/wirelessprinting)。 Win...
Page 13 从无线打印中心获取帮助 HP 无线打印中心网站 (www.hp.com/go/wirelessprinting) 是在线参考指南,可用来设置家庭网络和 HP 打印机进行无线打 印。该网站有助于您执行以下操作: •• 准备无线网络。 •• 设置打印机。 •• 重新配置系统。 •• 对配置进行故障排除,包括使用 Windows 网络诊断实用程序。 •• 了解防火墙以及安全信息和设置。 将 USB 连接...
Page 14 连接和安全提示 检查下列各种可能的情况并采取相应的解决措施: •• 您的计算机可能没有连接到网络。确保将计算机与 HP Photosmart 连接到同一网络。例如,如果是无线连接,则计算 机或打印机可能错误地连接到相邻网络。 •• 您的计算机可能已连接到虚拟专用网络 (VPN)。在继续安装前临时禁用 VPN。连接到 VPN 如同位于其他网络;您需 要断开与 VPN 的连接才能访问主网络上的产品。 ...
Page 15 HP 打印机有限保修声明
Page 16 Web 服务 什么是 e Print? HP e Print 服务通过向打印机的电子邮件地址发送电子邮件,提供安全和轻松的打印。从任何具有发送电子邮件功能的 设备向打印机的电子邮件地址发送电子邮件和附件,可同时打印电子邮件消息和识别的附件。启用 Web 服务后,在初 始化产品设置过程中分配打印机的地址。 •• HP e Print 提供了行业标准垃圾邮件过滤功能,并将电子邮件和附件转换 为仅打印格...

Manual Details

Brand HP
Pages 16
File Size 7.47 MB
Published June 17, 2026
5 views

Enter the captcha to get the download link:

captcha

Frequently Asked Questions

How do I check my ink levels?

Touch the Ink Level icon on the Home screen to view estimated ink levels.

What is the initial printer setup process?

Unpack, remove all protective materials, connect power, and turn it on. The display will guide you through activation steps.

Are there restrictions on using this printer with a computer that lacks a CD/DVD drive?

Yes; install software by downloading and installing drivers from www.hp.com/support or registering at www.register.hp.com.

How can I print photos directly from memory cards?

Insert the memory card into the slot, touch View & Print on the display, and use the Edit menu for adjustments like cropping.