# A B C D E F G H I J K L M N O P Q R S T U V W X Y Z

Hewlett-Packard HP Stitch S500 Printer Hewlett-Packard HP Stitch S500 64-inch Printer - Printer Assembly Instructions

Summary

The official assembly manual for the HP Stitch S500 64in large format printer. This comprehensive guide provides detailed, multilingual, step-by-step instructions required to successfully set up and integrate all core components, including printheads, edge holders, and maintenance cartridges. Designed for users undertaking installation or service of this professional printing system, the manual specifies necessary tools and warns about ideal workspace requirements. Note that essential consumables such as substrate rolls, LAN cables, and primary ink cartridges are not included with the unit.
📄 Preview PAGE OF 24

Page 1 Text Content

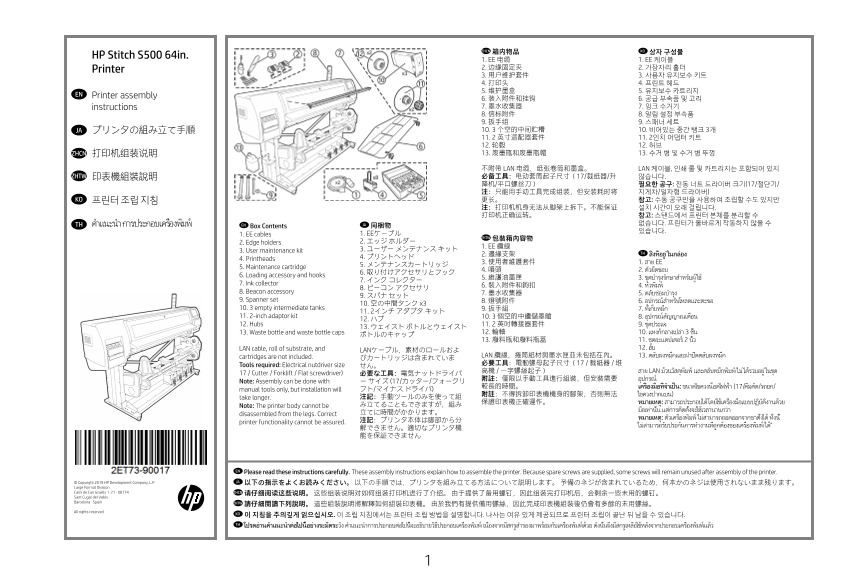
箱内物品 KO 상자 구성물

HP Stitch S500 64in.

1. EE 电缆 1. EE 케이블 2. 边缘固定夹 2. 가장자리 홀더

Printer

EN Printer assembly

6. 装入附件和挂钩 6. 공급 부속품 및 고리 instructions 7. 墨水收集器 7. 잉크 수거기 8. 信标附件 8. 알림 설정 부속품 9. 扳手组 9. 스패너 세트 JA プリンタの組み立て手順 10. 3 个空的中间贮槽 10. 비어있는 중간 탱크 3개 11. 2 英寸适配器套件 11. 2인치 어댑터 키트 12. 轮毂 12. 허브 ZHCN 打印机组装说明 13. 废墨瓶和废墨瓶帽 13. 수거 병 및 수거 병 뚜껑

不附带 LAN 电缆、纸张卷筒和墨盒。 LAN 케이블, 인쇄 롤 및 카트리지는 포함되어 있지

ZHTW 印表機組裝說明 必备工具:电动套筒起子尺寸(17/裁纸器/升 않습니다.

KO 프린터 조립 지침 更长。 참고: 수동 공구만을 사용하여 조립할 수도 있지만

TH คำ�แนะนำ� ก�รประกอบเคร่ืองพิมพ์ EN JA 없습니다. 프린터가 올바르게 작동하지 않을 수

Box Contents 同梱物

1. EE cables 1. EEケーブル

2. Edge holders 2. エッジ ホルダー

1. EE 纜線

3. User maintenance kit 3. ユーザー メンテナンス キット

2. 邊緣支架 TH สิ่งที่อยู่ ในกล่อง

4. Printheads 4. プリントヘッド

3. 使用者維護套件 1. ส�ย EE

5. Maintenance cartridge

6. Loading accessory and hooks

7. Ink collector

8. Beacon accessory 7. 墨水收集器 5. ตลับซ่อมบำ�รุง

9. Spanner set 8. 燈號附件 6. อุปกรณ์สำ�หรับโหลดและตะขอ

10. 3 empty intermediate tanks 9. 扳手組 7. ที่เก็บหมึก

11. 2-inch adaptor kit 10. 3 個空的中繼儲墨艙 8. อุปกรณ์สัญญ�ณเตือน

12. Hubs 11. 2 英吋轉接器套件 9. ชุดประแจ

13. Waste bottle and waste bottle caps 12. 輪軸 10. แทงก์กล�งเปล่� 3 ช้ิน

13. 廢料瓶和廢料瓶蓋 11. ชุดอะแดปเตอร์ 2 น้ิว LAN cable, roll of substrate, and 12. ฮับ

LANケーブル、素材のロールおよ

cartridges are not included. LAN 纜線、捲筒紙材與墨水匣並未包括在內。 13. ตลับผงหมึกและฝ�ปิดตลับผงหมึก

Tools required: Electrical nutdriver size 必要工具:電動螺母起子尺寸(17 / 裁紙器 / 堆

高機 / 一字螺絲起子) ส�ย LAN ม้วนวัสดุพิมพ์ และตลับหมึกพิมพ์ ไม่ ได้รวมอยู่ ในชุด

17 / Cutter / Forklift / Flat screwdriver) 必要な工具:電気ナットドライバ

Note: Assembly can be done with ー サイズ (17/カッター/フォークリ

manual tools only, but installation will フト/マイナス ドライバ)

take longer. 注記:手動ツールのみを使って組

Note: The printer body cannot be み立てることもできますが、組み

disassembled from the legs. Correct 立てに時間がかかります。

printer functionality cannot be assured. 注記:プリンタ本体は脚部から分

EN Please read these instructions carefully. These assembly instructions explain how to assemble the printer. Because spare screws are supplied, some screws will remain unused after assembly of the printer.

© Copyright 2019 HP Development Company, L.P. JA 以下の指示をよくお読みください。 以下の手順では、プリンタを組み立てる方法について説明します。 予備のネジが含まれているため、何本かのネジは使用されないまま残ります。

Large Format Division Camí de Can Graells 1-21 · 08174 请仔细阅读这些说明。 这些组装说明对如何组装打印机进行了介绍。 由于提供了备用螺钉,因此组装完打印机后,会剩余一些未用的螺钉。 Sant Cugat del Vallès Barcelona · Spain

All rights reserved

KO 이 지침을 주의깊게 읽으십시오. 이 조립 지침에서는 프린터 조립 방법을 설명합니다. 나사는 여유 있게 제공되므로 프린터 조립이 끝난 뒤 남을 수 있습니다.

TH โปรดอ่านคำาแนะนำาต่อไปนี้อย่างระมัดระวัง คำ�แนะนำ�ก�รประกอบต่อไปน้ีจะอธิบ�ยวิธีประกอบเครื่องพิมพ์ เนื่องจ�กมีสกรูสำ�รองม�พร้อมกับเครื่องพิมพ์ด้วย ดังน้ันจึงมีสกรูเหลือใช้หลังจ�กประกอบเครื่องพิมพ์แล้ว

Page Summary Contents For Hewlett-Packard HP Stitch S500 Printer Hewlett-Packard HP Stitch S500 64-inch Printer - Printer Assembly Instructions

Page 1 箱内物品 KO 상자 구성물 HP Stitch S500 64in. 1. EE 电缆 1. EE 케이블 2. 边缘固定夹 2. 가장자리 홀더 Printer EN Printer assembly 6. 装入附件和挂钩 6. 공급 부속품 및 고리 instructions 7. 墨水收集器 7. 잉크 수거기 8. 信标附件 8. 알림 설정 부속품 9. 扳手组 9. 스패너 세트 J...
Page 2 EN The space required for assembly is 1.5 m (5 ft) front and EN Remove the packaging rear, and 7.7 m (25,3 ft) at the side. JA パッケージの開梱 JA 組み立てにはプリンタ前面および背面に1.5m (5フィー KO 포장 제거 TH ถอดกล่องบรรจุภัณฑ์ออ...
Page 3 EN Remove printer from packaging JA プリンタの開梱 从包装中取出打印机 從產品包裝中取出印表機 KO 프린터 포장 풀기 TH นำ�เครื่องพิมพ์ออกจ�กบรรจุภัณฑ์ EN Remove 2 screws from each support using the spanner Remove 3 screws from each of th...
Page 4 EN Remove the box. Remove the desiccant bags on each side and the 2 on the Remove the loading accessory. Remove the 2 screws, protection, and metal bracket from cover, cut the tapes and remove the ink...
Page 5 EN Remove 5 screws on each side. Keep the screws for later use. Take the M10x160 bolt and spanner from next to the bag that these assembly instructions were in. At one end of the printer (not Remove t...
Page 6 EN Untighten the screw to lower the printer until it is back on the Place the ramps in postition on the pallet. Remove the plastic, unlock the wheels, roll the printer out of Insert 2 screws on each s...
Page 7 EN Tighten the 4 (T-25) screws. Open the cover. Take the beacon from the box and connect the cable. Lower the cover. Important: Keep the screws attached. JA 4本の (T-25) ネジを締めます。 カバーを開きます。 ビーコンを箱から取り出し、...
Page 8 EN Unpack more components JA その他のコンポーネントの開梱 从包装箱取出其他组件 拆開其他組件的包裝 KO 나머지 구성 요소 포장 풀기 TH แกะส่วนประกอบอื่นๆ EN Remove the side protection and all the tapes from the Important; Do not remove the indicate...
Page 9 EN Open the window. Detach the two orange tapes, and pull them from the Remove the tape. Open the maintenance cartidge door and remove the carton piece and tape together. There are two carton pieces p...
Page 10 EN Close the window. Remove the platen. Slide the edge holders onto the platen and replace it Attach the waste bottle platform to the stand. reversing the previous step. ZHCN 盖上护盖。 卸下压板。 将边缘固定夹滑至压板上,然...
Page 11 EN Setup the Printer JA プリンタのセットアップ 设置打印机 安裝印表機 KO 프린터 설치 TH ตั้งค่�เครื่องพิมพ์ EN Place the waste bottle onto the platform and insert the tube Move the printer to its final location. Connect LAN and...
Page 12 Switch on the printer at the back. Follow the front panel instructions. Shake the 3L ink EN The installer is fully responsible of installing the RIP software and train the customer about how to operat...
Page 13 EN Install the cartridges and connect them. Press OK on the front panel. The 3L accessory attempts autopurge, if it fails, the above message appears, tap OK to retry. If the problem persists, follow t...
Page 14 EN If the assisted purge is successful, the startup continues normally. If not, a System Error occurs: Remove the label. Gently shake the intermediate tanks. - You can repeat the process by restarting...
Page 15 Install the intermediate tanks and click OK on the front Place the lockouts onto the intermediate tanks’ drawers, Open the window. Open the printhead cover and check the setup purgers panel. and stick...
Page 16 EN Insert the maintenance cartridge, and push it in as far as Remove the orange packaging from the printhead. Open the window. Make sure the ink funnel is correctly Open the window and printhead cover...
Page 17 EN Load the substrate JA 素材の取り付け 装入纸张 裝入紙材 KO 인쇄물 공급 TH ใส่วัสดุพิมพ์ EN Install printheads from 5 to 8 (right side), close the When the printer prompts, install printheads 1 to 4. The printer will st...
Page 18 EN Rest the roll of substrate that you want to load on the loading table. Insert the lead-edge of the substrate into the printer where Wait until the substrate emerges from the printer as shown. Note:...
Page 19 EN On the front panel, select the family of the substrate The printer automatically performs substrate advance If the network requires a web proxy to access the Internet, ensure you have the proxy por...
Page 20 EN Follow connectivity wizard to: If during the wizard process, you get an error on proxy test, • Enable online substrate preset searches: search and install latest presets available in the web direct...
Page 21 EN To switch the Beacon on; in the front panel, go to: Important: Once printer setup has finished, be sure to study Important: Use the HP Print Os Service Center Mobile Settings>Setup>Beacon>...
Page 24 EN © Copyright 2019 HP Development Company, L.P. The information contained herein is subject to change without notice. The only warranties for HP products and services are set forth in the express war...

Manual Details

Brand HP
Pages 24
File Size 6.00 MB
Published June 18, 2026
5 views

Enter the captcha to get the download link:

captcha

Frequently Asked Questions

组装打印机需要哪些工具?

需要使用电动套筒起子尺寸 (17)、裁纸器和平口螺丝刀等手动工具。

组装过程中需要准备多大空间的场地?

前方、后方各需要 1.5 米(5 英尺)空间,两侧则需要 7.7 米(25.3 英尺)的空间。

打印头和墨水收集器哪些部分是标配且无法拆卸的?

打印机机身的脚架不能从底部拆下。

如何将设备成功注册到 PrintOS?

使用 HP PrintOs Service Center 应用程序,进入 Settings > Setup > Beacon,并选择 On 开关完成安装和注册。