ESTES 7206 - Star Stryker Guide
Summary
Assemble this detailed model rocket kit and bring your hobby skills to life! This comprehensive manual guides you through every stage, covering precision fin attachment, professional painting techniques, full recovery system installation, engine mounting, and safe pre-launch procedures. Ideal for rocketry enthusiasts and model builders looking for a complete, rewarding build experience from start to finish.
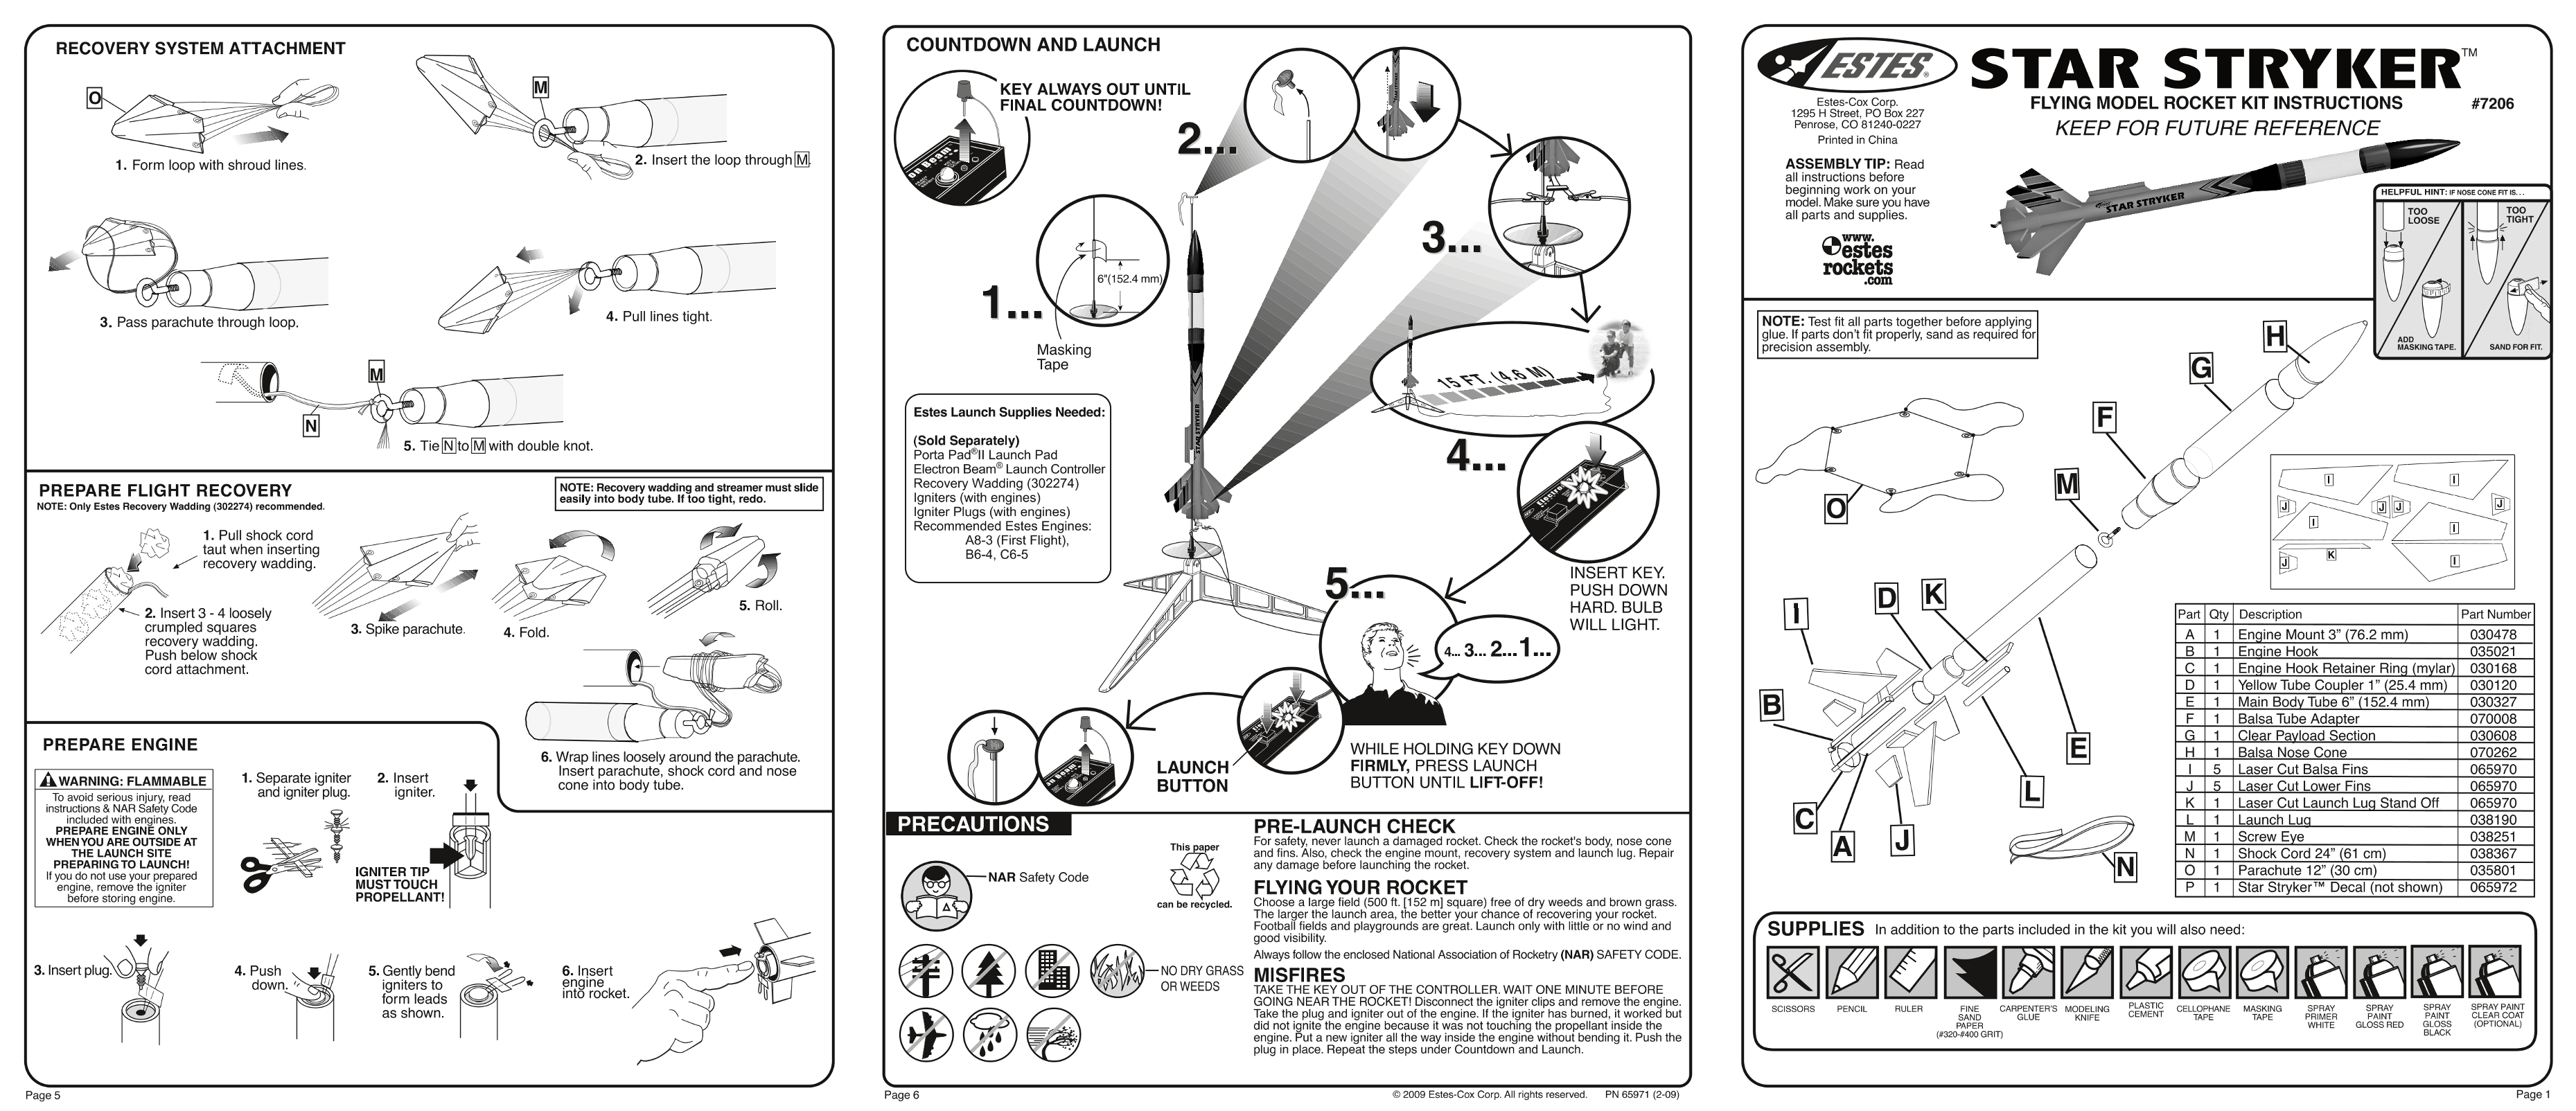
Page 1 Text Content
作 RECOVERY SYSTEM ATTACHMENT
EZAz Ax D7 STAR STRYIKER-
KEY ALWAYS OUT UNTIL FINAL COUNTDOWNI! 12g5 民 Rs-Coe Cop, 2 FLYING MODEL ROCKET KIT INSTRUCTIONS #7206
Penrose, CO 81240-0227 KEEP FOR FUTURE REFERENCE Printed in China
ASSEMBLY TIP: Read all instructions before
beginning work on your 站 HELPFUL HINT:IF Nos E CONE FTIS.… model. Make sure you have 、 ~ 2
all parts and supplies, 国 T99se 、 ] 铝 - Ww WT. 3 @estes 人 rocke | 后生 SS
4. Pulllines tight.
NOTE: Test ft all parts together before applying U glue.lf parts dont 谤 properly sand as required for Abp precision assembly. MASKING TAPE., SAND FOR FIT.
Masking Tape
NOTE: Recovery wadding and streamer must slide
PREPARE FLIGHT RECOVERY
easily into body tube. If too tight, redo.
NOTE: Only Estes Recovery (302274)
1. Pull shock cord
区 taut when inserting
属 wz recovery wadding.
INSERT KEY.
PUSH DOWN HARD. BULB
2.Insert3-4Iloosely Par | Qty | Description Part Number
WILL LIGHT.
crumpled squares
A 1 |Engine Mount3 (76.2 mm) 030478
recovery wadding.
B_ 1 IEngine Hook 035021
Push below shock
cord attachment. C_ 1T IEngine Hook Retainer Ring (mylar| 030168
D_ | 1_|Yellow Tube Coupler 1" (25.4 mm)j | 030120 E_ | 1 |Main Body Tube 6 (152.4 mm) 030327 F_ | 1T |Balsa Tube Adapter 070008 GT Clear Pavyload Section 030608
PREPARE ENGINE
WHILE HOLDING KEY DOWN
H_ | 1 Balsa Nose Cone 070262
6. Wrap lines loosely around the parachute.
LAUNCH FIRMLY, PRESS LAUNCH | 15 Laser Cut Balsa Fins 065970
Insert parachute, shock cord and nose
入 WARNING: FLAMMABLE 1. Separate igniter
2. Insert 时 cone into body tube. BUTTON UNTIL LIFTOFFI!
BUTTON J | 5 |Laser Cut Lower Fins 065970
and igniter plug. igniter
To avoid serious injury read
K | 1 Laser Cut Launch Lug Stand Of 065970
instructions & NAR Safety Code
included with engines, L_ | 1 Launch Lug 038190
PRE-LAUNCH CHECK
PREPARE ENGINE ONLY
M | 1_ |Screw Eye 038251
WHENYOU ARE OUTSIDE AT For safety neverlaunch a damaged rocket. Check the rocket's body nose cone
THE LAUNCH SITE and fins. Also, check the engine mount, recovery system and launch lug. Repair N_ | 1 |Shock Cord 24" (61 cm) 038367
PREPARING TO LAUNCHI
any damage before launching the rocket.
IGNITER TIP OO | 1 |Parachute 12"” (30 cm) 035801
ff you do not use your prepared
MUSTTOUCH
engine, remove the igniter FLYING YOUR ROCKET P | 1 | Star Strykerw Decal (not shownm) | 065972
PROPELLANTI!
before storing engine.
Choose alarge field (500 ft [152 m] square) free of dry weeds and brown grass. The larger the launch area, the better your chance of recovering your rocket. Footbail fields and playgrounds are great. Launch only with little or no wind and SUPPLIES in addition to the parts included in the kit you will also need: 人 good visibility
5. Gently bend 3
3.Insert plug. 6. Insert
MISFIRES
igniters to PE engine 7 OR WEEDS
TAKETHE KEY OUT OFTHE CONTROLLER. WAIT ONE MINUTE BEFORE
Into rocket. 个form leads 人
as Shown. 、、 CE
did not ignite the engine because it was not touching the propellant inside the PAPER. WHITE GLOSS RED GLOSS (OPTIONAU)
人 320-4400 GRIT) BLACK 多
plug in place. Repeat the steps under Countdown and Launch.
四 2009 Estes-Cox Corp. All rights reserved.
Page Summary Contents For ESTES 7206 - Star Stryker Guide
Manual Details
| Brand | Estes |
|---|---|
| Pages | 2 |
| File Size | 2.72 MB |
| Published | June 03, 2026 |
Enter the captcha to get the download link:
