Philips Beardtrimmer series 3000 Beardtrimmer BT3206 14 User Manual
Summary
Effortlessly groom and maintain your facial hair with this rechargeable Philips trimmer. This comprehensive guide provides detailed instructions on using the appliance for beards, mustaches, and achieving a perfect stubble look. The manual covers best practices, including optimal techniques for trimming, how to utilize various guard settings, deep cleaning maintenance, and essential safety tips for maximizing product longevity. Ideal for grooming at home, this guide helps all users achieve professional-quality results safely and easily.
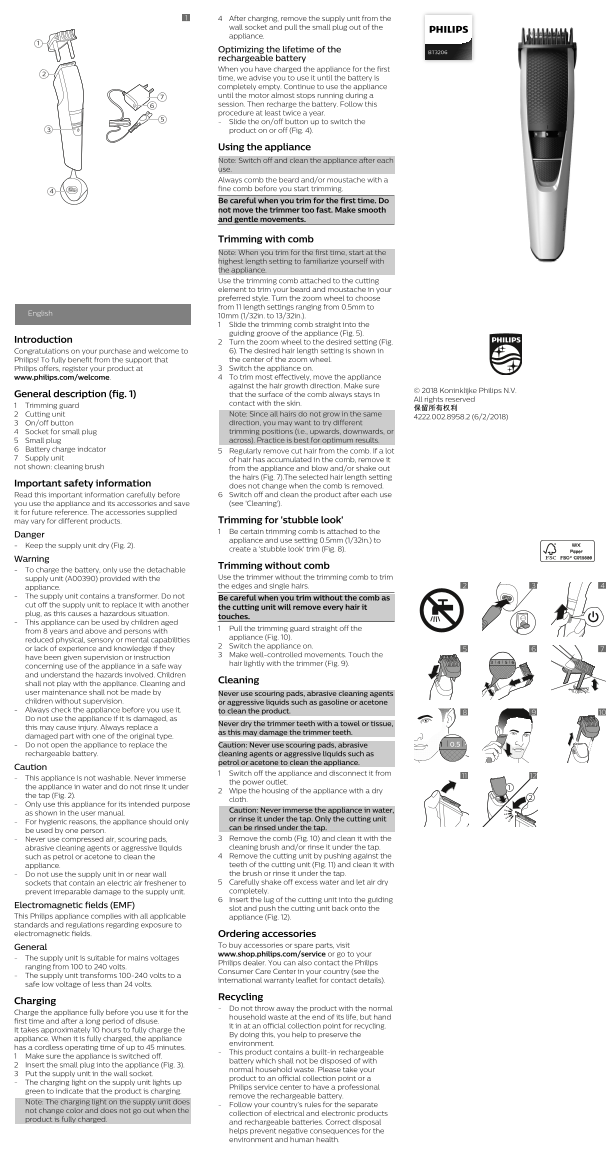
Page 1 Text Content
After charging, remove the supply unit from the wall socket and pull the small plug out of the appliance.
Optimizing the lifetime of the BT3206 rechargeable battery When you have charged the appliance for the first time, we advise you to use it until the battery is completely empty. Continue to use the appliance until the motor almost stops running during a session. Then recharge the battery. Follow this procedure at least twice a year. Slide the on/off button up to switch the product on or off (Fig. 4).
Using the appliance Note: Switch off and clean the appliance after each use. Always comb the beard and/or moustache with a fine comb before you start trimming. Be careful when you trim for the first time. Do not move the trimmer too fast. Make smooth and gentle movements.
Trimming with comb Note: When you trim for the first time, start at the highest length setting to familiarize yourself with the appliance. Use the trimming comb attached to the cutting element to trim your beard and moustache in your preferred style. Turn the zoom wheel to choose from 11 length settings ranging from 0.5mm to
English
10mm (1/32in. to 13/32in.). Slide the trimming comb straight into the guiding groove of the appliance (Fig. 5).
Introduction Turn the zoom wheel to the desired setting (Fig.
Congratulations on your purchase and welcome to 6). The desired hair length setting is shown in Philips! To fully benefit from the support that the center of the zoom wheel. Philips offers, register your product at Switch the appliance on. www.philips.com/welcome. To trim most effectively, move the appliance against the hair growth direction. Make sure
© 2018 Koninklijke Philips N.V.
General description (fig. 1) that the surface of the comb always stays in
All rights reserved
contact with the skin.
Trimming guard
Cutting unit Note: Since all hairs do not grow in the same
On/off button direction, you may want to try different Socket for small plug trimming positions (i.e., upwards, downwards, or Small plug across). Practice is best for optimum results.
Battery charge indcator Regularly remove cut hair from the comb. If a lot Supply unit of hair has accumulated in the comb, remove it not shown: cleaning brush from the appliance and blow and/or shake out
the hairs (Fig. 7).The selected hair length setting
Important safety information does not change when the comb is removed.
Read this important information carefully before Switch off and clean the product after each use you use the appliance and its accessories and save (see 'Cleaning').
it for future reference. The accessories supplied
may vary for different products. Trimming for 'stubble look' Be certain trimming comb is attached to the
Danger
appliance and use setting 0.5mm (1/32in.) to
Keep the supply unit dry (Fig. 2).
create a 'stubble look' trim (Fig. 8).
Warning
Trimming without comb
To charge the battery, only use the detachable
supply unit (A00390) provided with the Use the trimmer without the trimming comb to trim appliance. the edges and single hairs.
The supply unit contains a transformer. Do not Be careful when you trim without the comb as cut off the supply unit to replace it with another
the cutting unit will remove every hair it
plug, as this causes a hazardous situation.
touches.
This appliance can be used by children aged
Pull the trimming guard straight off the
from 8 years and above and persons with
appliance (Fig. 10).
reduced physical, sensory or mental capabilities
Switch the appliance on.
or lack of experience and knowledge if they
Make well-controlled movements. Touch the
have been given supervision or instruction
hair lightly with the trimmer (Fig. 9).
concerning use of the appliance in a safe way and understand the hazards involved. Children
Cleaning
shall not play with the appliance. Cleaning and user maintenance shall not be made by Never use scouring pads, abrasive cleaning agents children without supervision. or aggressive liquids such as gasoline or acetone Always check the appliance before you use it. to clean the product. Do not use the appliance if it is damaged, as
Never dry the trimmer teeth with a towel or tissue,
this may cause injury. Always replace a
as this may damage the trimmer teeth.
damaged part with one of the original type.
Do not open the appliance to replace the Caution: Never use scouring pads, abrasive 0.5
rechargeable battery. cleaning agents or aggressive liquids such as
petrol or acetone to clean the appliance.
Caution
Switch off the appliance and disconnect it from
This appliance is not washable. Never immerse
the power outlet.
the appliance in water and do not rinse it under
Wipe the housing of the appliance with a dry
the tap (Fig. 2).
cloth.
Only use this appliance for its intended purpose
Caution: Never immerse the appliance in water,
as shown in the user manual.
or rinse it under the tap. Only the cutting unit
For hygienic reasons, the appliance should only
can be rinsed under the tap.
be used by one person.
Never use compressed air, scouring pads, Remove the comb (Fig. 10) and clean it with the abrasive cleaning agents or aggressive liquids cleaning brush and/or rinse it under the tap. such as petrol or acetone to clean the Remove the cutting unit by pushing against the appliance. teeth of the cutting unit (Fig. 11) and clean it with Do not use the supply unit in or near wall the brush or rinse it under the tap. sockets that contain an electric air freshener to Carefully shake off excess water and let air dry prevent irreparable damage to the supply unit. completely. Insert the lug of the cutting unit into the guiding
Electromagnetic fields (EMF)
slot and push the cutting unit back onto the
This Philips appliance complies with all applicable appliance (Fig. 12). standards and regulations regarding exposure to electromagnetic fields. Ordering accessories
To buy accessories or spare parts, visit
General
www.shop.philips.com/service or go to your
The supply unit is suitable for mains voltages
Philips dealer. You can also contact the Philips
ranging from 100 to 240 volts.
Consumer Care Center in your country (see the
The supply unit transforms 100-240 volts to a
international warranty leaflet for contact details).
safe low voltage of less than 24 volts.
Recycling
Charging
Do not throw away the product with the normal
Charge the appliance fully before you use it for the
household waste at the end of its life, but hand
first time and after a long period of disuse.
it in at an official collection point for recycling.
It takes approximately 10 hours to fully charge the
By doing this, you help to preserve the
appliance. When it is fully charged, the appliance
environment.
has a cordless operating time of up to 45 minutes.
This product contains a built-in rechargeable
Make sure the appliance is switched off.
battery which shall not be disposed of with
Insert the small plug into the appliance (Fig. 3).
normal household waste. Please take your
Put the supply unit in the wall socket.
product to an official collection point or a
The charging light on the supply unit lights up
Philips service center to have a professional
green to indicate that the product is charging.
remove the rechargeable battery.
Note: The charging light on the supply unit does
Follow your country’s rules for the separate
not change color and does not go out when the
collection of electrical and electronic products
product is fully charged.
and rechargeable batteries. Correct disposal helps prevent negative consequences for the environment and human health.
Page Summary Contents For Philips Beardtrimmer series 3000 Beardtrimmer BT3206 14 User Manual
Manual Details
| Brand | Philips |
|---|---|
| Pages | 2 |
| File Size | 741.19 KB |
| Published | June 01, 2026 |
Enter the captcha to get the download link:

Frequently Asked Questions
How do I optimize the battery life of the BT3206?
The first two times, use the appliance until the battery is completely empty. After that, follow this process at least twice a year: run it until the motor almost stops, then recharge.
Is the trimmer washable?
No, this appliance is not washable. Do not immerse or rinse it under running water.
What should I do if the trimmer teeth are damaged?
Always replace a damaged part with one of the original type to prevent injury.
How many length settings are available for trimming?
There are 11 length settings, ranging from 0.5mm to 13/32in (approximately 10mm).
What is the ideal technique when trimming without a comb?
Move the appliance against the hair growth direction and ensure the surface of the comb stays in continuous contact with the skin.