Page 1
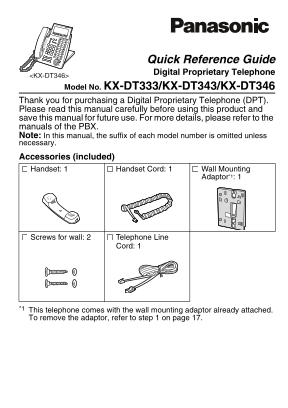
Quick Reference Guide Digital Proprietary Telephone <KX-DT346> Model No. KX-DT333/KX-DT343/KX-DT346 Thank you for purchasing a Digital Proprietary Telephone (DPT). Please read this manual carefu...
Page 2
This unit supports the following optional devices and features: KX-DT333 KX-DT343 KX-DT346 Features Display 3-Line 3-Line 6-Line Flexible Buttons LCD Backlight Options KX-NT303 Add-on 12 Key Module KX...
Page 3
Location of Controls Location of Controls <KX-DT346> LCD (Liquid Crystal INTERCOM: Used to make Display) or receive intercom calls. PAUSE: Used to insert a AUTO ANS (Auto Answer)/ pause when sto...
Page 4
Location of Controls TRANSFER: Used to Navigator Key: Used to transfer a call to another adjust the volume and the party. display contrast or select desired items. REDIAL: Used to redial the last dial...
Page 5
Settings Settings Speaker volume While in a hands-free conversation Handset/Headset While using the handset or volume*1 headset Press Up to increase Ringer volume While on-hook or receiving a call or ...
Page 6
Features List Features List Icon Meanings = Flexible button = Off-hook = On-hook (CO) = Feature number = Talk = Confirmation Tone C. Tone Making Calls Calling To an extension To an outside party exten...
Page 7
Features List System Speed Dialling To dial AUTO DIAL system speed dialling no. (3 digits) STORE Doorphone Call doorphone no. (2 digits) C. Tone During a Conversation Call Hold To hold To retrieve a c...
Page 8
Features List Setting the Telephone According to Your Needs Do Not Disturb Both Calls Outside Calls Cancel C. Tone Intercom Calls Timed Reminder To set 12 H hour/minute AM (4 digits) PM24 H hour/minut...
Page 9
Features List Making Use of the Voice Mail Service Listening to a message From your own extension KX-TVM series VPS extension no. Listen to Message Deliver Message Mailbox Password* Mailbox Management...
Page 10
Features List During playback Repeat Voice Guidance Consult your dealer for more details regarding feature numbers. It is possible to assign flexible buttons as feature buttons. Control panel/button n...
Page 11
Acessing Features Using the Display Acessing Features Using the Display Table 1 (Standard mode) Times Buttons (space) Table 2 (Option mode) Times Buttons ;’(space)
Page 12
Operation Board Angle Adjustment Operation Board Angle Adjustment The angle of the operation board can be set to one of eight angles (level 1 = 0°, level 8 = 45°). CAUTION: Hold the operation board un...
Page 13
Connection Connection Connect to a digital proprietary <Back view> telephone — Digital XDP connection The telephone line cord (included) Connect to a PBX. Connect to a single line telephone — XD...
Page 14
Installing KX-DT301/KX-NT303 Installing KX-DT301/KX-NT303 CAUTION: To prevent damage to the telephone, be sure to unplug the extension line before you set up or remove the KX-DT301 (USB Module) or the...
Page 15
Installing KX-DT301/KX-NT303 KX-DT301 The USB Module can be connected between the DPT and the personal computer through USB interface to implement personal CTI (Computer Telephony Integration). 1. Ope...
Page 16
Installing KX-DT301/KX-NT303 5. Insert the protrusions on the 6. Attach the KX-DT301 to your KX-DT301 into the 2 holes in unit with the screws (included the unit. with KX-DT301). 7. Install the USB dr...
Page 17
Wall Mounting Wall Mounting 1. Remove the wall mounting adaptor from the unit as shown. 2. Set the operation board to level 1, then connect and secure the telephone line cords. The cords can also be r...
Page 18
Important Information Important Information When using KX-DT300 series DPTs, keep the following conditions in mind. If you are having problems making calls, unplug the extension line and connect a kno...
Page 19
Important Information Take special care to follow the safety suggestions listed below. Installation Environment 1) Do not use this unit near water, for example, near a bathtub, washbowl or sink. Damp ...
Page 20
Important Information Information for Users on Collection and Disposal of Old Equipment and used Batteries These symbols on the products, packaging, and/or accompanying documents mean that used electr...
Page 21
Important Information This product is intended to be connected to a Panasonic PBX only. Panasonic Communications Company (U.K.) Ltd. declares that this equipment is in compliance with the essential re...
Page 22
Note Note
Page 23
One screw here for base unit 83 m WALL MOUNTING TEMPLATE 1. Drive the screws into the wall as indicated. 2. Hook the unit onto the screw heads. Note: Make sure to set the print size to correspond with...
Page 24
Panasonic Business Systems U.K. Panasonic House, Willoughby Road, Bracknell, Berkshire RG12 8FP Copyright: This material is copyrighted by Panasonic Communications Co., Ltd., and may be reproduced for...